So, I thought it was time for an apology. This summer has been busy and beautiful and full of new adventures for my cute little family but none of those adventures have included blogging.
We spent the beginning of our summer in Alaska and we loved every minute of it! Alaska has so much to do outside, which really is awesome when you have two very busy boys. I actually moved back to the Starter Home a few weeks ago but I have been without internet (and my hubby boooo).
We are on the road again and staying in hotels along the way.
I am currently typing this on the lobby computer in a hotel in Yakima, Washington.
Anyone ever been here?
This is wine country in Washington and it is beautiful to drive through all the vineyards. We should be heading home soon and I will pick up blogging again. I still have to reveal the final product of my kitchen and I am finishing projects for Ms V's nursery.
I hope all your summers are treating you well and we should probably catch up this fall :)
Thanks guys!


Showing posts with label Moving. Show all posts
Showing posts with label Moving. Show all posts
Saturday, August 20, 2011
Friday, June 3, 2011
Some Things About Alaska and a Delicious Burnt Cream Recipe

I am falling in love with Alaska. It is beautiful and the weather is gorgeous and there is so much to do outside with the kids!
There are a few things I wanted to share. First they bottle the milk here in square jugs like this one.
I know that they sell these in other states but they don't back home. They stack better and can ship them more cheaply (which is important here).
Also, it is becoming more and more difficult to convince my kids it is bedtime when it looks like this...
at 9:30 at night...
I have even hung black out curtains but it is still a little hard for them to understand.
Now on to the recipe.
My hubby is not a dessert person. Though, I am slowly converting him with a bite here and a taste there.
BUT
he LOVES creme brulee or as we lovingly call it around here Burnt Cream (it sounds more manly ;) I was always afraid of making it. It seemed like it was such an advanced and difficult thing but once I tried it I realized it really isn't that hard.
You can do it. I promise!
So here is my
Burnt Vanilla Cream (Vanilla Creme Brulee) Recipe
4 C Heavy Cream
2 Tbs Vanilla
1/2 C Sugar (plus a little extra for tops)
6 egg yolks
Preheat the oven to 325 degrees
In a large saucepan over medium heat bring the heavy cream just to a boil. Cover and set aside to sit for 15-20 minutes.
While your cream sits whisk the egg yolks and sugar together until well blended and the color begins to lighten. Slowly add the cream to the egg mixture while whisking. Whisk in the vanilla.
Divide between 6 small ramekins or 4 large ramekins. Place them in a roasting pan and fill the pan with hot water until it reaches about half way up the sides of the ramekins.Bake 40-45 minutes. You want them to be set but it still needs to jiggle a little in the middle. Remove from the roasting pan and place the ramekins in the fridge for at least 3 hours but up to 3 days (this is a great make ahead dessert!)
Remove them from the fridge at least 1/2 an hour before you want to eat them. Sprinkle them with a small amount of sugar and use a small propane torch to create a crusty top. Move the torch continually. It will take a little time to burn/melt it all. Let your dessert sit a few minutes and then dig in!
I topped this one with fresh mango but you can use any fresh fruit if you want.

There are a few things I wanted to share. First they bottle the milk here in square jugs like this one.
 |
| source |
I know that they sell these in other states but they don't back home. They stack better and can ship them more cheaply (which is important here).
Also, it is becoming more and more difficult to convince my kids it is bedtime when it looks like this...
 |
| source |
I have even hung black out curtains but it is still a little hard for them to understand.
Now on to the recipe.
My hubby is not a dessert person. Though, I am slowly converting him with a bite here and a taste there.
BUT
he LOVES creme brulee or as we lovingly call it around here Burnt Cream (it sounds more manly ;) I was always afraid of making it. It seemed like it was such an advanced and difficult thing but once I tried it I realized it really isn't that hard.
You can do it. I promise!
So here is my
Burnt Vanilla Cream (Vanilla Creme Brulee) Recipe
4 C Heavy Cream
2 Tbs Vanilla
1/2 C Sugar (plus a little extra for tops)
6 egg yolks
Preheat the oven to 325 degrees
In a large saucepan over medium heat bring the heavy cream just to a boil. Cover and set aside to sit for 15-20 minutes.
While your cream sits whisk the egg yolks and sugar together until well blended and the color begins to lighten. Slowly add the cream to the egg mixture while whisking. Whisk in the vanilla.
Divide between 6 small ramekins or 4 large ramekins. Place them in a roasting pan and fill the pan with hot water until it reaches about half way up the sides of the ramekins.Bake 40-45 minutes. You want them to be set but it still needs to jiggle a little in the middle. Remove from the roasting pan and place the ramekins in the fridge for at least 3 hours but up to 3 days (this is a great make ahead dessert!)
Remove them from the fridge at least 1/2 an hour before you want to eat them. Sprinkle them with a small amount of sugar and use a small propane torch to create a crusty top. Move the torch continually. It will take a little time to burn/melt it all. Let your dessert sit a few minutes and then dig in!
I topped this one with fresh mango but you can use any fresh fruit if you want.

Tuesday, April 5, 2011
The BIG Move: How to tackle a big project.
Have you ever had something huge you had to tackle and you know what the end goal is but all the steps to get there are all mushed in your brain?
Well that was me today. I knew I needed to get my home packed for the big move but I just could not decide what I needed to do first. So there I stood, in my kitchen, just staring at my cupboards and trying to remember if you were supposed to breath through your nose or your mouth to calm yourself down.
Or is it place your head between your knees? I forget.
It took me about all day to finally get myself in gear and get packed. I finally remembered that the easiest way to tackle a big project is to break it down into smaller ones. Instead of thinking about all the packing I had to do I started going from room to room. Pack the kitchen, the boys room, baby girls room, our room, toy room, bathrooms, laundry etc. I am almost done but the last thing on my list to pack is my dear old laptop.
Do you know what that means? It means I will be off line, cut off, removed from the world wide web for the next week-and-a-half! The hubby drives out today (with laptop in hand) and I will be hopping on a plane with the kiddos on the 13th.
I will have my handy dandy iPhone so I will be updating facebook and twitter during the week so you can follow me there.
I think I have everything ready to go and I just keep telling myself if I forget something I can always buy it in Alaska.
I mean it's not like Anchorage is in the wilderness. They have stores and stuff...right? Right?
I can't wait to keep you guys posted on the goings on and changes at The Starter Home and especially this new adventure into America's last frontier.
See you in a couple of weeks!
Monday, April 4, 2011
Aquarium or Ocean Cake Tutorial
One of those crazy things in life hit me square between the eyes a few days ago, my oldest is turning FIVE this summer! There is just no way he could already be that old.
I really would like to put it off and not face the fact that my babies are growing up but the thing is, his birthday is in the summer and we will be in the last frontier, away from family and friends, so I decided to have an early birthday party.
The poor boy is really confused as to when his birthday really is but I don't think any kid would complain about having two parties.
A few weeks ago my oldest Mr. P watched an episode of cake boss with me on Netflix. I am not a professional cake decorator in any way but I really enjoy making my kids birthday cakes. One because I get to try out new things and two I hate store bought cake frosting. I am using the word HATE here.
Out of 7 birthdays so far I have made all but one because we decided to tile our kitchen the morning of the birthday party so he got an ice cream cake instead. It's okay I made it up to him with an awesome smoking volcano cake the next year.
Any who... the episode we watched was the one where Buddy makes an aquarium cake.
Umm... wow.
A few weeks later I ask Mr. P what cake he wanted for his birthday and you better believe he said "An aquarium or ocean cake with fish and crabs and shells and coral."
He also requested a tank with live fish but I had to draw a line.
Well I decided I could create something fun for him even if it wasn't exactly up to par with Buddy's cake.
First I baked one of my favorite yellow cake recipes that my sister-in-law Lauren shared with me. It was originally from Smitten Kitchen
Chiffon Cake
I also whipped up some of my favorite frosting. It is seriously called That's The Best Frosting I've Ever Had and I got it from the Pioneer Woman.
That's The Best Frosting I've Ever Had
5 Tablespoons Flour
1 cup Milk
1 teaspoon Vanilla
1 cup Butter
1 cup Granulated Sugar (not Powdered Sugar!)
1. In a small saucepan, whisk flour into milk and heat, stirring constantly, until it thickens. You want it to be very thick, thicker than cake mix, more like a brownie mix is.
2. Remove from heat and let it cool to room temperature. (If I’m in a hurry, I place the saucepan over ice in the sink for about 10 minutes or so until the mixture cools.) It must be completely cool before you use it in the next step. Stir in vanilla.
3. While the mixture is cooling, cream the butter and sugar together until light and fluffy. You don’t want any sugar graininess left.
4. Add the completely cooled milk/flour/vanilla mixture and beat the living daylights out of it. If it looks separated, you haven’t beaten it enough! Beat it until it all combines and resembles whipped cream.
I let my cakes cool completely. I cut the 8 inch one in half so I could fill it. I used chocolate ganache and fresh strawberries to fill it. To make chocolate ganache, mix 1 cup heavy cream and 9 ounces of bittersweet or semi-sweet chocolate in a sauce pan over medium heat until the chocolate melts completely. You can then pour it over as a topping on a cake or you can let it cool and use your mixer to whip it for a delish melt-in-your-mouth filling.
I filled and frosted the 8 inch and then filled the 2 6inch rounds and frosted them. I then stacked them on the 8 inch. I used a few dowel supports because the cake is so light and soft.
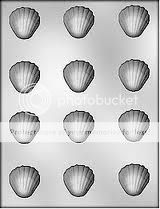
Next I made my sea creatures. I purchased a few different chocolate molds.
I found mine at a local candy and cake making store. They were about 2 bucks a pop and they had several different sea creatures to choose from.
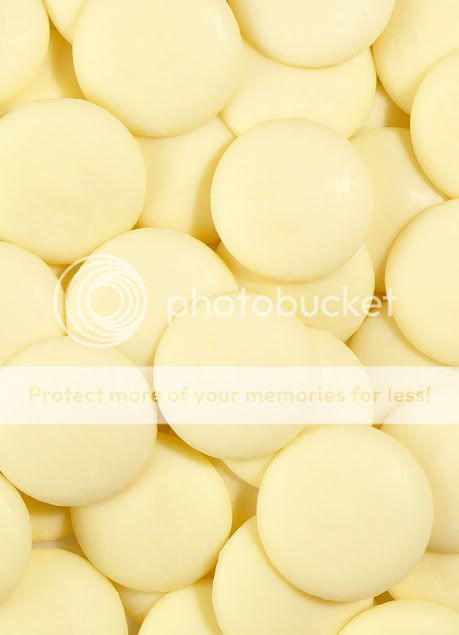
I also bought some candy melts. I purchased Guittard white vanilla melting chocolate but you could also buy the candy melts you see at the grocery store. If you do buy chocolate you need to make sure it is melting or molding chocolate. Normal chocolate needs to be tempered after it is melted and takes more work.
I melted my melting chocolate in a glass measuring cup in the microwave. Whatever you purchase will have instructions on the best way to melt it. After it was melted, I poured it into each of my molds. You can color melting chocolate but you have to buy special food coloring because normal food coloring will not work with melting chocolate. The special food coloring was expensive for someone like me who would only use it once so I opted not to use it.
Instead, after my molds had cooled and hardened. I used a product called luster dust. This is an edible, orderless, tasteless and sparkly colored dust that you can use on cakes and candies. I just used a normal cheap watercolor brush and brushed on different colors onto my sea creatures. I also used food markers to color their eyes.

To make the coral I crushed up some ice and placed 1/3 in a bowl. I then melted my melting chocolate and poured it over the ice. I then layered a few more pieces of ice and poured more melting chocolate and then I covered it with the remaining ice. I waited for the melting chocolate to set and then placed in on a backing sheet lined with paper towels and let the ice melt out of all the holes and crevices.
Then you just have to put your cake together.
I colored the frosting blue and used brown sugar to create the sand. Here is the front.

Here is the side. I used fruit by the foot to create the seaweed. I just arranged on a cookie sheet in a wavey pattern and let it dry.

Here is the back. Mr. U (my two year old) helped me arrange the creatures on the back.
That is how easy it is.

My favorite part of the cake was the coral. I loved how it turned out.

All of the kids got a piece of cake and of course and edible sea creature.
Now I know my cake is not as stunning as the cake boss but I was proud and my Mr. P was so excited when he saw it. He just loved it.
So how about you guys? Do you make your kids cakes or do you order them? Have you ever taken on a crazy cake like this?
I really would like to put it off and not face the fact that my babies are growing up but the thing is, his birthday is in the summer and we will be in the last frontier, away from family and friends, so I decided to have an early birthday party.
The poor boy is really confused as to when his birthday really is but I don't think any kid would complain about having two parties.
A few weeks ago my oldest Mr. P watched an episode of cake boss with me on Netflix. I am not a professional cake decorator in any way but I really enjoy making my kids birthday cakes. One because I get to try out new things and two I hate store bought cake frosting. I am using the word HATE here.
Out of 7 birthdays so far I have made all but one because we decided to tile our kitchen the morning of the birthday party so he got an ice cream cake instead. It's okay I made it up to him with an awesome smoking volcano cake the next year.
Any who... the episode we watched was the one where Buddy makes an aquarium cake.
 |
| http://blogs.discovery.com |
A few weeks later I ask Mr. P what cake he wanted for his birthday and you better believe he said "An aquarium or ocean cake with fish and crabs and shells and coral."
He also requested a tank with live fish but I had to draw a line.
Well I decided I could create something fun for him even if it wasn't exactly up to par with Buddy's cake.
First I baked one of my favorite yellow cake recipes that my sister-in-law Lauren shared with me. It was originally from Smitten Kitchen
Chiffon Cake
2 cups sifted flour
1 1/2 cups sugar, divided
1 tablespoon baking powder
1 teaspoon salt
3/4 cup cold water
1/2 cup vegetable oil
1 teaspoon lemon zest
1 teaspoon vanilla extract
5 large egg yolks at room temperature
8 large egg whites at room temperature
1/2 teaspoon cream of tartar
1. Make cake layers: Preheat the oven to 325°F. Have two 9-inch round cake pans ready, bottom lined with wax or parchment paper that has been lightly sprayed with cooking spray, but otherwise ungreased.
2. Sift the flour, 1 1/4 cups sugar, baking powder and salt together twice into a large bowl.
3. In another bowl, beat the yolks, water, oil, zest and vanilla on high speed until smooth. Stir into the flour mixture until smooth. In another large bowl, or the bowl of your stand mixer, beat the egg whites with the cream of tartar until soft peaks are formed. Add the remaining 1/4 cup sugar, and beat on high speed until the peaks are stiff but not dry.
4. Use a rubber spatula to fold one-quarter of the egg whites into the egg yolk mixture, then fold in the remaining whites. Do so gently, only until the egg whites are no longer visible. Overdoing it will deflate the egg whites, and yield a denser, shorter cake.
5. Scrape the batter into the two prepared pans and spread evenly. Bake them until the top springs back when lightly pressed and a toothpick inserted into the center comes out clean about 30 minutes.
6. Let cakes cool on a cooling rack for at least an hour. When completely cool, run a knife around the sides to release, then flip out onto a plate (or your hand, if you’re daring) and then another plate.
I baked my cake in one 8 inch round and two 6 inch rounds for 30 minutes.
I also whipped up some of my favorite frosting. It is seriously called That's The Best Frosting I've Ever Had and I got it from the Pioneer Woman.
That's The Best Frosting I've Ever Had
5 Tablespoons Flour
1 cup Milk
1 teaspoon Vanilla
1 cup Butter
1 cup Granulated Sugar (not Powdered Sugar!)
1. In a small saucepan, whisk flour into milk and heat, stirring constantly, until it thickens. You want it to be very thick, thicker than cake mix, more like a brownie mix is.
2. Remove from heat and let it cool to room temperature. (If I’m in a hurry, I place the saucepan over ice in the sink for about 10 minutes or so until the mixture cools.) It must be completely cool before you use it in the next step. Stir in vanilla.
3. While the mixture is cooling, cream the butter and sugar together until light and fluffy. You don’t want any sugar graininess left.
4. Add the completely cooled milk/flour/vanilla mixture and beat the living daylights out of it. If it looks separated, you haven’t beaten it enough! Beat it until it all combines and resembles whipped cream.
I let my cakes cool completely. I cut the 8 inch one in half so I could fill it. I used chocolate ganache and fresh strawberries to fill it. To make chocolate ganache, mix 1 cup heavy cream and 9 ounces of bittersweet or semi-sweet chocolate in a sauce pan over medium heat until the chocolate melts completely. You can then pour it over as a topping on a cake or you can let it cool and use your mixer to whip it for a delish melt-in-your-mouth filling.
I filled and frosted the 8 inch and then filled the 2 6inch rounds and frosted them. I then stacked them on the 8 inch. I used a few dowel supports because the cake is so light and soft.
Next I made my sea creatures. I purchased a few different chocolate molds.
 |
| www.amazon.com |
I also bought some candy melts. I purchased Guittard white vanilla melting chocolate but you could also buy the candy melts you see at the grocery store. If you do buy chocolate you need to make sure it is melting or molding chocolate. Normal chocolate needs to be tempered after it is melted and takes more work.
 |
| www.save-on-crafts.com |
Instead, after my molds had cooled and hardened. I used a product called luster dust. This is an edible, orderless, tasteless and sparkly colored dust that you can use on cakes and candies. I just used a normal cheap watercolor brush and brushed on different colors onto my sea creatures. I also used food markers to color their eyes.

To make the coral I crushed up some ice and placed 1/3 in a bowl. I then melted my melting chocolate and poured it over the ice. I then layered a few more pieces of ice and poured more melting chocolate and then I covered it with the remaining ice. I waited for the melting chocolate to set and then placed in on a backing sheet lined with paper towels and let the ice melt out of all the holes and crevices.
Then you just have to put your cake together.
I colored the frosting blue and used brown sugar to create the sand. Here is the front.

Here is the side. I used fruit by the foot to create the seaweed. I just arranged on a cookie sheet in a wavey pattern and let it dry.

Here is the back. Mr. U (my two year old) helped me arrange the creatures on the back.
That is how easy it is.

My favorite part of the cake was the coral. I loved how it turned out.
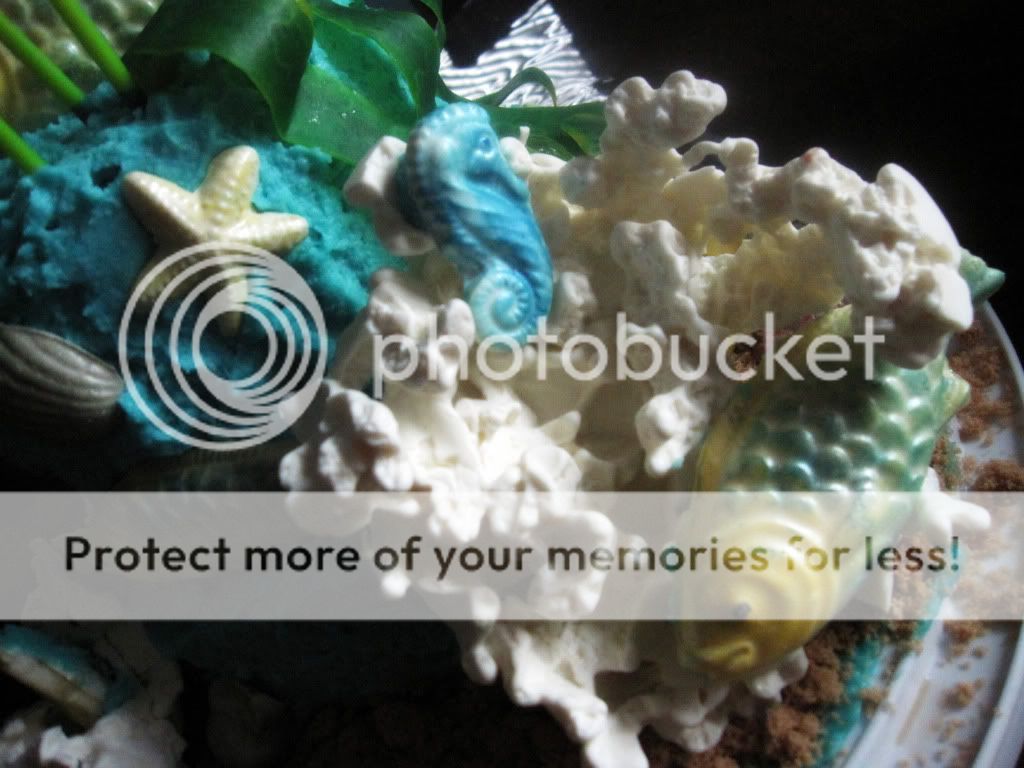
All of the kids got a piece of cake and of course and edible sea creature.
Now I know my cake is not as stunning as the cake boss but I was proud and my Mr. P was so excited when he saw it. He just loved it.
So how about you guys? Do you make your kids cakes or do you order them? Have you ever taken on a crazy cake like this?
Wednesday, March 23, 2011
Alaska...America's Last Frontier
Do you remember when I talked about spending time away from the Starter Home last summer? Well we did it because of the hubster's job. We are getting ready to head out again. We spent last summer it the hot south and this year...well we are voyaging to the final frontier...ALASKA (feeling a little treky right now). I am actually really excited.
One thing that is really hard about being gone for the summer is that I have never had a garden. I think this year I am going to try container gardening for fruits and veggies.
Has anyone done this before?
I will have to learn about growing seasons there and what will do well but I am looking forward to the challenge!

Because we are moving so far away my husband will be driving the car while I fly with the 3 kiddos...alone.
Did I mention I will be alone?
I am actually not that worried about the flight but I am stressed about the check-in/carseat and baggage drop-off/security part. Trying to get 3 kids, stroller and diaper bags through security is no picnic but I think it beats spending a week in the car with the same 3 kids.

Two other big positives about Alaska are that I might run into these ladies.
Where does Sara Palin live?
And the most beautiful and wonderful Ana White! I would love to have a building lesson with her. My husband built me some wonderful furniture from her website.
The next few weeks are going to be super crazy for me. I have started the nursery. I even got the walls painted but I am going to try and get it completed before I leave for the finale frontier. I also have to get everything packed and ready to go. You may have to bear with me over the next few weeks while I get my home in order to move, move and get unpacked. One positive is that I have a ton of tutorials to share with you...once I have time.
Thanks for your patience!
 |
| www.tourppp.com |
One thing that is really hard about being gone for the summer is that I have never had a garden. I think this year I am going to try container gardening for fruits and veggies.
Has anyone done this before?
I will have to learn about growing seasons there and what will do well but I am looking forward to the challenge!
Because we are moving so far away my husband will be driving the car while I fly with the 3 kiddos...alone.
Did I mention I will be alone?
I am actually not that worried about the flight but I am stressed about the check-in/carseat and baggage drop-off/security part. Trying to get 3 kids, stroller and diaper bags through security is no picnic but I think it beats spending a week in the car with the same 3 kids.
Two other big positives about Alaska are that I might run into these ladies.
Where does Sara Palin live?
 |
| www.huffingtonpost.com |
And the most beautiful and wonderful Ana White! I would love to have a building lesson with her. My husband built me some wonderful furniture from her website.
 | |
| www.ana-white.com |
The next few weeks are going to be super crazy for me. I have started the nursery. I even got the walls painted but I am going to try and get it completed before I leave for the finale frontier. I also have to get everything packed and ready to go. You may have to bear with me over the next few weeks while I get my home in order to move, move and get unpacked. One positive is that I have a ton of tutorials to share with you...once I have time.
Thanks for your patience!
Subscribe to:
Posts (Atom)
