Showing posts with label Fabric. Show all posts

Friday, April 29, 2011

My Zinc Bookcase: A Faux Finishing Tutorial Part 2

Best Blogger Tips
If you remember from the first part of the tutorial, I recently have fallen in love with zinc furniture. My inspiration came from pieces like this from Restoration Hardware. Like this gorgeous nightstand.

Beautiful. But of course I don't have $1000 to throw at a new piece of furniture so I decided to try and create the look myself.

I finished the outside of my bookcase using my faux zinc finishing technique but the inside I had left to look like this.
Yes I know it looks great just the way it is (chuckle) but you know me, I am an overachiever.

It took me a few days to decide how to finish the inside. I kept going back and forth between fabric and the zinc look. All I knew is that I wanted it to have nice clean lines inside and I wanted to hide all the unfinished edges of the tinfoil.

I decided to go with fabric and to make sure my fabric would have clean lines I used poster board and mod podge.

First I had to cover the 2x2s that were in each corner. I cut my fabric to cover the two by two but I added 1 inch to the length. I covered the fabric with mod podge.

I folded each end over 1/2.

I pressed it over the 2x2 and moved it until it fit snugly and smoothed it out.

I did this on all of the 2x2s and then moved on to cover the sides and tops.

I first measured my sides and top and then I cut out my poster boards about 1/4" less. So if I measured 15 1/2 " by 23" I actually cut my poster board to 15 1/4" by 22 3/4".

Next I cut fabric about an inch bigger on all four sides and coated the poster board in a thin layer of mod podge.

I turned it over and smoothed the fabric out. I then wrapped the edges over and glued them down.

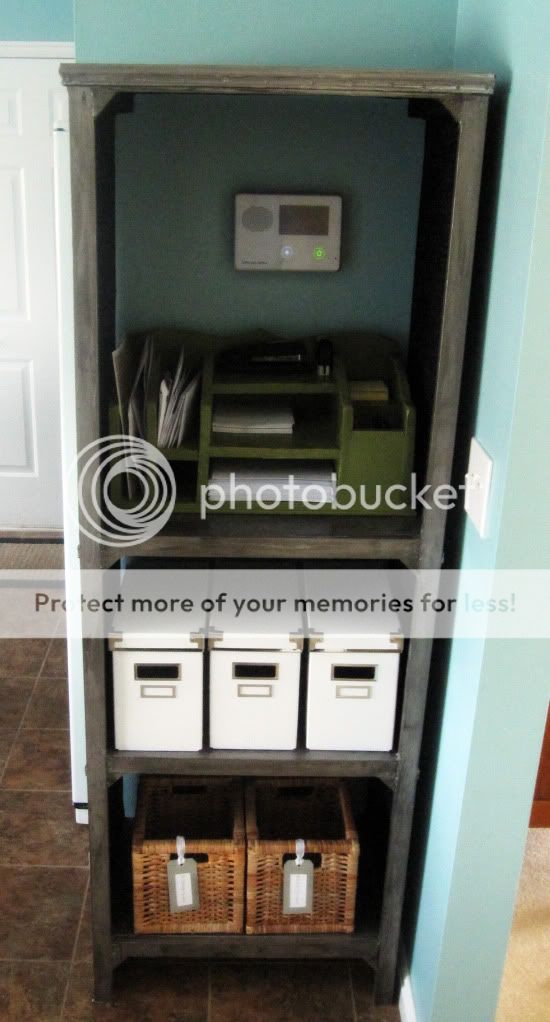
I then did another layer of mod podge on the back of the poster board and glued them the the sides of my bookcase until it looked like this.

I really liked how it turned out. It gave me clean lines and it added some interest to the piece. Here is another angle.

Here is a reminder of my inspiration.


I filled my shelves with things to help me get organized.


On the bottom shelf I put two baskets.
 I labeled the baskets with upstairs and downstairs. The kitchen is on the main floor and seems to be the gathering place for EVERYTHING in the house. This way I can throw things into the baskets as the day goes on and then take only one trip up and one trip down to put everything back. The baskets are from Ikea and I am going to do a tutorial on the tags.

On the middle shelf I have file boxes.
One thing I have struggled organizing since I have been married is mail. I have tried SO MANY different storage options but it always piles up on me. I am hoping that this bookcase will make opening my mail and then throwing away, shredding or filing right away more reasonable.These file boxes were also from Ikea.

On the top shelf I have my version of this Ballard Designs Desk Organizer.


This was the first thing I have ever built in my life. It is a little rough but I am like a proud mama when it comes to this organizer. I will share a tutorial soon on how to build one yourself.

You could easily use this technique on a existing piece of furniture but you could also build something new. You can visit Ana White's site for some great plans. You can even check here to see the kitchen furniture we built with her free plans.

I hope everyone had a great week. Did anyone else watch the royal wedding? I got together with a few friends and watched it today (thanks to a DVR). They were so cute and I loved watching them break into huge grins. I thought it was nice to see something so sweet on TV when usually it is just sad. My heart and prayers go out to those living in the areas affected by the crazy tornadoes they have been having down south.

Thursday, March 17, 2011

Felt Cupcake Pincushion Tutorial: Two Delicious Options

Best Blogger Tips
I think I was really lucky because after I got married because my mom gave me ALL of her sewing stuff including her sewing machine. It was so nice to have everything from the get-go and even nicer to not have to pay for it all myself.

One of the things in my hand-me-down pack of treasures was the classic tomato pincushion.

You know the one I am talking about.

I remember playing with this particular pincushion as a child. I don't know why kids get so much enjoyment out of playing with pins but I know I loved it. Now I have kiddos of my own and they surely enjoy playing with them, too. Well I decided to upgrade my pincushion. Mostly because I already had the supplies so it would be FREE for me.

Yeah, I'm cheap like that.

Since I was upgrading I decided it needed to be something cute. Delicious even.

So I made myself a yummy cupcake pincushion and it turned out so cute but as I admired my creation I realized there was an even easier way to do it. So... I am going to show you both ways and you can decide which option works for you.


You will need:
2 sheets of felt in the same or coordinating colors

and

about a 8"x12" rectangle of fabric and about 8"x12" of quilt batting
or
about a 5"x12" rectangle of knit fabric

hot glue gun
sewing machine or needle and thread
and pins of course

Option 1: Fabric and Batting 
Cut strips from your two pieces of felt about 1/2"-3/4" lengthwise

Cut each of your felt pieces in half lengthwise and use your iron to press them in half.

Take two pieces of your felt (I used a dark brown and a light brown) and lay them on top of each other with just a small amount of the bottom fabric showing.

Beginning at one end roll your fabric tightly. Roll it to create a cone shape. You can tap the top or the bottom of the cone to adjust it. Here is how mine looked.

Add your second pieces of felt. Use a small dot of hot glue to secure it.

Continue to wrap until you have your cupcake top.

Turn your "cupcake" over and trim the excess off.

Now you need to create your liner. Using your "cupcake" as a guide, trace a circle about 1/2" bigger then the bottom. Cut the circle out and cut a matching circle from the batting. Use a basting stitch to secure the batting to the fabric.


Take the rest of your fabric and cut a rectangle. You want it to be able to wrap all the way around the cupcake with about 1" overlap. You also want it to be about 1/2" longer.

Match the fabric up with the batting and cut a matching rectangle. Using a sewing machine stitch lines about 1/4"-1/2" apart. This will create that ribbed look of a cupcake liner. Trim off any excess.

Press one long side of your rectangle over about 1/2" and one short side over 1/2". Wrap it around your cupcake. Mark with pins or disappearing ink where the liner needs to be sewn together.

Remove it from the cupcake and pin.

Turn the cuff you made inside-out and match right sides together with your circle piece. Stitch together and turn right side out.

Pull your liner onto your cupcake (this is when it occurred to me that using a stretchy fabric for the liner would be way easier)

Now find those two skinny strips of felt you cut earlier. Glue the ends on top of one another and glue it to the "cupcake" right above the liner.

Twist them and wrap it around your cupcake. Use hot glue in a few places to secure it in place. Trim off any extra and glue the end down. Place your sprinkle pins in it. DO NOT EAT :)

While I was taking pictures my 4-year-old came in and said, "Mom, that looks like a yummy cupcake." He picked it up and pulled the pins out. "COOL! The pins look like big sprinkles!"

pause pause pause

"Can I eat it?"

Nothing like a little guys comments to make you feel like you did your job.

Option 2: Stretchy Knit Fabric

I created my cupcake top the same way.

This time I used a piece of brown ribbed stretch knit. I rolled it to see how long I needed it. I also cut it to be about an inch wider than the cupcake.

I sewed the two short sides together to create a cuff. I then used a gathering stitch to gather one long side. After I had it gathered as tight as I wanted I ran a tighter stitch over my gathers to hold it tightly together.

Trim and turn right side out. Pull it onto your "cupcake".

Use the same technique to create the frosting edge by taking two skinny pieces and twisting them. This one was much easier. It took maybe 10 minutes.

I think it turned out so cute!

You can see that they are two different sizes. It just depended on how tight I wrapped them and how tall I made the cone shape.
 Yummy and oh-so-cute.

These would also be darling for a cupcake themed room or for play food.

What about you guys? Did you have to buy all your sewing supplies or do you not sew because of how expensive it would be to start up?

I am really grateful for all my mom's stuff. Having it in my home is actually the reason I became interested in sewing. Thanks mom!

Oh and Happy St. Patrick's Day. Yes, I know my post has nothing to do with it but myself and all my kiddos are currently in green but more importantly today is the first day of March Madness! Yep, we are one of "those" families. 

Thursday, February 24, 2011

DIY Carseat Cover Tutorial

Best Blogger Tips
So, still no luck in my charger search. I am in deep clean mode on my house today so hopefully I will get lucky!

I love the idea of a carseat canopy. I remember with my boys I would try to slip a blanket over the carseat but it would constantly slip off. Whoever it was that decided to put straps on a blanket You. Are. A. Genius! and why didn't I think of that earlier?

This cover will keep the hot sun and cold wind away from your precious bundle. Not to mention those pesky germ covered hands.


I decided to give this a try for one of my Hubby's cousins. She is having a little boy and I thought this might make a great shower gift.

You will need the following:

1 yard for the top fabric
1 yard for the bottom fabric
an extra 1/8 yard for your straps
Velcro (make sure it does not have an adhesive back)
thread
scissors
embellishments

Step 1: Cut out four 8 inch by 3 1/2 inch strips of fabric for your straps.


Step 2: On the right side of the fabric mark 3/4 of an inch from the top and side (I just used pins.)

Step 3: Cut your Velcro to 2 inches by 1 1/2 inches. Pin your Velcro in place on the right side of the fabric. You will need to pin two straps with the soft side of the Velcro and two straps with the rough side. I used white super soft Velcro in size small so two of my pieces put together made the 2 inch by 1 1/2 inch size.

Step 4: Sew in place. I made a box around the Velcro and than also sewed an x through the middle. I went around the sides twice to make sure it was held tight. Sew close to the edge of your Velcro so it doesn't pull up.


Step 5: Pin right sides of the fabric together so you the Velcro is opposite each other (i.e. the soft Velcro on top of one piece and the rough on the bottom of the other.) Sew together using a 1/2 inch seam. Make sure you don't sew around the entire thing, you need to leave a space to turn it right side out.


Step 6: Clip the corners and turn your straps right side out. Use a crochet hook, knitting needle or anything long and pointy to push the corners out. Press with an iron.


Step 7: If you have done everything right you should be able to Velcro your strap into a circle like so.

Step 8: Use a finishing stitch (just a small stitch really close to the edge) to finish your straps and close the gaps.

Step 9: Pin the right sides of your two large pieces of fabric to together and join with a 1/2 inch hem. I put rounded corners on mine. An easy way to do this is to mark the fabric 4-6 inches from each corner and use them as guides while you slowly turn your fabric. Make sure you leave a gap so you can turn your fabric right side out. Once you have finished turn it right side out and press with an iron. Use a finishing stitch to finish it off and close the gap.
Step 10: Pin your straps so their centers are 18 inches from the top and 13 inches from the outsides of your finished canopy. This fit my car seat perfectly but you might want to pin yours and then try in on your car seat. If this is a gift I think these measurements should work fine for most car seats.

Mark your straps with a box that is in the center, about 2 3/4 inches from each short edge.


Step 11: You will want to sew another box and x like you did with the Velcro. The top and bottom of your box should line up with the marks you made and the sides will line up with your finishing stitch on your strap. It should look like this when you are done.

Step 12: Add you embellishments. Because this was for a boy I just went with coordinating button but you could add bows, fabric flowers etc to the top of your straps. I threaded the button first and then glued it on using craft glue.
Here is the finished product laid out.Here it is on a car seat.


It seriously is so easy and a great beginner project.

Related Posts Plugin for WordPress, Blogger...