What a crazy weekend it was with blogger! I have to give props to the people who's job it is to fix and maintain blogger because 1) most of what they do is completely foreign to me and 2) I can't imagine how stressful things become when something doesn't go right and it is up to them to figure it out and fix it.
Not a job for me, I can tell you that.
Spring is finally starting to arrive in Alaska and with views like these outside our apartment I am feeling a little spoiled.
We are loving all the trails and things to do outside. We are trying to get out and enjoy it all. Our "to-do" list here keeps growing because there are so many things to go do and see.
One of our friends took her girls on a walk a few days ago and across the pond from her was a black bear mama and two cubs. A little scary but luckily they were far away so they could just sit and watch the cubs play.
Before we left on our adventure in Alaska we got quit a bit done on the nursery. First things first, we had to get the yellow out of there and get some fresh paint on the walls. If you remember from my nursery mood board I had decided to use Sherwin Williams Sassy Green and Heron Plume on my walls. I thought I would give you some before pictures. We were mostly using this room for storage since we had gotten home.
I was trying to get a move on and had already begun to tape the room before I remembered that I needed to get before pictures. I had shoved all the junk to the center of the room to start painting so please don't judge me on all the junk.
Thanks!
This door looks out into the hallway and the door on the left is the closet. Now this is a pretty small room at around 9ft x 9ft but, to be honest, they don't get much bigger in my house.
This is from the next corner looking at the closet door and window. The location of the closet is in this room has caused me some serious grief with arranging furniture and I think I am going to remove the door and hang a curtain to make arranging a little easier.
This is the the corner just right of the door.
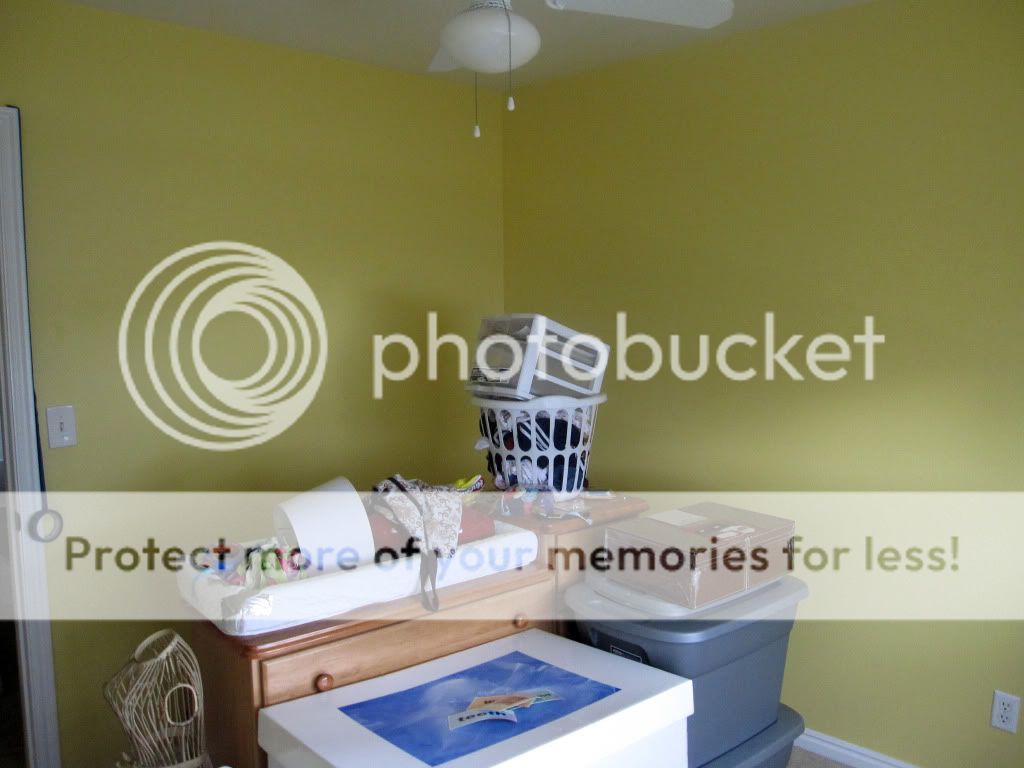
Now here is a little sneak peak of the wall color now. Of course I forgot to take a picture of the walls before I started to move things in so I had to crop this from another picture I took.
I am excited to show you the progress of this room and I am looking forward to getting home to work on it.
In other news I started potty training Mr. U today. So far it is going okay but it has only been a few hours. Also, Mr P starts soccer this week. I might be crazy....
Showing posts with label Babies and Kids. Show all posts
Monday, May 16, 2011
Spring Has Sprung and Nursery Paint
Labels:
Babies and Kids,
Before and After,
My Home,
Nursery
Friday, April 1, 2011
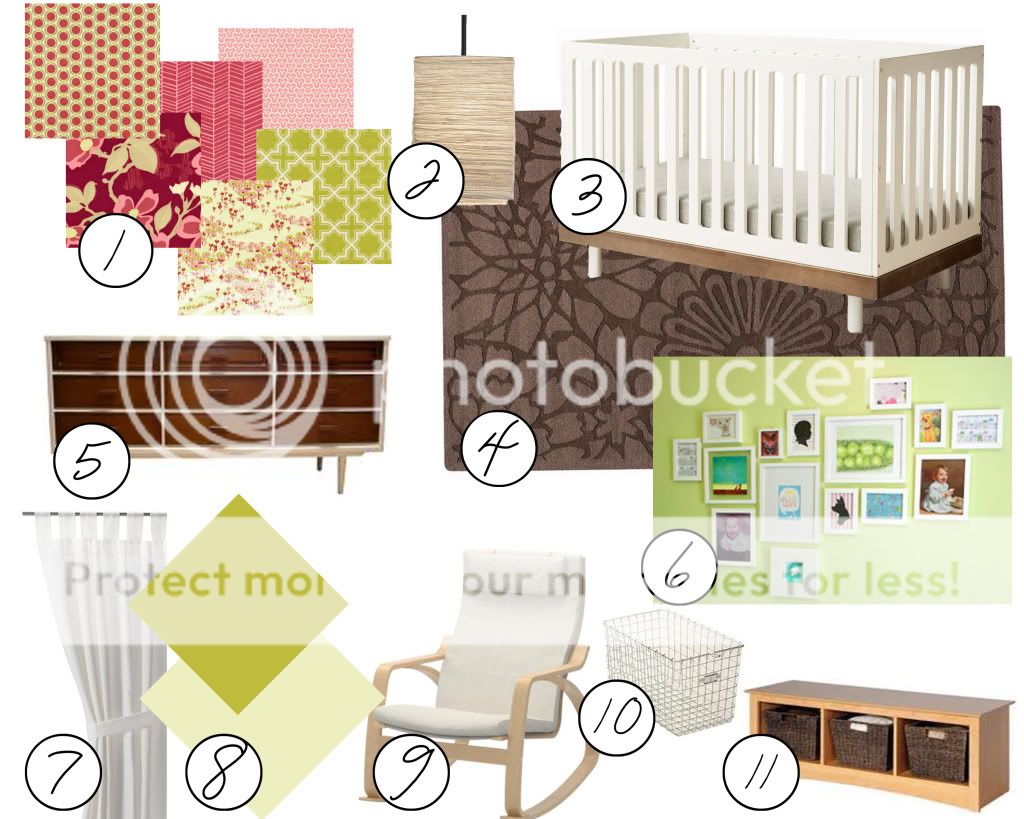
My Modern Nursery Mood Board
I am getting so excited about this nursery. To be honest it started out so simple and then more and more ideas came to my mind.
When we first started working on the nursery I told my hubby that he wouldn't really need to do anything for it.
Well...I was kind of wrong and he has been working his tail off to get everything done before we pack up and he heads off on his week long drive.
So without further ado, my first mood board:
1: Fabric from Joel Dewberry's Modern Meadows Collection. If it looks familiar it is because you have seen it in a different color pallet here, here and here. I just love Joel Dewberry. His fabric just speaks to me. He has a new fabric line out called aviary. I just love it.
2: This lamp shade is from Ikea. My hubby actually just hung it for me.
3:This beautiful crib is by Oeuf but with a price tag of $940 it is slightly out of my price range. Okay it is way out of my price range. Don't worry your little heads though, I have a few ideas up my sleeve.
4: This will be my first area rug I have ever purchased. I bought it online and I hope I like it once I see it in person.
5: Oh, my. This dresser is To. Die. For. To bad awesome mid century antiques are either to expensive or non-existent in my neck of the woods. Now if you would like and 80's plywood dresser, we have plenty to choose from. Again, no worries I have something up my sleeve.
6: I love the art wall in Young House Love's nursery.
7: Simple white drapes.
8: Paint from Sherwin Williams Sassy Green and Heron Plume.
9: Ikea Poang simple comfy chair.
10: Wire baskets. Still on the hunt for cheap inexpensive ones.
11: Perfect storage for toys and little extras.
Well I am certainly excited. I am hoping to get everything done before me and the kiddos take off for Alaska.
Wish me luck!
I also wanted to give a quick thanks to all of you that stop by here to check up on what is going on. I really appreciate all your sweet comments!
When we first started working on the nursery I told my hubby that he wouldn't really need to do anything for it.
Well...I was kind of wrong and he has been working his tail off to get everything done before we pack up and he heads off on his week long drive.
So without further ado, my first mood board:
1: Fabric from Joel Dewberry's Modern Meadows Collection. If it looks familiar it is because you have seen it in a different color pallet here, here and here. I just love Joel Dewberry. His fabric just speaks to me. He has a new fabric line out called aviary. I just love it.
2: This lamp shade is from Ikea. My hubby actually just hung it for me.
3:This beautiful crib is by Oeuf but with a price tag of $940 it is slightly out of my price range. Okay it is way out of my price range. Don't worry your little heads though, I have a few ideas up my sleeve.
4: This will be my first area rug I have ever purchased. I bought it online and I hope I like it once I see it in person.
5: Oh, my. This dresser is To. Die. For. To bad awesome mid century antiques are either to expensive or non-existent in my neck of the woods. Now if you would like and 80's plywood dresser, we have plenty to choose from. Again, no worries I have something up my sleeve.
6: I love the art wall in Young House Love's nursery.
7: Simple white drapes.
8: Paint from Sherwin Williams Sassy Green and Heron Plume.
9: Ikea Poang simple comfy chair.
10: Wire baskets. Still on the hunt for cheap inexpensive ones.
11: Perfect storage for toys and little extras.
Well I am certainly excited. I am hoping to get everything done before me and the kiddos take off for Alaska.
Wish me luck!
I also wanted to give a quick thanks to all of you that stop by here to check up on what is going on. I really appreciate all your sweet comments!
Labels:
Babies and Kids,
Mood Board,
My Home,
Nursery
Thursday, February 24, 2011
DIY Carseat Cover Tutorial
So, still no luck in my charger search. I am in deep clean mode on my house today so hopefully I will get lucky!
I love the idea of a carseat canopy. I remember with my boys I would try to slip a blanket over the carseat but it would constantly slip off. Whoever it was that decided to put straps on a blanket You. Are. A. Genius! and why didn't I think of that earlier?
This cover will keep the hot sun and cold wind away from your precious bundle. Not to mention those pesky germ covered hands.


Step 2: On the right side of the fabric mark 3/4 of an inch from the top and side (I just used pins.)
Step 3: Cut your Velcro to 2 inches by 1 1/2 inches. Pin your Velcro in place on the right side of the fabric. You will need to pin two straps with the soft side of the Velcro and two straps with the rough side. I used white super soft Velcro in size small so two of my pieces put together made the 2 inch by 1 1/2 inch size.

Step 4: Sew in place. I made a box around the Velcro and than also sewed an x through the middle. I went around the sides twice to make sure it was held tight. Sew close to the edge of your Velcro so it doesn't pull up.

Step 5: Pin right sides of the fabric together so you the Velcro is opposite each other (i.e. the soft Velcro on top of one piece and the rough on the bottom of the other.) Sew together using a 1/2 inch seam. Make sure you don't sew around the entire thing, you need to leave a space to turn it right side out.

Step 6: Clip the corners and turn your straps right side out. Use a crochet hook, knitting needle or anything long and pointy to push the corners out. Press with an iron.

Step 7: If you have done everything right you should be able to Velcro your strap into a circle like so.

Step 8: Use a finishing stitch (just a small stitch really close to the edge) to finish your straps and close the gaps.

Step 9: Pin the right sides of your two large pieces of fabric to together and join with a 1/2 inch hem. I put rounded corners on mine. An easy way to do this is to mark the fabric 4-6 inches from each corner and use them as guides while you slowly turn your fabric. Make sure you leave a gap so you can turn your fabric right side out. Once you have finished turn it right side out and press with an iron. Use a finishing stitch to finish it off and close the gap.
Step 10: Pin your straps so their centers are 18 inches from the top and 13 inches from the outsides of your finished canopy. This fit my car seat perfectly but you might want to pin yours and then try in on your car seat. If this is a gift I think these measurements should work fine for most car seats.
Mark your straps with a box that is in the center, about 2 3/4 inches from each short edge.

Step 11: You will want to sew another box and x like you did with the Velcro. The top and bottom of your box should line up with the marks you made and the sides will line up with your finishing stitch on your strap. It should look like this when you are done.

Step 12: Add you embellishments. Because this was for a boy I just went with coordinating button but you could add bows, fabric flowers etc to the top of your straps. I threaded the button first and then glued it on using craft glue.
Here is the finished product laid out.
Here it is on a car seat.

It seriously is so easy and a great beginner project.
I love the idea of a carseat canopy. I remember with my boys I would try to slip a blanket over the carseat but it would constantly slip off. Whoever it was that decided to put straps on a blanket You. Are. A. Genius! and why didn't I think of that earlier?
This cover will keep the hot sun and cold wind away from your precious bundle. Not to mention those pesky germ covered hands.
I decided to give this a try for one of my Hubby's cousins. She is having a little boy and I thought this might make a great shower gift.
You will need the following:
1 yard for the top fabric
1 yard for the bottom fabric
an extra 1/8 yard for your straps
Velcro (make sure it does not have an adhesive back)
thread
scissors
embellishments
Step 1: Cut out four 8 inch by 3 1/2 inch strips of fabric for your straps.
1 yard for the bottom fabric
an extra 1/8 yard for your straps
Velcro (make sure it does not have an adhesive back)
thread
scissors
embellishments
Step 1: Cut out four 8 inch by 3 1/2 inch strips of fabric for your straps.
Step 2: On the right side of the fabric mark 3/4 of an inch from the top and side (I just used pins.)
Step 3: Cut your Velcro to 2 inches by 1 1/2 inches. Pin your Velcro in place on the right side of the fabric. You will need to pin two straps with the soft side of the Velcro and two straps with the rough side. I used white super soft Velcro in size small so two of my pieces put together made the 2 inch by 1 1/2 inch size.
Step 4: Sew in place. I made a box around the Velcro and than also sewed an x through the middle. I went around the sides twice to make sure it was held tight. Sew close to the edge of your Velcro so it doesn't pull up.
Step 5: Pin right sides of the fabric together so you the Velcro is opposite each other (i.e. the soft Velcro on top of one piece and the rough on the bottom of the other.) Sew together using a 1/2 inch seam. Make sure you don't sew around the entire thing, you need to leave a space to turn it right side out.
Step 6: Clip the corners and turn your straps right side out. Use a crochet hook, knitting needle or anything long and pointy to push the corners out. Press with an iron.
Step 7: If you have done everything right you should be able to Velcro your strap into a circle like so.
Step 8: Use a finishing stitch (just a small stitch really close to the edge) to finish your straps and close the gaps.
Step 9: Pin the right sides of your two large pieces of fabric to together and join with a 1/2 inch hem. I put rounded corners on mine. An easy way to do this is to mark the fabric 4-6 inches from each corner and use them as guides while you slowly turn your fabric. Make sure you leave a gap so you can turn your fabric right side out. Once you have finished turn it right side out and press with an iron. Use a finishing stitch to finish it off and close the gap.
Mark your straps with a box that is in the center, about 2 3/4 inches from each short edge.
Step 11: You will want to sew another box and x like you did with the Velcro. The top and bottom of your box should line up with the marks you made and the sides will line up with your finishing stitch on your strap. It should look like this when you are done.
Step 12: Add you embellishments. Because this was for a boy I just went with coordinating button but you could add bows, fabric flowers etc to the top of your straps. I threaded the button first and then glued it on using craft glue.
Here is the finished product laid out.
It seriously is so easy and a great beginner project.
Friday, January 14, 2011
Subscribe to:
Posts (Atom)