Because of my lack of internet this last week I got a lot of sewing done from my to do list. Remember you can follow me on Pinterest and see some of my to-dos. I will share some pictures of my projects in a day or two. Ms V's closet is expanding!
Like my lighting dilemma, it is pretty much impossible to DIY a sink, cabinet pulls or a faucet and all of those things are EX-PEN-SIVE!
I love bin pulls but when I looked at places like Home Depot they were priced between $4-$5 each. Now, I have a small kitchen and with that price it was still going to cost around $100 just for cabinet hardware.
I started looking online to see if I could find a better deal. I came across a great little Ebay shop that you can find here that was selling the cup pulls for $1.79 each and my handles were around $1.30. Also, because I bought more than 25 knobs and pulls I got free shipping. So I paid around $50 for everything (including 7 pulls for a future furniture build). I felt that even though I couldn't DIY something cheap I still got a great deal and I love them!
Next I really wanted to replace my kitchen sink. We had an old stainless steel sink. I know that stainless steel can be done beautifully but my sink was not an example of that.
Again. after looking around a new kitchen sink was going to be paying at least $100. So I started looking online at a local classified website. We ended up finding a brand new acrylic white sink for only $40. Now that is saving some dough.
We also wanted a new faucet. I went online to ebay, again, and found a faucet for $20 because it was missing the side spray (it usually retailed at $120.) I then bought a side spray for $15. So my brand new sink and faucet set me back only $75!
I think there are some really great deals out there and you can definitely redo your kitchen or any room in your house on the cheap if you are willing to use your creativity, do your research and maybe even be a little patient .
On a completely unrelated note, does anyone watch Bachelorette? What is up with mask guy and why is Bentley such a jerk?
I really couldn't get over mask guy swimming with the mask on! All I could think of was the hilarious tan lines he will soon be rocking if he doesn't take it off!
Any favorites yet?
I have mine.
Showing posts with label My Home. Show all posts
Wednesday, June 1, 2011
Pulls, Sinks and Faucets...Oh My!
Labels:
Cheap Decor,
Kitchen,
My Home,
Pinterest
Monday, May 16, 2011
Spring Has Sprung and Nursery Paint
What a crazy weekend it was with blogger! I have to give props to the people who's job it is to fix and maintain blogger because 1) most of what they do is completely foreign to me and 2) I can't imagine how stressful things become when something doesn't go right and it is up to them to figure it out and fix it.
Not a job for me, I can tell you that.
Spring is finally starting to arrive in Alaska and with views like these outside our apartment I am feeling a little spoiled.
We are loving all the trails and things to do outside. We are trying to get out and enjoy it all. Our "to-do" list here keeps growing because there are so many things to go do and see.
One of our friends took her girls on a walk a few days ago and across the pond from her was a black bear mama and two cubs. A little scary but luckily they were far away so they could just sit and watch the cubs play.
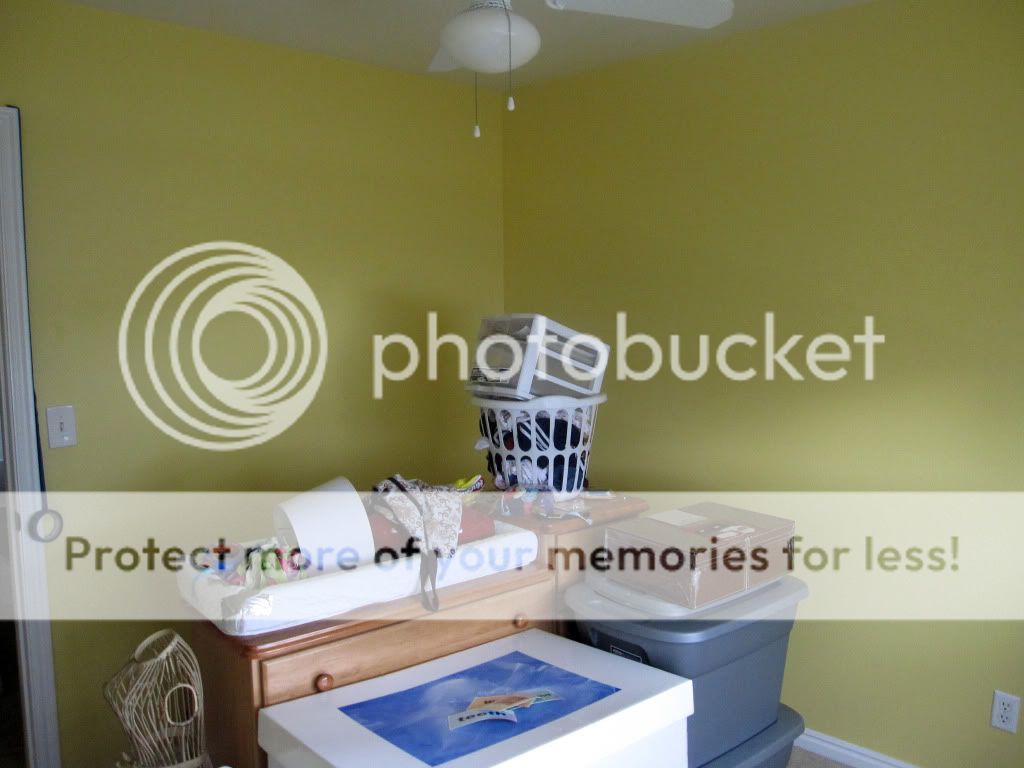
Before we left on our adventure in Alaska we got quit a bit done on the nursery. First things first, we had to get the yellow out of there and get some fresh paint on the walls. If you remember from my nursery mood board I had decided to use Sherwin Williams Sassy Green and Heron Plume on my walls. I thought I would give you some before pictures. We were mostly using this room for storage since we had gotten home.
I was trying to get a move on and had already begun to tape the room before I remembered that I needed to get before pictures. I had shoved all the junk to the center of the room to start painting so please don't judge me on all the junk.
Thanks!
This door looks out into the hallway and the door on the left is the closet. Now this is a pretty small room at around 9ft x 9ft but, to be honest, they don't get much bigger in my house.
This is from the next corner looking at the closet door and window. The location of the closet is in this room has caused me some serious grief with arranging furniture and I think I am going to remove the door and hang a curtain to make arranging a little easier.
This is the the corner just right of the door.
Now here is a little sneak peak of the wall color now. Of course I forgot to take a picture of the walls before I started to move things in so I had to crop this from another picture I took.
I am excited to show you the progress of this room and I am looking forward to getting home to work on it.
In other news I started potty training Mr. U today. So far it is going okay but it has only been a few hours. Also, Mr P starts soccer this week. I might be crazy....
Not a job for me, I can tell you that.
Spring is finally starting to arrive in Alaska and with views like these outside our apartment I am feeling a little spoiled.
We are loving all the trails and things to do outside. We are trying to get out and enjoy it all. Our "to-do" list here keeps growing because there are so many things to go do and see.
One of our friends took her girls on a walk a few days ago and across the pond from her was a black bear mama and two cubs. A little scary but luckily they were far away so they could just sit and watch the cubs play.
Before we left on our adventure in Alaska we got quit a bit done on the nursery. First things first, we had to get the yellow out of there and get some fresh paint on the walls. If you remember from my nursery mood board I had decided to use Sherwin Williams Sassy Green and Heron Plume on my walls. I thought I would give you some before pictures. We were mostly using this room for storage since we had gotten home.
I was trying to get a move on and had already begun to tape the room before I remembered that I needed to get before pictures. I had shoved all the junk to the center of the room to start painting so please don't judge me on all the junk.
Thanks!
This door looks out into the hallway and the door on the left is the closet. Now this is a pretty small room at around 9ft x 9ft but, to be honest, they don't get much bigger in my house.
This is from the next corner looking at the closet door and window. The location of the closet is in this room has caused me some serious grief with arranging furniture and I think I am going to remove the door and hang a curtain to make arranging a little easier.
This is the the corner just right of the door.
Now here is a little sneak peak of the wall color now. Of course I forgot to take a picture of the walls before I started to move things in so I had to crop this from another picture I took.
I am excited to show you the progress of this room and I am looking forward to getting home to work on it.
In other news I started potty training Mr. U today. So far it is going okay but it has only been a few hours. Also, Mr P starts soccer this week. I might be crazy....
Labels:
Babies and Kids,
Before and After,
My Home,
Nursery
Tuesday, May 10, 2011
Shedding a Little Light on the Issue: Kitchen Lighting
Whenever you look at designer kitchens they always have tons of light sources and beautiful light fixtures.
My kitchen was lacking both.
As I started looking for lighting I had to get over the idea that all the lighting in your home needed to match. I have almost always lived in a home with matched lighting through out the entire house. I was also overwhelmed at how expensive it could be! You can easily spend $300-$400 on one light fixture not to mention the expense of hiring an electrician to wire and install new lighting. That type of cash was completely outside my budget.
Luckily I have a ridiculously handy husband who comes from a family of ridiculously handy men. They can fix, install or build anything.
We went with simple lighting from IKEA. They had clean lines and they would help us add a lot more light to our kitchen. We (and I think you all know by we I mean my husband) also installed recessed lighting we got from Home Depot.
We first changed out the light fixture above the dining table.
If you remember I had this light before.
And this is the light after.
This light set us back 50 bucks. Not bad.
Now, over the cooking area and bar I wanted a lot more light. I only had two light fixtures before. One was over the sink and one was in the middle of the ceiling. Every time I did anything in the kitchen I was always working in my own shadow.
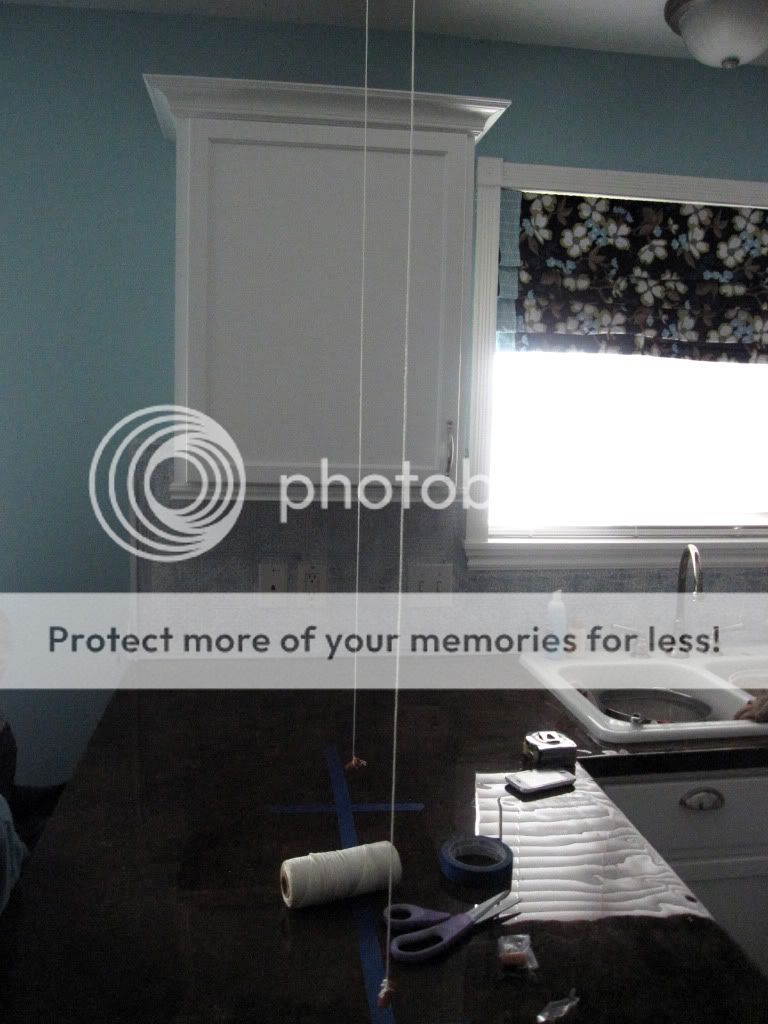
We added pendant lighting above the bar but before hanging the light we had to decide where to place them.
I stood there staring at the ceiling over the bar wondering how I could figure out how to center them and make sure they were even. I finally went online and found some great suggestions.
First measure the width of your bar.
Find the middle of your measurement and mark the center of your counter top with painters tape.(If you like my counters you can find out how I painted them here)
Next you want to mark where the pendants will hang. Mark these spots with more tape. You may have to play with this a little. Just make sure if you are hanging multiple lights, that the distance between each is the same.
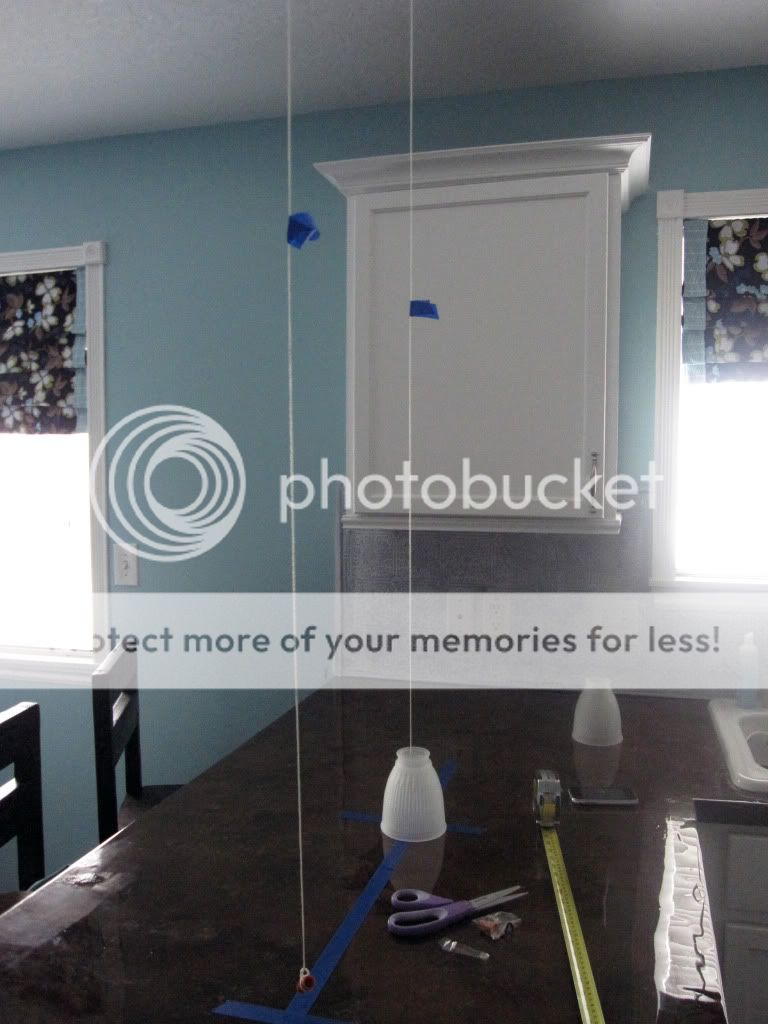
Next you want to take a very long piece of string and tie something heavy to the end like a washer. Attach the string to the ceiling with tape so the washer hangs directly over the intersections.
You may need to play with the positioning a little until you are happy. I would also recommend opening any cupboards that may get in the way to make sure you have given them enough clearance.
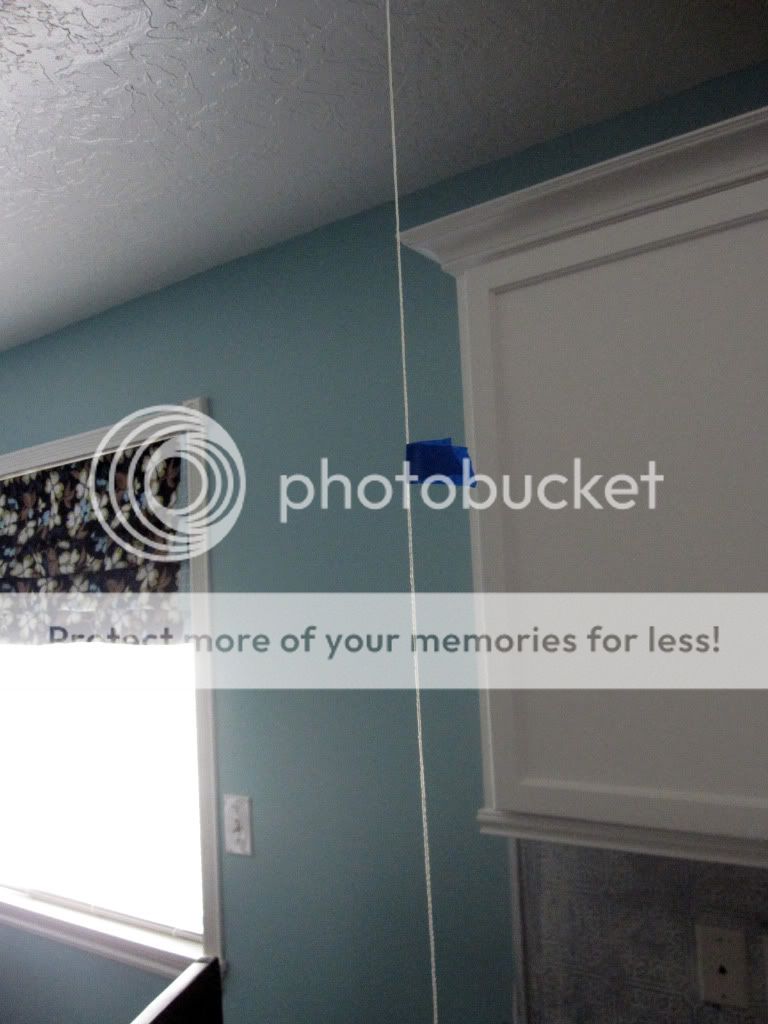
Now you need to figure out the length of your lights. Take another piece of blue tape and mark the height of where you think you would like your light.
Stand and sit around your counter to make sure the height is right. I had my kids and husband sit at the counter while I stood on the other side to make sure that they weren't too low and then my husband and I switched.
My husband cut the holes and wired the lights.
We (again my husband) also wired some recessed lighting and ended up installing 5 new recessed lights.
Here is the before lighting.
And here it is after. One of the recessed lights above the fridge was cut out of the picture.
We also added wireless puck lights under the cabinets. I am not sold on them yet. I don't have any "hidden" plugs behind the cabinets so I can't really use wired lights without cords and plugs dangling all over the place so I am stuck with them as an only option right now.
I am so happy with my new lighting. It is so nice to be able to see what I am doing and to create a bright and happy atmosphere.
A big thanks has to go out to my hubby for crawling around in the attic all afternoon to do this.
Love you babe!
So how about you guys? Is lighting that important to you or do you not really think about it? I know I really didn't until I started working on this kitchen. I am happy I took it into consideration and decided to add it to our kitchen.
My kitchen was lacking both.
As I started looking for lighting I had to get over the idea that all the lighting in your home needed to match. I have almost always lived in a home with matched lighting through out the entire house. I was also overwhelmed at how expensive it could be! You can easily spend $300-$400 on one light fixture not to mention the expense of hiring an electrician to wire and install new lighting. That type of cash was completely outside my budget.
Luckily I have a ridiculously handy husband who comes from a family of ridiculously handy men. They can fix, install or build anything.
We went with simple lighting from IKEA. They had clean lines and they would help us add a lot more light to our kitchen. We (and I think you all know by we I mean my husband) also installed recessed lighting we got from Home Depot.
We first changed out the light fixture above the dining table.
If you remember I had this light before.
And this is the light after.
This light set us back 50 bucks. Not bad.
Now, over the cooking area and bar I wanted a lot more light. I only had two light fixtures before. One was over the sink and one was in the middle of the ceiling. Every time I did anything in the kitchen I was always working in my own shadow.
We added pendant lighting above the bar but before hanging the light we had to decide where to place them.
I stood there staring at the ceiling over the bar wondering how I could figure out how to center them and make sure they were even. I finally went online and found some great suggestions.
First measure the width of your bar.
Find the middle of your measurement and mark the center of your counter top with painters tape.(If you like my counters you can find out how I painted them here)
Next you want to mark where the pendants will hang. Mark these spots with more tape. You may have to play with this a little. Just make sure if you are hanging multiple lights, that the distance between each is the same.
Next you want to take a very long piece of string and tie something heavy to the end like a washer. Attach the string to the ceiling with tape so the washer hangs directly over the intersections.
You may need to play with the positioning a little until you are happy. I would also recommend opening any cupboards that may get in the way to make sure you have given them enough clearance.
Now you need to figure out the length of your lights. Take another piece of blue tape and mark the height of where you think you would like your light.
Stand and sit around your counter to make sure the height is right. I had my kids and husband sit at the counter while I stood on the other side to make sure that they weren't too low and then my husband and I switched.
My husband cut the holes and wired the lights.
We (again my husband) also wired some recessed lighting and ended up installing 5 new recessed lights.
Here is the before lighting.
And here it is after. One of the recessed lights above the fridge was cut out of the picture.
We also added wireless puck lights under the cabinets. I am not sold on them yet. I don't have any "hidden" plugs behind the cabinets so I can't really use wired lights without cords and plugs dangling all over the place so I am stuck with them as an only option right now.
I am so happy with my new lighting. It is so nice to be able to see what I am doing and to create a bright and happy atmosphere.
A big thanks has to go out to my hubby for crawling around in the attic all afternoon to do this.
Love you babe!
So how about you guys? Is lighting that important to you or do you not really think about it? I know I really didn't until I started working on this kitchen. I am happy I took it into consideration and decided to add it to our kitchen.
Labels:
Before and After,
Kitchen,
Money Saving Tips,
My Home,
Tutorials
Friday, April 29, 2011
My Zinc Bookcase: A Faux Finishing Tutorial Part 2
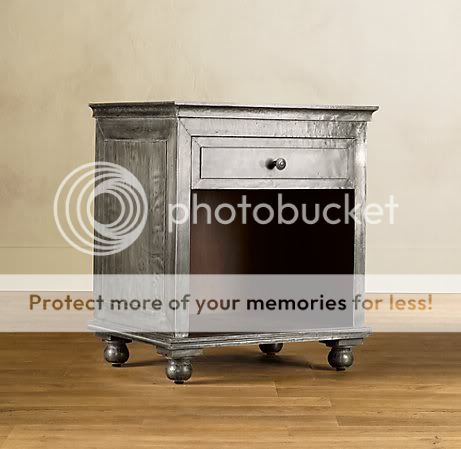
If you remember from the first part of the tutorial, I recently have fallen in love with zinc furniture. My inspiration came from pieces like this from Restoration Hardware. Like this gorgeous nightstand.
Beautiful. But of course I don't have $1000 to throw at a new piece of furniture so I decided to try and create the look myself.
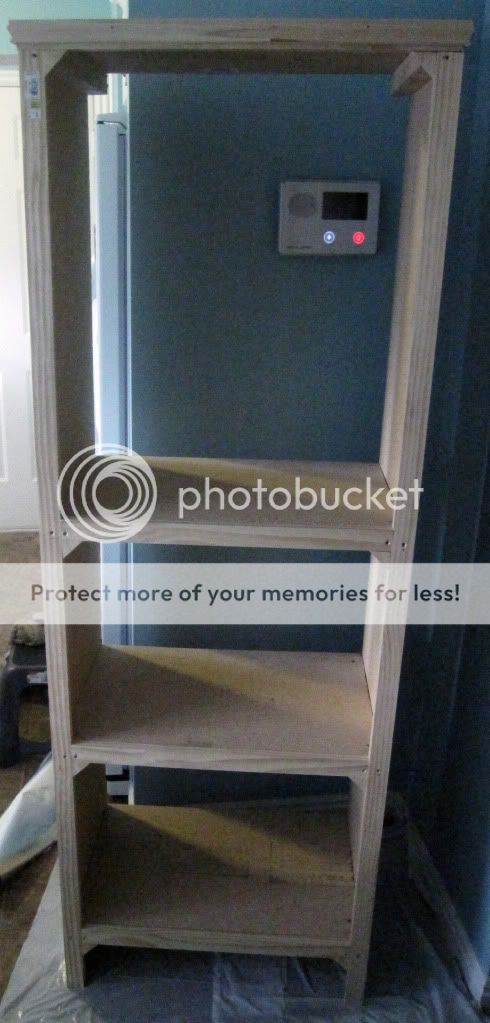
I finished the outside of my bookcase using my faux zinc finishing technique but the inside I had left to look like this.
Yes I know it looks great just the way it is (chuckle) but you know me, I am an overachiever.
It took me a few days to decide how to finish the inside. I kept going back and forth between fabric and the zinc look. All I knew is that I wanted it to have nice clean lines inside and I wanted to hide all the unfinished edges of the tinfoil.
I decided to go with fabric and to make sure my fabric would have clean lines I used poster board and mod podge.
First I had to cover the 2x2s that were in each corner. I cut my fabric to cover the two by two but I added 1 inch to the length. I covered the fabric with mod podge.
I folded each end over 1/2.
I pressed it over the 2x2 and moved it until it fit snugly and smoothed it out.
I did this on all of the 2x2s and then moved on to cover the sides and tops.
I first measured my sides and top and then I cut out my poster boards about 1/4" less. So if I measured 15 1/2 " by 23" I actually cut my poster board to 15 1/4" by 22 3/4".
Next I cut fabric about an inch bigger on all four sides and coated the poster board in a thin layer of mod podge.
I turned it over and smoothed the fabric out. I then wrapped the edges over and glued them down.
I then did another layer of mod podge on the back of the poster board and glued them the the sides of my bookcase until it looked like this.
I really liked how it turned out. It gave me clean lines and it added some interest to the piece. Here is another angle.
Here is a reminder of my inspiration.
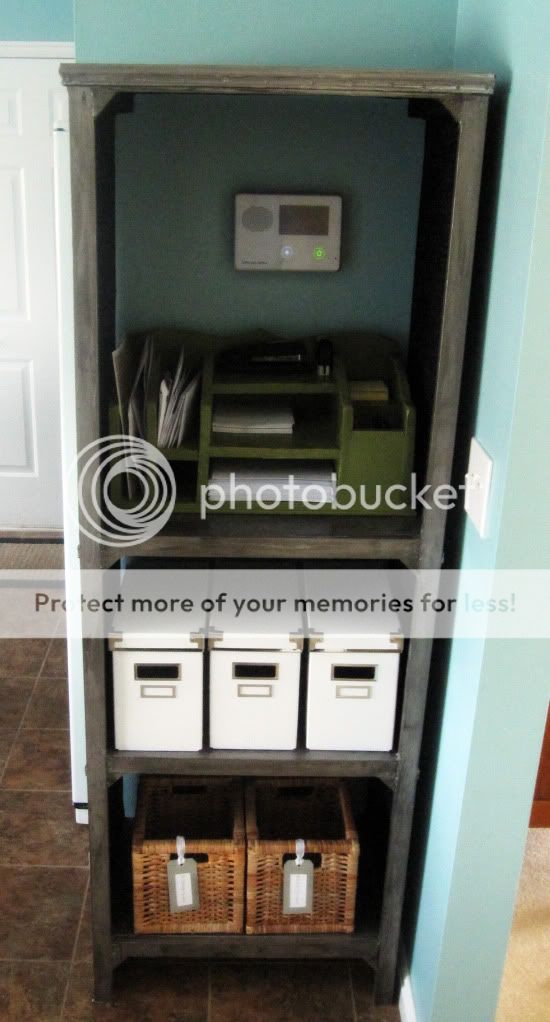
I filled my shelves with things to help me get organized.
On the bottom shelf I put two baskets.
I labeled the baskets with upstairs and downstairs. The kitchen is on the main floor and seems to be the gathering place for EVERYTHING in the house. This way I can throw things into the baskets as the day goes on and then take only one trip up and one trip down to put everything back. The baskets are from Ikea and I am going to do a tutorial on the tags.
On the middle shelf I have file boxes.
One thing I have struggled organizing since I have been married is mail. I have tried SO MANY different storage options but it always piles up on me. I am hoping that this bookcase will make opening my mail and then throwing away, shredding or filing right away more reasonable.These file boxes were also from Ikea.
On the top shelf I have my version of this Ballard Designs Desk Organizer.
This was the first thing I have ever built in my life. It is a little rough but I am like a proud mama when it comes to this organizer. I will share a tutorial soon on how to build one yourself.
You could easily use this technique on a existing piece of furniture but you could also build something new. You can visit Ana White's site for some great plans. You can even check here to see the kitchen furniture we built with her free plans.
I hope everyone had a great week. Did anyone else watch the royal wedding? I got together with a few friends and watched it today (thanks to a DVR). They were so cute and I loved watching them break into huge grins. I thought it was nice to see something so sweet on TV when usually it is just sad. My heart and prayers go out to those living in the areas affected by the crazy tornadoes they have been having down south.
Beautiful. But of course I don't have $1000 to throw at a new piece of furniture so I decided to try and create the look myself.
I finished the outside of my bookcase using my faux zinc finishing technique but the inside I had left to look like this.
Yes I know it looks great just the way it is (chuckle) but you know me, I am an overachiever.
It took me a few days to decide how to finish the inside. I kept going back and forth between fabric and the zinc look. All I knew is that I wanted it to have nice clean lines inside and I wanted to hide all the unfinished edges of the tinfoil.
I decided to go with fabric and to make sure my fabric would have clean lines I used poster board and mod podge.
First I had to cover the 2x2s that were in each corner. I cut my fabric to cover the two by two but I added 1 inch to the length. I covered the fabric with mod podge.
I folded each end over 1/2.
I pressed it over the 2x2 and moved it until it fit snugly and smoothed it out.
I did this on all of the 2x2s and then moved on to cover the sides and tops.
I first measured my sides and top and then I cut out my poster boards about 1/4" less. So if I measured 15 1/2 " by 23" I actually cut my poster board to 15 1/4" by 22 3/4".
Next I cut fabric about an inch bigger on all four sides and coated the poster board in a thin layer of mod podge.
I turned it over and smoothed the fabric out. I then wrapped the edges over and glued them down.
I then did another layer of mod podge on the back of the poster board and glued them the the sides of my bookcase until it looked like this.
I really liked how it turned out. It gave me clean lines and it added some interest to the piece. Here is another angle.
Here is a reminder of my inspiration.
I filled my shelves with things to help me get organized.
On the bottom shelf I put two baskets.
I labeled the baskets with upstairs and downstairs. The kitchen is on the main floor and seems to be the gathering place for EVERYTHING in the house. This way I can throw things into the baskets as the day goes on and then take only one trip up and one trip down to put everything back. The baskets are from Ikea and I am going to do a tutorial on the tags.
On the middle shelf I have file boxes.
One thing I have struggled organizing since I have been married is mail. I have tried SO MANY different storage options but it always piles up on me. I am hoping that this bookcase will make opening my mail and then throwing away, shredding or filing right away more reasonable.These file boxes were also from Ikea.
On the top shelf I have my version of this Ballard Designs Desk Organizer.
This was the first thing I have ever built in my life. It is a little rough but I am like a proud mama when it comes to this organizer. I will share a tutorial soon on how to build one yourself.
You could easily use this technique on a existing piece of furniture but you could also build something new. You can visit Ana White's site for some great plans. You can even check here to see the kitchen furniture we built with her free plans.
I hope everyone had a great week. Did anyone else watch the royal wedding? I got together with a few friends and watched it today (thanks to a DVR). They were so cute and I loved watching them break into huge grins. I thought it was nice to see something so sweet on TV when usually it is just sad. My heart and prayers go out to those living in the areas affected by the crazy tornadoes they have been having down south.
Labels:
Before and After,
Building,
Cheap Decor,
Fabric,
Furniture,
Kitchen,
Mod Podge,
My Home,
Tutorials
Thursday, April 21, 2011
My Zinc Bookcase: A Faux Finishing Tutorial Part 1
We have had quite an adventure up here. My husbands company finds us housing to live in while we are away for the summer but when we got here the apartments were not ready to move into, so we have been staying at an extended stay.
Oh, the fun you can have in a tiny room with 3 kids all day.... wait...
Well, after looking into the apartments they had for us I found out that they accepted animals and from most of the reviews it sounded like there are a ton of animals there. Well I panicked a little because my oldest has animal allergies, especially to cats, and those allergies induce asthma attacks.
Bad ones.
I called the housing department at my hubby's work and they were so sweet and understanding and took it upon themselves to find us a new place on almost no notice! We get to move in on Saturday and I get to kiss this extended stay goodbye. Now that is exciting!
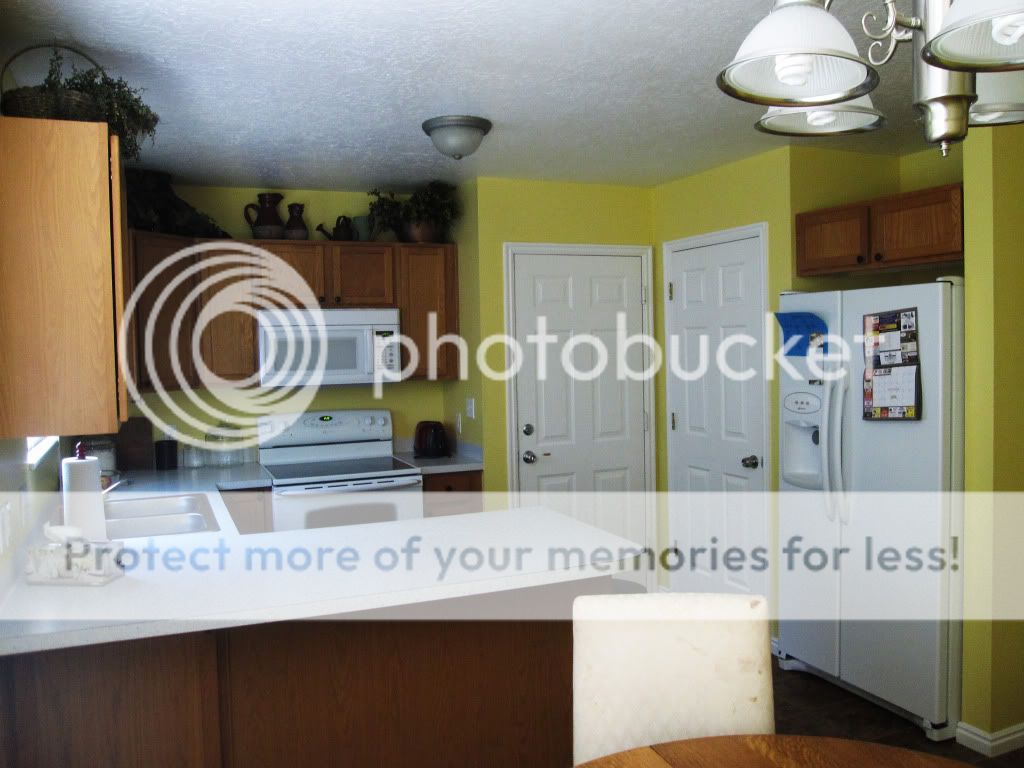
In my kitchen at The Starter Home I have an awkward empty space right next to the fridge. I have always wondered why they didn't just put more cabinets there...
Well I decided to build a mail storage/book shelf thing for that wall so increase my storage space and make use of all that empty space.
My husband built the bookcase using mdf, 2x2's, 1x2's and moulding.
Because the main part of this was made from MDF I knew I would have to paint it but I wasn't really sold on a color or even how it would look once it was all done. After scourging the internet I fell in love with zinc wrapped furniture. Zinc furniture is all over the place in super gorgeous/expensive designs right now. I mean just take a look at this piece from Restoration Hardware. I mean it is only a measly $795. Pocket change....right...?
I loved the idea of adding another layer to my kitchen. I had painted wood cabinets, stained wood furniture so I thought a metallic piece would be a great addition but the real questions was how in the world could I create it? I thought about just painting the wood with metallic paint but I was worried that it would look just like that.
Wood painted with metallic paint.
So I decided to get a little creative and pray to the crafting gods that it would all turn out how I wanted.
I used some tinfoil, a ton of mod podge, craft paint (I bought black, cream, gray and brown metallic craft paints) and a foam craft brush.
The very first thing I did was apply the tinfoil. I planned out where I wanted seams and started going for it.
Cut your tinfoil to fit the area you will cover and then use your craft brush to apply a thin layer of mod podge to the wood.
Smooth your tinfoil over the wood being careful to not wrinkle it too much.
Keep up this process until you have completely covered your item. When my hubby walked in at this point you could tell that he hated it but wasn't sure how I felt about it. He sat there quietly starring and not wanting to hurt my feelings.
I let him struggle for a minute before I told him I wasn't done. Big Huge Sigh of Relief!
Do you see that large container of mod podge! Seriously love that stuff.
Next I used small nails to create the look that the metal was wrapped around the furniture. I used pictures from Restoration Hardware to choose where to place them. Then I started the faux finishing.
I was going to use a glazing medium to create the the faux zinc look but then I decided to use the flat finish mod podge. Not only would it create a protective finish but since it drys clear it would work similar to a glaze.
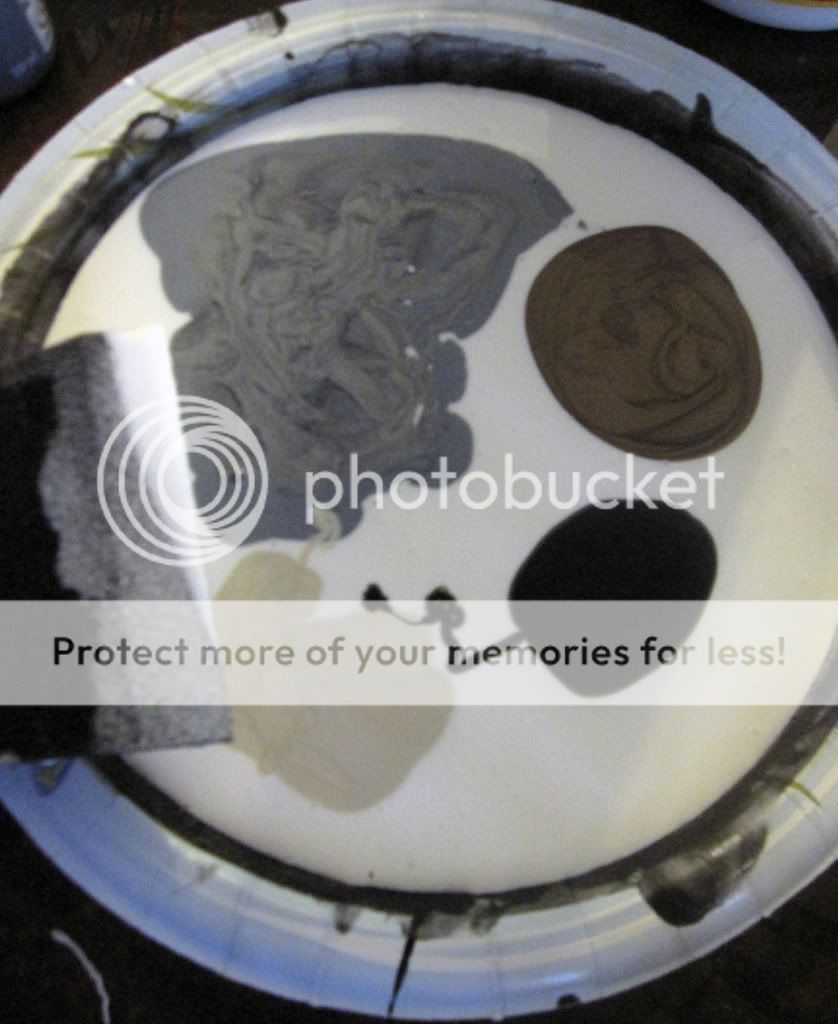
I poured a bunch of mod podge on a plate and added my colors.
I used mostly the grey metallic color and just added spots of the black, brown and cream. Next I mixed the colors until they were kind of swirly.
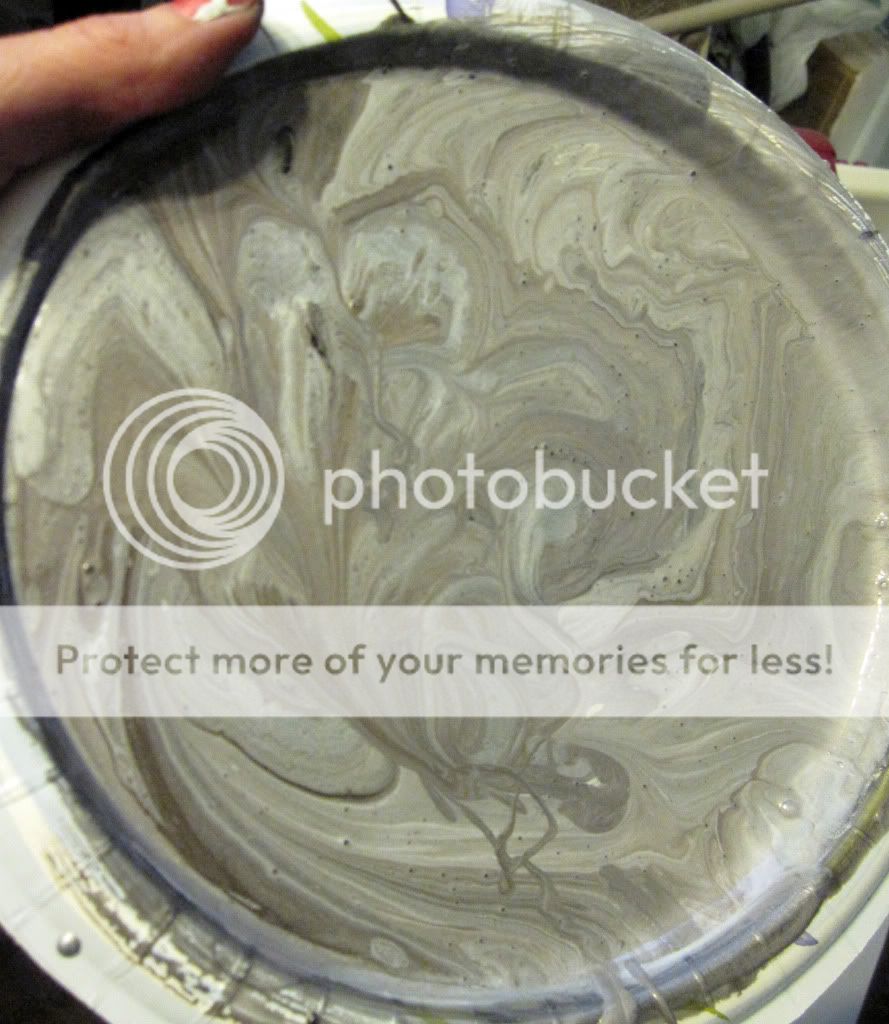
Like this.
You don't want to mix it too much because you want there to be variation in the color. I just painted on a layer letting the colors go where they wanted and not trying to be too perfect with it. This was while it was still wet.
Do you see how it is kind of streaky and varied? Let that layer dry and keep layering. I think I ended up with four coats of different mixtures.
This was the side after the first layer had dried. It still looked a little tinfoily.
Now the sides were a little plain so I added metal straps to them. I cut out strips of cardboard and, using mod podge, I covered them in tinfoil.
If you like my granite counters in the background of these photos you can learn how I created them with craft paint here.
I attached the strips to the sides of my bookcase with nails and used my mod podge/paint mix to faux finish them.
I let everything dry thoroughly and then topped it with two coats of satin finish poly-acrylic.
Oh, the fun you can have in a tiny room with 3 kids all day.... wait...
Well, after looking into the apartments they had for us I found out that they accepted animals and from most of the reviews it sounded like there are a ton of animals there. Well I panicked a little because my oldest has animal allergies, especially to cats, and those allergies induce asthma attacks.
Bad ones.
I called the housing department at my hubby's work and they were so sweet and understanding and took it upon themselves to find us a new place on almost no notice! We get to move in on Saturday and I get to kiss this extended stay goodbye. Now that is exciting!
In my kitchen at The Starter Home I have an awkward empty space right next to the fridge. I have always wondered why they didn't just put more cabinets there...
Well I decided to build a mail storage/book shelf thing for that wall so increase my storage space and make use of all that empty space.
My husband built the bookcase using mdf, 2x2's, 1x2's and moulding.
Because the main part of this was made from MDF I knew I would have to paint it but I wasn't really sold on a color or even how it would look once it was all done. After scourging the internet I fell in love with zinc wrapped furniture. Zinc furniture is all over the place in super gorgeous/expensive designs right now. I mean just take a look at this piece from Restoration Hardware. I mean it is only a measly $795. Pocket change....right...?
![]() | |
| www.restorationhardware.com |
I loved the idea of adding another layer to my kitchen. I had painted wood cabinets, stained wood furniture so I thought a metallic piece would be a great addition but the real questions was how in the world could I create it? I thought about just painting the wood with metallic paint but I was worried that it would look just like that.
Wood painted with metallic paint.
So I decided to get a little creative and pray to the crafting gods that it would all turn out how I wanted.
I used some tinfoil, a ton of mod podge, craft paint (I bought black, cream, gray and brown metallic craft paints) and a foam craft brush.
The very first thing I did was apply the tinfoil. I planned out where I wanted seams and started going for it.
Cut your tinfoil to fit the area you will cover and then use your craft brush to apply a thin layer of mod podge to the wood.
Smooth your tinfoil over the wood being careful to not wrinkle it too much.
Keep up this process until you have completely covered your item. When my hubby walked in at this point you could tell that he hated it but wasn't sure how I felt about it. He sat there quietly starring and not wanting to hurt my feelings.
I let him struggle for a minute before I told him I wasn't done. Big Huge Sigh of Relief!
Do you see that large container of mod podge! Seriously love that stuff.
Next I used small nails to create the look that the metal was wrapped around the furniture. I used pictures from Restoration Hardware to choose where to place them. Then I started the faux finishing.
I was going to use a glazing medium to create the the faux zinc look but then I decided to use the flat finish mod podge. Not only would it create a protective finish but since it drys clear it would work similar to a glaze.
I poured a bunch of mod podge on a plate and added my colors.
I used mostly the grey metallic color and just added spots of the black, brown and cream. Next I mixed the colors until they were kind of swirly.
Like this.
You don't want to mix it too much because you want there to be variation in the color. I just painted on a layer letting the colors go where they wanted and not trying to be too perfect with it. This was while it was still wet.
Do you see how it is kind of streaky and varied? Let that layer dry and keep layering. I think I ended up with four coats of different mixtures.
This was the side after the first layer had dried. It still looked a little tinfoily.
Now the sides were a little plain so I added metal straps to them. I cut out strips of cardboard and, using mod podge, I covered them in tinfoil.
If you like my granite counters in the background of these photos you can learn how I created them with craft paint here.
I attached the strips to the sides of my bookcase with nails and used my mod podge/paint mix to faux finish them.
I let everything dry thoroughly and then topped it with two coats of satin finish poly-acrylic.
Here is just one side. I decided not to finish the inside of it with the zinc finish so I will show you in the next post how I chose to finish the inside and I will also have the final after pictures!
Thanks to all you who come, read and share your thoughts on the happenings at The Starter Home and hopefully the next time I am posting it will be from an apartment and not a hotel :)
Tuesday, April 19, 2011
Handmade Kitchen Furniture: An Ode to Anna White
For those of you that don't know who Ana White is, it's okay because I am going to introduce you.
Meet Ana White.
She is beautiful, a wife, a mama, an Alaskan and can build like no ones business.
Not only can she build but she shares all of her plans FOR FREE on her fantastic site that you can find here.
We used three of her plans to make our furniture for our "new kitchen" on the cheapo.
Let's review the extent of my kitchen furniture before.
Yep...that's it in all its glory.
Now this photo does not do justice to the table. My great-grandmother received this as her wedding gift. It was passed down to my grandma and then to my momma. It is a beautiful table but it did not fit the space well not to mention I cringed every time a toy was banged into it. The chairs were hand-me-downs from my mom and then we used folding chairs for the kiddos.
That is how my kitchen looked for the last 4 1/2 years because furniture is expensive!
Our first project was her very popular farmhouse table.
We printed the plans and shortened the measurements for the length of the table and got to work.
We (and by we I mean my hubby) cut all the wood and assembled the table according to Ana's instructions. After the hubster got it all put together I filled the screw holes and sanded it smooth with my new sander. We then brought it inside because it was still too stinkin' cold outside to stain it.
Now here is where the real process started. At first I thought I wanted a lighter "driftwood" look for the table. I used wood conditioner and a water based stain from minwax.
I topped it with minwax finishing paste.
I liked that the wax filled in the little cracks in-between the boards. I let it dry and it sat like that for a day or two. I kept trying to convince myself that I liked the table but I didn't. I don't have a picture of what it looked like but you can see a small corner of it here.
Also, the wax cracked where it had been pushed into the seams between the wood and I knew that I would have take a toothpick after every meal to clean out those little crevices.
So I started over. I sanded it down and scraped the wax out of the seams. I was trying to decide what to use in the seams to keep all those pesky crumbs out and decided to try some wood glue (I still am not sure why I though this was a good idea).
Anyway.
The glue did not work. Surprise. Surprise. So after it was dried I had to scrap all of it out and after talking to some other wood enthusiast and my mama I decided to try would filler. I bought minwax wood putty that was stained to match the stain I would use.
I got all the seams filled and waited for it to dry... and waited, and waited. I finally read the instructions and realized that wood putty does not dry. EVER.
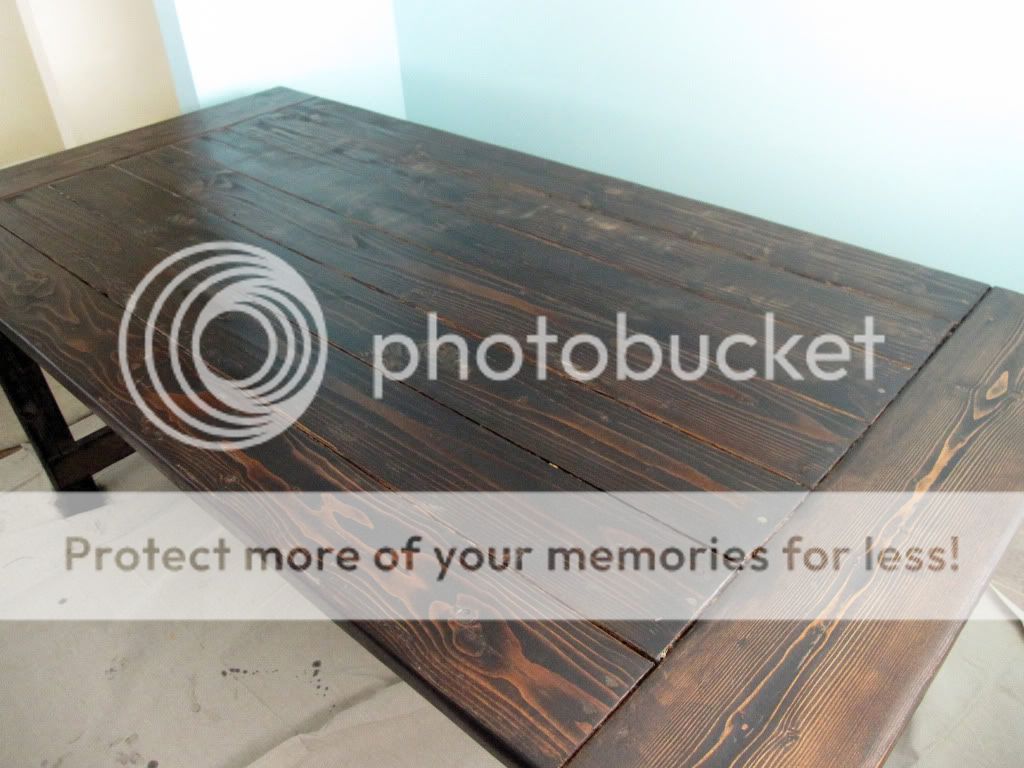
So I scraped that out and bought some wood filler. I filled the seams and let it dry. I then sanded it smooth. I stained the table using a pretty dark stain called Jacobean. I used two coats and then sealed it with 2 coats of satin finish polyurethane.
I needed the tabletop to withstand my kids.
And here she is after the first coat of stain.
And here she is all done.
I love the way the dark stain pops against our blue walls. Our total cost on this table was around $175. I love the table and in increases the room we have for our family. I can actually fit all the food and plates on the table! Plus it would easily accommodate one more kiddo if we so decide.
The chairs for the table were not made by us but I found them through a local classified website. They were brand new and I paid $60 for all of them. I know I could have found cheaper used ones if I had been patient but I wasn't.
They started out with a cherry wood frame and a white damask fabric. I primed and painted them with a white gloss spray paint.
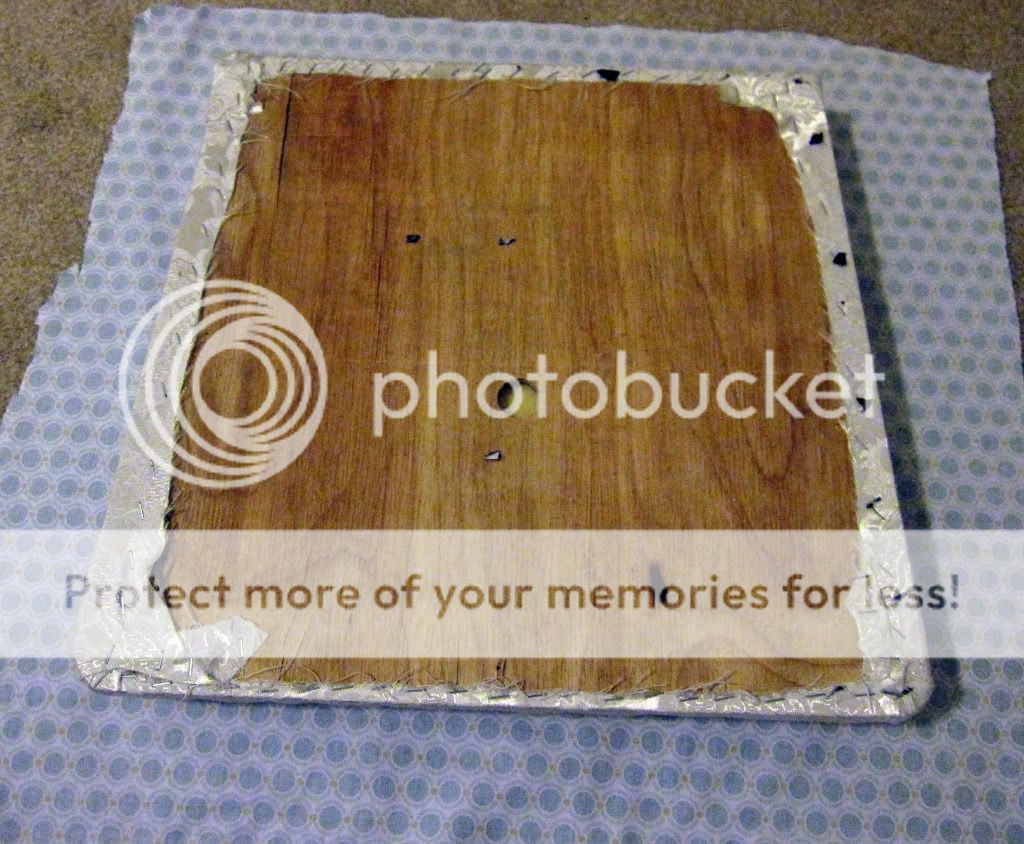
I removed the seats and cut Joel Dewberry's Acorn Chain in Pond fabric into large squares and stapled it right over the existing fabric.
I then added the seats back onto my chairs. I am so happy with them! I thought about adding plastic over the top but it was just too cheap/restaurant looking. I decided to scotch guard them and I kept enough fabric in case I need to redo one of the seats.
Total cost for my brand new chairs was around $80.
Next we tackled the matching farmhouse bench. We also shortened the length to match the table and my husband did the cutting and building and I filled holes, sanded and stained it to match the table.
Because we already had the screws, stain and polyurethane we only had to pay for the wood. I think the total cost came to $15 for the bench. This is where the kids sit and it is a little more hardy then the chairs.
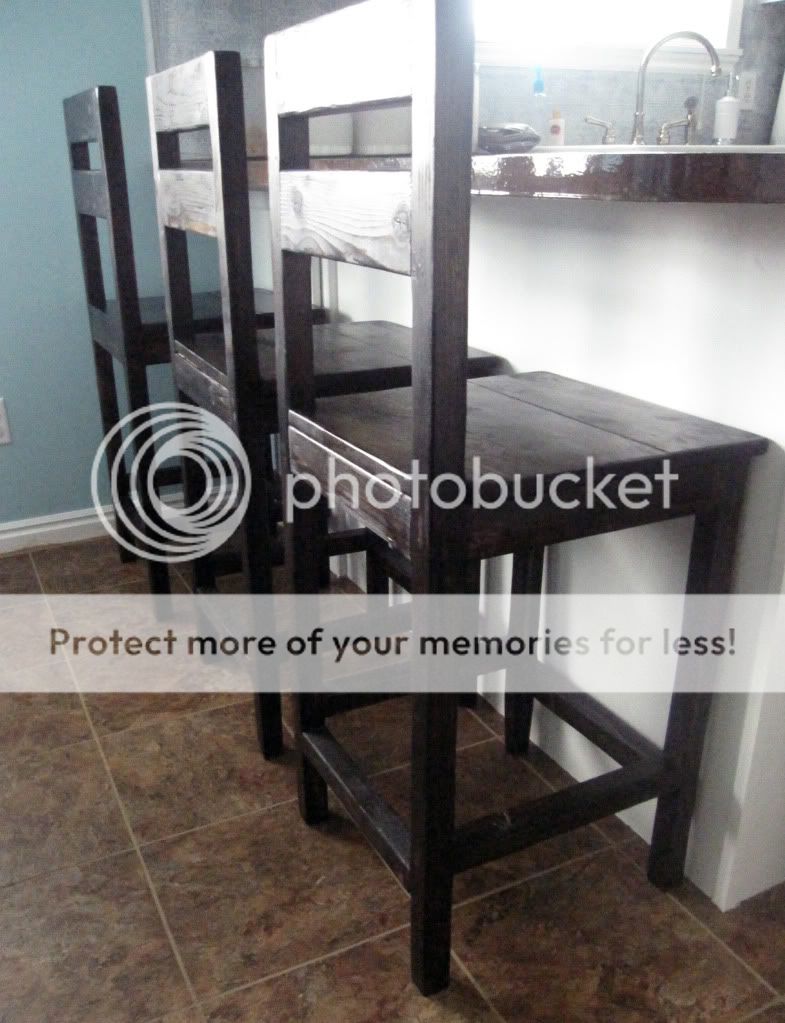
Our last build from Ana's site were bar stools.
The bar stools were for an extra tall bar but I loved that they had backs. We shortened the legs and used 2 2x4's on the back instead of the 2x3's and used 2x6's for the seat. Ana's plans are so versatile and it really is easy to customize the plans to fit your space and needs.
I used the same stain on the bar stools.
I think we spent around $30 total for all 3 stools.This was our first time having bar stools and I love having them! The kids eat breakfast and lunch up there and it keeps me from having to wipe both the counter and table down after every meal.
So we were out around $300 for all our kitchen furniture! Thinking that this table goes for $2600 at Restoration Hardware I think we ended up pretty well.
Yeah, we're cheap like that.
So do you guys have any new ideas for kitchen furniture you are going to build? Visit her site and you will find at least a dozen plans that you will want to add to your to-do list for every room in your house.
I know my list is very, very long.
Go check it out and get building!
Meet Ana White.
![]() |
| www.ana-white.com |
She is beautiful, a wife, a mama, an Alaskan and can build like no ones business.
Not only can she build but she shares all of her plans FOR FREE on her fantastic site that you can find here.
We used three of her plans to make our furniture for our "new kitchen" on the cheapo.
Let's review the extent of my kitchen furniture before.
Yep...that's it in all its glory.
Now this photo does not do justice to the table. My great-grandmother received this as her wedding gift. It was passed down to my grandma and then to my momma. It is a beautiful table but it did not fit the space well not to mention I cringed every time a toy was banged into it. The chairs were hand-me-downs from my mom and then we used folding chairs for the kiddos.
That is how my kitchen looked for the last 4 1/2 years because furniture is expensive!
Our first project was her very popular farmhouse table.
We printed the plans and shortened the measurements for the length of the table and got to work.
We (and by we I mean my hubby) cut all the wood and assembled the table according to Ana's instructions. After the hubster got it all put together I filled the screw holes and sanded it smooth with my new sander. We then brought it inside because it was still too stinkin' cold outside to stain it.
Now here is where the real process started. At first I thought I wanted a lighter "driftwood" look for the table. I used wood conditioner and a water based stain from minwax.
I topped it with minwax finishing paste.
![]() |
| www.homedepot.com |
Also, the wax cracked where it had been pushed into the seams between the wood and I knew that I would have take a toothpick after every meal to clean out those little crevices.
So I started over. I sanded it down and scraped the wax out of the seams. I was trying to decide what to use in the seams to keep all those pesky crumbs out and decided to try some wood glue (I still am not sure why I though this was a good idea).
Anyway.
The glue did not work. Surprise. Surprise. So after it was dried I had to scrap all of it out and after talking to some other wood enthusiast and my mama I decided to try would filler. I bought minwax wood putty that was stained to match the stain I would use.
![]() |
| www.homedepot.com |
So I scraped that out and bought some wood filler. I filled the seams and let it dry. I then sanded it smooth. I stained the table using a pretty dark stain called Jacobean. I used two coats and then sealed it with 2 coats of satin finish polyurethane.
I needed the tabletop to withstand my kids.
![]() | ||
| www.homedepot.com |
And here she is all done.
I love the way the dark stain pops against our blue walls. Our total cost on this table was around $175. I love the table and in increases the room we have for our family. I can actually fit all the food and plates on the table! Plus it would easily accommodate one more kiddo if we so decide.
The chairs for the table were not made by us but I found them through a local classified website. They were brand new and I paid $60 for all of them. I know I could have found cheaper used ones if I had been patient but I wasn't.
They started out with a cherry wood frame and a white damask fabric. I primed and painted them with a white gloss spray paint.
I removed the seats and cut Joel Dewberry's Acorn Chain in Pond fabric into large squares and stapled it right over the existing fabric.
I then added the seats back onto my chairs. I am so happy with them! I thought about adding plastic over the top but it was just too cheap/restaurant looking. I decided to scotch guard them and I kept enough fabric in case I need to redo one of the seats.
Total cost for my brand new chairs was around $80.
Next we tackled the matching farmhouse bench. We also shortened the length to match the table and my husband did the cutting and building and I filled holes, sanded and stained it to match the table.
Because we already had the screws, stain and polyurethane we only had to pay for the wood. I think the total cost came to $15 for the bench. This is where the kids sit and it is a little more hardy then the chairs.
Our last build from Ana's site were bar stools.
The bar stools were for an extra tall bar but I loved that they had backs. We shortened the legs and used 2 2x4's on the back instead of the 2x3's and used 2x6's for the seat. Ana's plans are so versatile and it really is easy to customize the plans to fit your space and needs.
I used the same stain on the bar stools.
I think we spent around $30 total for all 3 stools.This was our first time having bar stools and I love having them! The kids eat breakfast and lunch up there and it keeps me from having to wipe both the counter and table down after every meal.
So we were out around $300 for all our kitchen furniture! Thinking that this table goes for $2600 at Restoration Hardware I think we ended up pretty well.
![]() | |||
| www.restorationhardware.com |
So do you guys have any new ideas for kitchen furniture you are going to build? Visit her site and you will find at least a dozen plans that you will want to add to your to-do list for every room in your house.
I know my list is very, very long.
Go check it out and get building!
Labels:
Before and After,
Building,
Furniture,
Kitchen,
Money Saving Tips,
My Home
Subscribe to:
Posts (Atom)