Showing posts with label Faux. Show all posts

Thursday, April 21, 2011

My Zinc Bookcase: A Faux Finishing Tutorial Part 1

Best Blogger Tips
We have had quite an adventure up here. My husbands company finds us housing to live in while we are away for the summer but when we got here the apartments were not ready to move into, so we have been staying at an extended stay.

Oh, the fun you can have in a tiny room with 3 kids all day.... wait...

Well, after looking into the apartments they had for us I found out that they accepted animals and from most of the reviews it sounded like there are a ton of animals there. Well I panicked a little because my oldest has animal allergies, especially to cats, and those allergies induce asthma attacks.

Bad ones. 

I called the housing department at my hubby's work and they were so sweet and understanding and took it upon themselves to find us a new place on almost no notice! We get to move in on Saturday and I get to kiss this extended stay goodbye. Now that is exciting!

In my kitchen at The Starter Home I have an awkward empty space right next to the fridge. I have always wondered why they didn't just put more cabinets there...

Well I decided to build a mail storage/book shelf thing for that wall so increase my storage space and make use of all that empty space.

My husband built the bookcase using mdf, 2x2's, 1x2's and moulding.
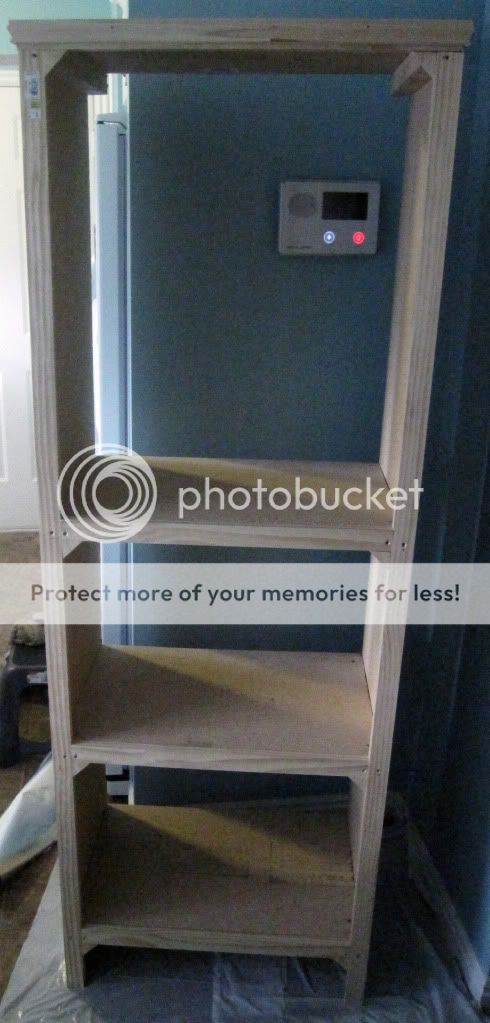

Because the main part of this was made from MDF I knew I would have to paint it but I wasn't really sold on a color or even how it would look once it was all done. After scourging the internet I fell in love with zinc wrapped furniture. Zinc furniture is all over the place in super gorgeous/expensive designs right now. I mean just take a look at this piece from Restoration Hardware. I mean it is only a measly $795. Pocket change....right...?
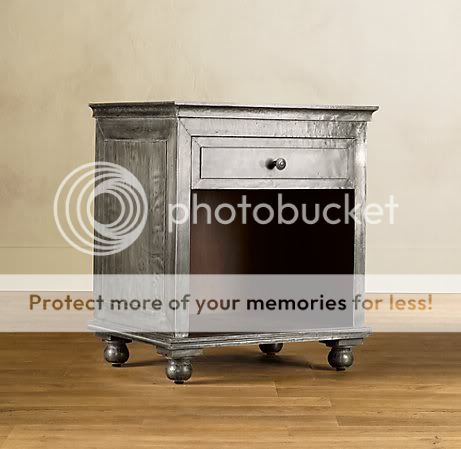
www.restorationhardware.com

I loved the idea of adding another layer to my kitchen. I had painted wood cabinets, stained wood furniture so I thought a metallic piece would be a great addition but the real questions was how in the world could I create it? I thought about just painting the wood with metallic paint but I was worried that it would look just like that.

Wood painted with metallic paint.

So I decided to get a little creative and pray to the crafting gods that it would all turn out how I wanted.

I used some tinfoil, a ton of mod podge, craft paint (I bought black, cream, gray and brown metallic craft paints) and a foam craft brush.

The very first thing I did was apply the tinfoil. I planned out where I wanted seams and started going for it.

Cut your tinfoil to fit the area you will cover and then use your craft brush to apply a thin layer of mod podge to the wood.

Smooth your tinfoil over the wood being careful to not wrinkle it too much.

Keep up this process until you have completely covered your item. When my hubby walked in at this point you could tell that he hated it but wasn't sure how I felt about it.  He sat there quietly starring and not wanting to hurt my feelings.

I let him struggle for a minute before I told him I wasn't done. Big Huge Sigh of Relief!

Do you see that large container of mod podge! Seriously love that stuff.

Next I used small nails to create the look that the metal was wrapped around the furniture. I used pictures from Restoration Hardware to choose where to place them. Then I started the faux finishing.

I was going to use a glazing medium to create the the faux zinc look but then I decided to use the flat finish mod podge. Not only would it create a protective finish but since it drys clear it would work similar to a glaze.

I poured a bunch of mod podge on a plate and added my colors.
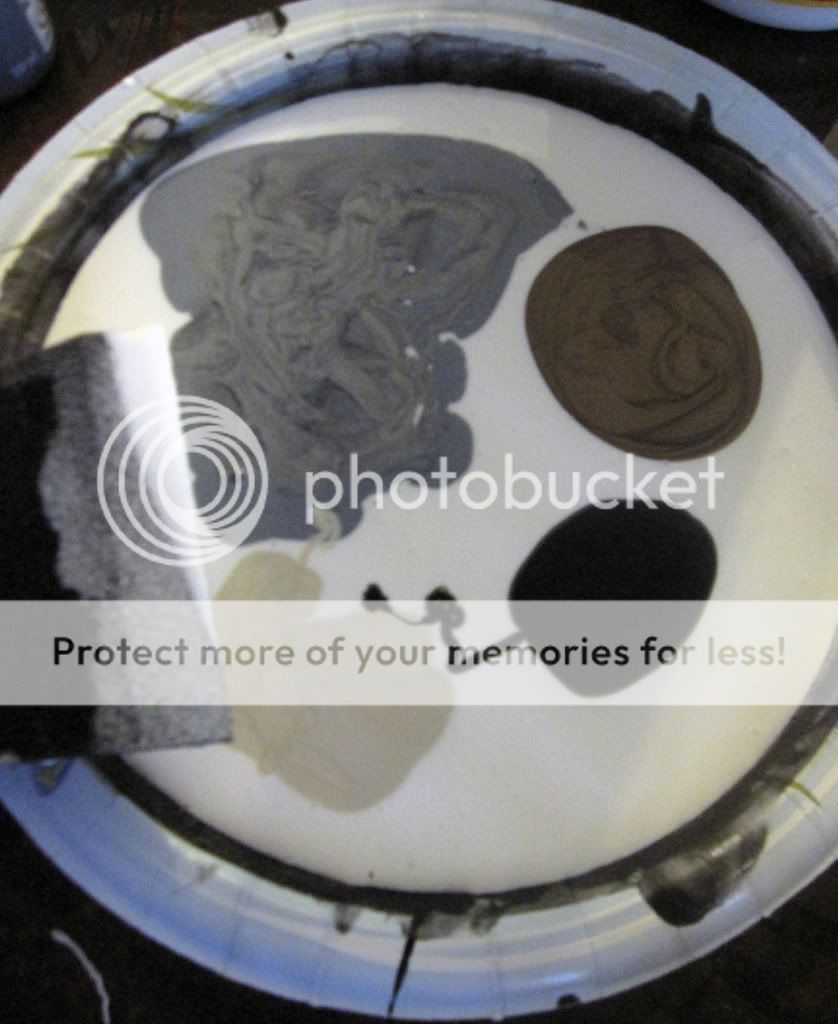
I used mostly the grey metallic color and just added spots of the black, brown and cream. Next I mixed the colors until they were kind of swirly.

Like this.
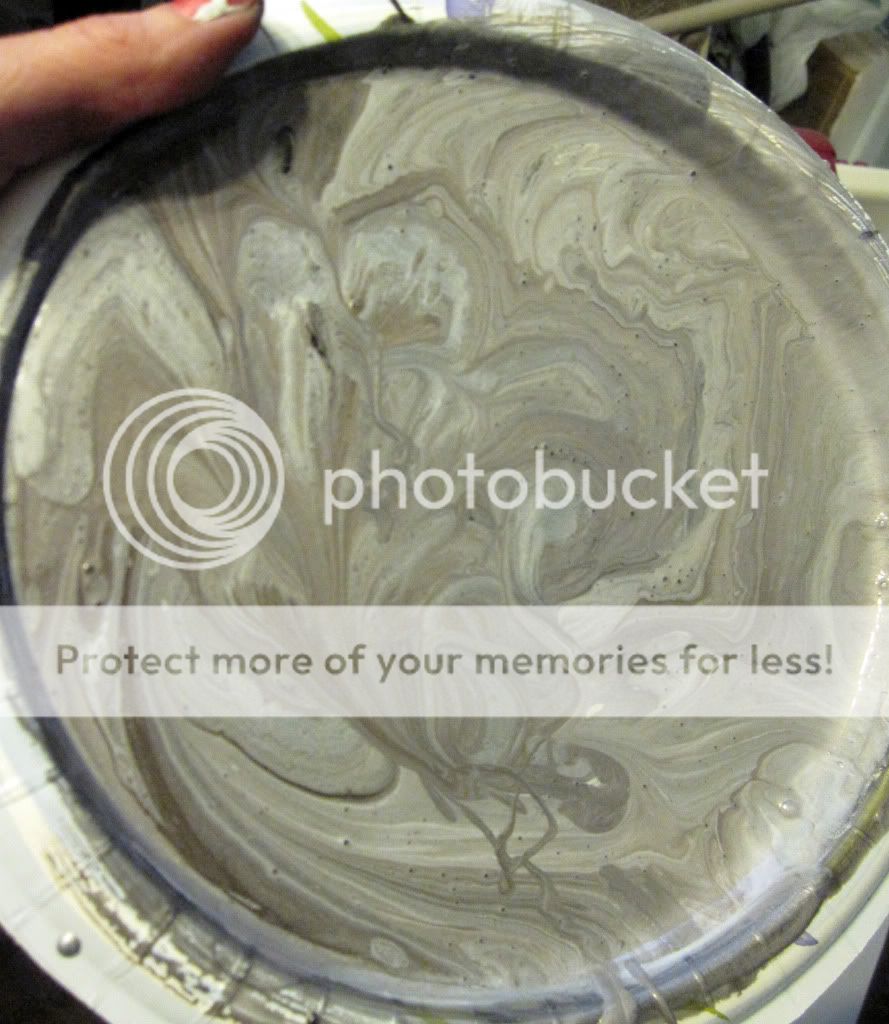
You don't want to mix it too much because you want there to be variation in the color. I just painted on a layer letting the colors go where they wanted and not trying to be too perfect with it. This was while it was still wet.

Do you see how it is kind of streaky and varied? Let that layer dry and keep layering. I think I ended up with four coats of different mixtures.

This was the side after the first layer had dried. It still looked a little tinfoily.

Now the sides were a little plain so I added metal straps to them. I cut out strips of cardboard and, using mod podge, I covered them in tinfoil.
If you like my granite counters in the background of these photos you can learn how I created them with craft paint here.

I attached the strips to the sides of my bookcase with nails and used my mod podge/paint mix to faux finish them.


I let everything dry thoroughly and then topped it with two coats of satin finish poly-acrylic.

Here is just one side. I decided not to finish the inside of it with the zinc finish so I will show you in the next post how I chose to finish the inside and I will also have the final after pictures!

Thanks to all you who come, read and share your thoughts on the happenings at The Starter Home and hopefully the next time I am posting it will be from an apartment and not a hotel :)

Tuesday, March 15, 2011

Kitchen Shelves, Milk Glass and a Vintage Grocery Sign Tutorial

Best Blogger Tips
I only have 3 more smallish sized projects to go and my kitchen will be officially finished, for now.

We tackled the last big one yesterday which was lighting. I have new recessed and pendant lighting. I can't wait to show you guys. I really am so lucky that my hubby has some serious handyman skills. My kitchen was an absolute mess though. Insulation and dust EVERYWHERE. I am still finding it.

My small starter home has 4 bedrooms. Not big bedrooms mind you but bedrooms all the same. There is our master, of course, and then 3 "kid" rooms. Each of these rooms can hold one child and could easily hold two. So theoretically my kitchen should be able to fit 5-8 people.

HA!

I remember when we first moved in, the space seemed so large. How would we ever fill it?

Well it isn't that hard to fill up empty space. What is difficult is using space efficiently to fit everything.

Especially in a starter home.

While scanning the web for inspiration on storage solutions that took zero to no floor space I found some awesome pictures.

Thus the idea for shelves was born.
www.kitchenbacksplashes.blogspot.com

www.kitchenbacksplashes.blogspot.com

I also fell in the love with the stacks of white dishes. I wanted to use the shelves to store my white serving/cooking dishes but I knew I wouldn't have enough to fill the shelves just yet. So I went to my local thrift store and searched for white. Well there wasn't that much and I only found 3 white pieces. I was NOT patient enough to keep coming back and searching so I just bought any piece I liked and knew I could bust out the trusty dusty spray paint.

I ended up doing about 4 coats to get the coverage I needed.


We purchased the shelving and brackets at Home Depot. We screwed the brackets into the studs and cut the shelving down to size. The shelves look great but the sides were not finished.


We bought veneer edging at Home Depot.
www.homedepot.com

 Hold the edging up and cut it about 1/2 inch- 1 inch longer than you need.

Iron it on.


Use a utility knife to cut off any excess.


I was also inspired by this grocery sign. This is actually a real-life vintage grocery sign. Awesome antiques are few and far between in my neighborhood.
www.countryliving.com

So I decided to make my own. I had some left over MDF from a bookcase my hubby built. I primed it with a few coats of white paint. I then printed and cut out the letters for my sign. I used the font Franklin Gothic Medium in case you want one, too. I used my sewing ruler to give me a straight edge.

I traced the letters and I filled them in with paint.


I then used my orbital sander to age it up a bit. I also used a little bit of light stain around the edges and on a few random spots. I wiped on the stain and then immediately wiped it off. I did this until it built up to the color I wanted.


Here she is all vintage and what not.

And here are my beautiful shelves. I just Love them. All the things on the top shelf are thrift store finds that were either white to start with or spray painted. The bottom shelf is devoted to my actual cooking and serving wear. So it is a little empty right now. It will cost a little more than my $1 thrift store finds to fill it.

I am really happy with it.

What about you guys? Have you found some awesome creative ways to increase storage in your own starter home?

Friday, March 4, 2011

I Painted My Counters! Yep, That's Right...

Best Blogger Tips
While thinking about my kitchen redo this summer the one thing that kept bugging me was my counters. I knew my floor had been replaced, I could paint the walls, paint the cabinets, update the cabinet hardware but what could I do with those dang ugly dated counters.

I looked into laminate, granite, but everything was out of my super cheapo budget.


I did a ton of research and finally found out that I could paint those ugly dated counters to look like granite.

Paint them to look like granite? Are you serious?

Now that I can afford.

My hubby and I had to start the process after the kids were in bed. It is just impossible to keep them completely out of anything so we were up pretty late, seriously really late. So, I can't lie, I got very few pictures of the process.

I went to my local Home Depot and looked at granite. I also picked up some free samples to bring home and compared it to my "tile." Once I picked the sample that I liked, I took it to the craft store and matched acrylic craft paint to it. I picked a really dark brown, a dark brown, a dark tan and white.


My husband removed the sink and moved the oven. I scraped the counters to remove any excess gunk and wiped them down with 409 to remove any grease. I also used hot soap and water to wash them off.We taped off the counters and wrapped them with plastic drop cloth to protect the cabinets and floor.

We primed them with the same primer I used on the cabinets, Sherwin Williams Adhesion Primer.
We let that dry thoroughly.

So the next few steps I completely forgot to take pictures. First we coated the counter with a layer of black latex and let it dry. All granite's base is black even if the overall effect is brown or white.

Next I started to faux finish the counter. I used a natural sea sponge to sponge on the color. I started with my main dark brown color. I used the really dark brown color to create some accent veins. Make sure you turn your sponge and maybe use more then one to create different patterns on your counter.

I used the dark tan to create more accents. I also used the white to create even more accents. It was around one AM at this point when I ran out of paint so the hubby ran to Walmart and picked up some more. (Thank goodness it is open 24/7). When he got back I sponged the white on and then I went back with the dark brown to soften it.  This was the end result. Sadly the camera does not show how good it really looks. You don't need to let each layer dry in between colors but you do need to let it dry completely before going onto the next step.

Next cam the scary part. We used a product called envirotex lite. This product creates a hard super shiny surface. You can buy it at Hobby Lobby and I would recommend using a 40% coupon to help make it even cheaper.
The kit comes with two seperate bottles, one is a resin and the other is a hardener. You mix them in equal parts in a straight sided bucket. You really have to mix it well, the instructions say at least 2 minutes. We mixed it for one in minute in one bucket and then poured it into a second bucket and mixed for another minute. Make sure you scrape the sides and bottom well. If this product is not mixed correctly you will get spots that will not harden.

Then you get to the really scary part.

You have to pour it on the counter and after you do that, there is no turning back.

Before you start make sure you kill any and all flies in your house! My hubby and I joked about how funny it would be to wake up to find a fly stuck in our counter. Well it happened. Not funny. We had to sand that sucker off.

Gross.

My hubby poured the epoxy on the counter and used a rubber squeegee to evenly spread it over the surface. This product is a self leveler but you do need to pour enough onto your counter to allow it to level correctly.

The instructions said to use a propane torch to help bring the bubbles to the surface to pop. Well we decided to just use lighters. Not. A. Good. Idea. This began my hubbies second trip to Walmart but it was now 2 AM. The people there were wondering what in the world he was up to and why he needed craft paint and a propane torch in the middle of the night. 

Using the torch was so much easier and I would highly recommend it. You will want to buy some sponge brushes to wipe the drips of the edge and to keep re-applying it to the edges of your counters.

Look how shiny it is. LOVE IT.

I have now had the counters finished for about 4 months and I really, really like them. They have held up really well and I think they make my kitchen look updated and fantastic. I have been cleaning them with glass cleaner to help keep up the shine.


So I am giving you a pretty big peak as to what my kitchen is looking like now. You still don't get to see everything but I wanted you to appreciate the counters in all their glory.

Thursday, February 24, 2011

Faux Roman Shade Tutorial

Best Blogger Tips
I think I may have a child with sticky fingers... Well of course I have children with sticky fingers.

What I really mean to say is I have a thief in my midst.

So far, in the last week, Mr. U (my 2-year-old) has successfully snitched and hidden my camera charger, 3 bottles of cooking wine, a drawer from my bathroom organizer that includes all my hair ties and bobby pins and a partridge in a pear tree. Okay... I am joking about the last one.

The only reason it isn't missing is because we don't own one.

The best part is I can't find ANY OF IT! How does that much stuff go missing without a trail or even a hint of it's location? He is so sneaky, busy and currently loves destroying my house.

I am holding out on buying a new charger too because I know as soon as I get it in the mail Mr. U will come meandering out with the charger in hand.   Sneaky I tell you...


Well enough about my current drama and on to the tutorial...

Remember when I told you about how I picked out my colors for my kitchen?   Well I had yards of some gorgeous fabric from Joel Dewberry and I wanted to do some kind window treatment with it. I settled on a Faux Roman Shade.

Well the day I decided to get everything done I realized I had no black-out fabric but I did have yards of navy cotton fabric.

First I measure my window. I wanted my valance to fit inside my window so I measured inside the casing but if you would like yours outside you need to measure the outside. I also measured the height of my window.

You will need to take your width and add 1 inch. So if your window is 60 inches wide you would end up with a measurement of 61 inches. 

My windows were only about 50 inches tall so I just used the 45" width of my fabric for the length and cut it to 61" wide.


I cut a piece of my patterned fabric and a piece of my navy. I sewed the right sides together only sewing up the sides and the bottom (leave the top open).

I clipped the corners and turned it right side out.

I pressed all the edges well and top stitched the sides and bottom.

I created a pocket for my tension rod by folding the top 1/4" over and pressing it with an iron. I then folded it 1" over and pressed again. I stitched the hem to create a pocket.

I then laid the fabric out and created pleats. I used a measuring tape to keep them as even as possible. I pinned them in place.

Now you can just sew each of your pleats in place... or you can do what I did. I really didn't want stitches on the top pleat for everyone to see. I sewed the bottom pleats in place with a straight stitch.

I ran a small stitch about 1/4" long over the top stitching to secure the edge of the pleat in place.


I flipped the top over to see the back fold of the top pleat. I then ran a straight stitch across it.

I then laid the the valance down flat and whip stitched the top of the back pleat to the back piece of fabric. Every once and awhile I would do through the front piece to help secure it.

Well I hung it in the window and it looked like this. I was about ready to scream. I wanted it to look perfect in the window and...well...it looked like this. Not at all what I had hoped.

So to fix the nice gaps on each side I cut 4 strips of fabric about 4" wide. I sewed them right sides together on the two long sides and one short side. I turned them inside out and pressed them well. I then top stitched around the long sides and one short side.


I then hot glued, yes you heard me. I hot glued them on. I started at the bottom and worked my way up and just glued as I went. You can't tell and no one would know. Well... except me and now all of you.

Ahh... much better.

I really am so pleased with how they turned out.

The hubster has been working on my new dining room table. Ah, how nice it is to have a handy-man-hubby. I am so excited to show it to you guys. I should be staining it tomorrow.

Wednesday, February 16, 2011

Faux Antique Tin Backsplash

Best Blogger Tips
What a week I've had. I was in the middle of sewing a darling pettiskirt for my Ms V (taking pictures for ya'll to see) when my camera died. No problem I'll just charge her up, good as new, right?

Wrong.

I went up to my room and there was the camera case sitting on the floor, open, charger missing. Pretty sure it was Mr U my 2 year old. He is so mischievous.

Anywho, I finished some cute clothes this last week for the kiddos and hopefully I will get some tutorials up soon. The weather here has been beautiful the last few days and I have wanted to get some outdoor projects done but I want to take pictures.

So, wish me luck in my search. So far it hasn't been in any of his usual hiding places.

Maybe I can talk the hubby into just buying me an SLR camera instead :)

Anyway, onto the tutorial.

I was really inspired by beautiful antique tin.


But I could not afford the real stuff. So I went to my fallback, faux finish it.

First I peeled off the real cheap laminate backsplash.

I sanded the wall smooth and then I used a utility knife to scrape off all the silicone and gunk off the counter.

 I primed the wall to prepare it for my tin...wallpaper.

I am sure you all have heard of paintable embossed wallpaper.  I got mine at Home Depot for I think around $20-$25. I cut the wallpaper down to the rough dimensions I needed and because it was pre-pasted I just rolled it in water, booked it (you fold sticky sides together and roll it up) and let it sit. I then hung it on the wall and used a squeegee to smooth it out. I also used a utility knife to make more exact cuts. 

I then painted the wall with a gray oops paint and let it dry

 
I then painted white over the top and wiped it off until I liked what I saw.

I finished up with two coats of polycrylic to seal everything up tight. I used polycrylic because it is water based and it doesn't yellow like polyurethane. 

I am still trying to decide what to do with the outlet covers. Ideas? I am just not sure what would look best.

Seriously, wish me luck on my search...
Related Posts Plugin for WordPress, Blogger...