Thursday, February 24, 2011

DIY Carseat Cover Tutorial

Best Blogger Tips
So, still no luck in my charger search. I am in deep clean mode on my house today so hopefully I will get lucky!

I love the idea of a carseat canopy. I remember with my boys I would try to slip a blanket over the carseat but it would constantly slip off. Whoever it was that decided to put straps on a blanket You. Are. A. Genius! and why didn't I think of that earlier?

This cover will keep the hot sun and cold wind away from your precious bundle. Not to mention those pesky germ covered hands.


I decided to give this a try for one of my Hubby's cousins. She is having a little boy and I thought this might make a great shower gift.

You will need the following:

1 yard for the top fabric
1 yard for the bottom fabric
an extra 1/8 yard for your straps
Velcro (make sure it does not have an adhesive back)
thread
scissors
embellishments

Step 1: Cut out four 8 inch by 3 1/2 inch strips of fabric for your straps.


Step 2: On the right side of the fabric mark 3/4 of an inch from the top and side (I just used pins.)

Step 3: Cut your Velcro to 2 inches by 1 1/2 inches. Pin your Velcro in place on the right side of the fabric. You will need to pin two straps with the soft side of the Velcro and two straps with the rough side. I used white super soft Velcro in size small so two of my pieces put together made the 2 inch by 1 1/2 inch size.

Step 4: Sew in place. I made a box around the Velcro and than also sewed an x through the middle. I went around the sides twice to make sure it was held tight. Sew close to the edge of your Velcro so it doesn't pull up.


Step 5: Pin right sides of the fabric together so you the Velcro is opposite each other (i.e. the soft Velcro on top of one piece and the rough on the bottom of the other.) Sew together using a 1/2 inch seam. Make sure you don't sew around the entire thing, you need to leave a space to turn it right side out.


Step 6: Clip the corners and turn your straps right side out. Use a crochet hook, knitting needle or anything long and pointy to push the corners out. Press with an iron.


Step 7: If you have done everything right you should be able to Velcro your strap into a circle like so.

Step 8: Use a finishing stitch (just a small stitch really close to the edge) to finish your straps and close the gaps.

Step 9: Pin the right sides of your two large pieces of fabric to together and join with a 1/2 inch hem. I put rounded corners on mine. An easy way to do this is to mark the fabric 4-6 inches from each corner and use them as guides while you slowly turn your fabric. Make sure you leave a gap so you can turn your fabric right side out. Once you have finished turn it right side out and press with an iron. Use a finishing stitch to finish it off and close the gap.
Step 10: Pin your straps so their centers are 18 inches from the top and 13 inches from the outsides of your finished canopy. This fit my car seat perfectly but you might want to pin yours and then try in on your car seat. If this is a gift I think these measurements should work fine for most car seats.

Mark your straps with a box that is in the center, about 2 3/4 inches from each short edge.


Step 11: You will want to sew another box and x like you did with the Velcro. The top and bottom of your box should line up with the marks you made and the sides will line up with your finishing stitch on your strap. It should look like this when you are done.

Step 12: Add you embellishments. Because this was for a boy I just went with coordinating button but you could add bows, fabric flowers etc to the top of your straps. I threaded the button first and then glued it on using craft glue.
Here is the finished product laid out.Here it is on a car seat.


It seriously is so easy and a great beginner project.

Faux Roman Shade Tutorial

Best Blogger Tips
I think I may have a child with sticky fingers... Well of course I have children with sticky fingers.

What I really mean to say is I have a thief in my midst.

So far, in the last week, Mr. U (my 2-year-old) has successfully snitched and hidden my camera charger, 3 bottles of cooking wine, a drawer from my bathroom organizer that includes all my hair ties and bobby pins and a partridge in a pear tree. Okay... I am joking about the last one.

The only reason it isn't missing is because we don't own one.

The best part is I can't find ANY OF IT! How does that much stuff go missing without a trail or even a hint of it's location? He is so sneaky, busy and currently loves destroying my house.

I am holding out on buying a new charger too because I know as soon as I get it in the mail Mr. U will come meandering out with the charger in hand.   Sneaky I tell you...


Well enough about my current drama and on to the tutorial...

Remember when I told you about how I picked out my colors for my kitchen?   Well I had yards of some gorgeous fabric from Joel Dewberry and I wanted to do some kind window treatment with it. I settled on a Faux Roman Shade.

Well the day I decided to get everything done I realized I had no black-out fabric but I did have yards of navy cotton fabric.

First I measure my window. I wanted my valance to fit inside my window so I measured inside the casing but if you would like yours outside you need to measure the outside. I also measured the height of my window.

You will need to take your width and add 1 inch. So if your window is 60 inches wide you would end up with a measurement of 61 inches. 

My windows were only about 50 inches tall so I just used the 45" width of my fabric for the length and cut it to 61" wide.


I cut a piece of my patterned fabric and a piece of my navy. I sewed the right sides together only sewing up the sides and the bottom (leave the top open).

I clipped the corners and turned it right side out.

I pressed all the edges well and top stitched the sides and bottom.

I created a pocket for my tension rod by folding the top 1/4" over and pressing it with an iron. I then folded it 1" over and pressed again. I stitched the hem to create a pocket.

I then laid the fabric out and created pleats. I used a measuring tape to keep them as even as possible. I pinned them in place.

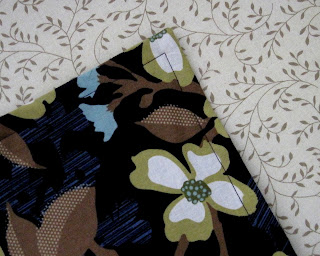
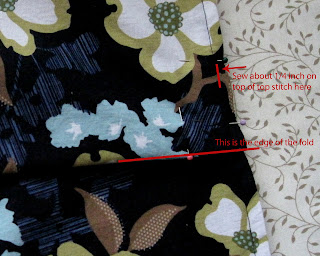
Now you can just sew each of your pleats in place... or you can do what I did. I really didn't want stitches on the top pleat for everyone to see. I sewed the bottom pleats in place with a straight stitch.

I ran a small stitch about 1/4" long over the top stitching to secure the edge of the pleat in place.


I flipped the top over to see the back fold of the top pleat. I then ran a straight stitch across it.

I then laid the the valance down flat and whip stitched the top of the back pleat to the back piece of fabric. Every once and awhile I would do through the front piece to help secure it.

Well I hung it in the window and it looked like this. I was about ready to scream. I wanted it to look perfect in the window and...well...it looked like this. Not at all what I had hoped.

So to fix the nice gaps on each side I cut 4 strips of fabric about 4" wide. I sewed them right sides together on the two long sides and one short side. I turned them inside out and pressed them well. I then top stitched around the long sides and one short side.


I then hot glued, yes you heard me. I hot glued them on. I started at the bottom and worked my way up and just glued as I went. You can't tell and no one would know. Well... except me and now all of you.

Ahh... much better.

I really am so pleased with how they turned out.

The hubster has been working on my new dining room table. Ah, how nice it is to have a handy-man-hubby. I am so excited to show it to you guys. I should be staining it tomorrow.

Wednesday, February 16, 2011

Faux Antique Tin Backsplash

Best Blogger Tips
What a week I've had. I was in the middle of sewing a darling pettiskirt for my Ms V (taking pictures for ya'll to see) when my camera died. No problem I'll just charge her up, good as new, right?

Wrong.

I went up to my room and there was the camera case sitting on the floor, open, charger missing. Pretty sure it was Mr U my 2 year old. He is so mischievous.

Anywho, I finished some cute clothes this last week for the kiddos and hopefully I will get some tutorials up soon. The weather here has been beautiful the last few days and I have wanted to get some outdoor projects done but I want to take pictures.

So, wish me luck in my search. So far it hasn't been in any of his usual hiding places.

Maybe I can talk the hubby into just buying me an SLR camera instead :)

Anyway, onto the tutorial.

I was really inspired by beautiful antique tin.


But I could not afford the real stuff. So I went to my fallback, faux finish it.

First I peeled off the real cheap laminate backsplash.

I sanded the wall smooth and then I used a utility knife to scrape off all the silicone and gunk off the counter.

 I primed the wall to prepare it for my tin...wallpaper.

I am sure you all have heard of paintable embossed wallpaper.  I got mine at Home Depot for I think around $20-$25. I cut the wallpaper down to the rough dimensions I needed and because it was pre-pasted I just rolled it in water, booked it (you fold sticky sides together and roll it up) and let it sit. I then hung it on the wall and used a squeegee to smooth it out. I also used a utility knife to make more exact cuts. 

I then painted the wall with a gray oops paint and let it dry

 
I then painted white over the top and wiped it off until I liked what I saw.

I finished up with two coats of polycrylic to seal everything up tight. I used polycrylic because it is water based and it doesn't yellow like polyurethane. 

I am still trying to decide what to do with the outlet covers. Ideas? I am just not sure what would look best.

Seriously, wish me luck on my search...

Monday, February 7, 2011

Double Chocolate Chip Cream Cheese Cookies

Best Blogger Tips
I have a confession to make.

I love dessert. Making it, smelling it, eating it.

Especially if it involves warm gooey chocolate. The hubster, on the other hand, does not, so I don't have a ton of opportunities to full fill my obsession (unless I want to eat a desert all by myself).

Ok, so I do make them for myself sometimes... I share with my little guys, too.

But whenever we get together with family or friends I always try to volunteer to bring a dessert. I hate when I get stuck bringing the salad...


 Now these are some serious cookies and they are not playing around.

This is a dark chocolate cookie with milk chocolate chips and a cream cheese filling. So what I am trying to say is this is a full glass of milk cookie and man are they good.


These cookies are so soft and rich.


Want to make some for yourself?

Here is the recipe:

Cookie Dough
  • 2 sticks cold butter, cubed (I recommend unsalted)
  • 1 1/4 cup granulated sugar
  • 2 eggs
  • 1/3 cup unsweetened cocoa powder
  • 2 1/4 cups all-purpose flour
  • 1/4 tsp salt
  • 3/4 teaspoon baking powder
  • 1/2 teaspoon baking soda
  • 1/2 tablespoon cornstarch
  • 2 cups semi-sweet chocolate chips
Cream Cheese Filling
  • 4 oz cream cheese
  • 1/4 cup sugar
  • 1 egg
  • 1 tablespoon flour
Preheat your oven to 350 degrees and line your cookie sheets with parchment paper.

Cream your butter and sugar until fluffy. Do not over beat because you want to keep the dough as cold as possible.

Add your eggs and blend until the eggs are incorporated.

Add your cocoa and mix in.

Add your flour (measure using the spoon and sweep method), salt, baking powder, baking soda and cornstarch. Mix until just incorporated.

Remove your beaters and add the chocolate chips. Use your hands to mix in the chocolate chips.

Place the dough on parchment paper and wrap it tight. Place in the fridge for a few hours or overnight. Or if you are impatient like I am, put it in the freezer for 10-15 minutes. I usually put it in the freezer and mix the cream cheese filling. 

Beat your cream cheese until fluffy.

Add your sugar and cream together. Add the egg and beat until smooth. Add the flour and beat again.

Remove the dough from the fridge/freezer. Pull chunks off but do not roll them into balls if you want them to look like those chunky bakery cookies.

Use your thumb to press an indent in the cookies. Use a spoon to fill the cookies with your cream cheese mixture. It is fine if it runs over the edge. They do not have to be perfect!

Take small chunks of cookie dough, slightly flatten them and place them on top.

Bake the cookies at 350 degrees for 9 minutes. Let them cool for at least a few minutes (try hard) and then eat them with a big glass of milk.

Yumm

Linking up to...


Show and Tell Green


It's a Keeper


Funky Junk's Sat Nite Special
Related Posts Plugin for WordPress, Blogger...