So, I thought it was time for an apology. This summer has been busy and beautiful and full of new adventures for my cute little family but none of those adventures have included blogging.
We spent the beginning of our summer in Alaska and we loved every minute of it! Alaska has so much to do outside, which really is awesome when you have two very busy boys. I actually moved back to the Starter Home a few weeks ago but I have been without internet (and my hubby boooo).
We are on the road again and staying in hotels along the way.
I am currently typing this on the lobby computer in a hotel in Yakima, Washington.
Anyone ever been here?
This is wine country in Washington and it is beautiful to drive through all the vineyards. We should be heading home soon and I will pick up blogging again. I still have to reveal the final product of my kitchen and I am finishing projects for Ms V's nursery.
I hope all your summers are treating you well and we should probably catch up this fall :)
Thanks guys!


Saturday, August 20, 2011

Friday, June 3, 2011
Some Things About Alaska and a Delicious Burnt Cream Recipe

I am falling in love with Alaska. It is beautiful and the weather is gorgeous and there is so much to do outside with the kids!
There are a few things I wanted to share. First they bottle the milk here in square jugs like this one.
I know that they sell these in other states but they don't back home. They stack better and can ship them more cheaply (which is important here).
Also, it is becoming more and more difficult to convince my kids it is bedtime when it looks like this...
at 9:30 at night...
I have even hung black out curtains but it is still a little hard for them to understand.
Now on to the recipe.
My hubby is not a dessert person. Though, I am slowly converting him with a bite here and a taste there.
BUT
he LOVES creme brulee or as we lovingly call it around here Burnt Cream (it sounds more manly ;) I was always afraid of making it. It seemed like it was such an advanced and difficult thing but once I tried it I realized it really isn't that hard.
You can do it. I promise!
So here is my
Burnt Vanilla Cream (Vanilla Creme Brulee) Recipe
4 C Heavy Cream
2 Tbs Vanilla
1/2 C Sugar (plus a little extra for tops)
6 egg yolks
Preheat the oven to 325 degrees
In a large saucepan over medium heat bring the heavy cream just to a boil. Cover and set aside to sit for 15-20 minutes.
While your cream sits whisk the egg yolks and sugar together until well blended and the color begins to lighten. Slowly add the cream to the egg mixture while whisking. Whisk in the vanilla.
Divide between 6 small ramekins or 4 large ramekins. Place them in a roasting pan and fill the pan with hot water until it reaches about half way up the sides of the ramekins.Bake 40-45 minutes. You want them to be set but it still needs to jiggle a little in the middle. Remove from the roasting pan and place the ramekins in the fridge for at least 3 hours but up to 3 days (this is a great make ahead dessert!)
Remove them from the fridge at least 1/2 an hour before you want to eat them. Sprinkle them with a small amount of sugar and use a small propane torch to create a crusty top. Move the torch continually. It will take a little time to burn/melt it all. Let your dessert sit a few minutes and then dig in!
I topped this one with fresh mango but you can use any fresh fruit if you want.

There are a few things I wanted to share. First they bottle the milk here in square jugs like this one.
 |
| source |
I know that they sell these in other states but they don't back home. They stack better and can ship them more cheaply (which is important here).
Also, it is becoming more and more difficult to convince my kids it is bedtime when it looks like this...
 |
| source |
I have even hung black out curtains but it is still a little hard for them to understand.
Now on to the recipe.
My hubby is not a dessert person. Though, I am slowly converting him with a bite here and a taste there.
BUT
he LOVES creme brulee or as we lovingly call it around here Burnt Cream (it sounds more manly ;) I was always afraid of making it. It seemed like it was such an advanced and difficult thing but once I tried it I realized it really isn't that hard.
You can do it. I promise!
So here is my
Burnt Vanilla Cream (Vanilla Creme Brulee) Recipe
4 C Heavy Cream
2 Tbs Vanilla
1/2 C Sugar (plus a little extra for tops)
6 egg yolks
Preheat the oven to 325 degrees
In a large saucepan over medium heat bring the heavy cream just to a boil. Cover and set aside to sit for 15-20 minutes.
While your cream sits whisk the egg yolks and sugar together until well blended and the color begins to lighten. Slowly add the cream to the egg mixture while whisking. Whisk in the vanilla.
Divide between 6 small ramekins or 4 large ramekins. Place them in a roasting pan and fill the pan with hot water until it reaches about half way up the sides of the ramekins.Bake 40-45 minutes. You want them to be set but it still needs to jiggle a little in the middle. Remove from the roasting pan and place the ramekins in the fridge for at least 3 hours but up to 3 days (this is a great make ahead dessert!)
Remove them from the fridge at least 1/2 an hour before you want to eat them. Sprinkle them with a small amount of sugar and use a small propane torch to create a crusty top. Move the torch continually. It will take a little time to burn/melt it all. Let your dessert sit a few minutes and then dig in!
I topped this one with fresh mango but you can use any fresh fruit if you want.

Wednesday, June 1, 2011
Pulls, Sinks and Faucets...Oh My!
Because of my lack of internet this last week I got a lot of sewing done from my to do list. Remember you can follow me on Pinterest and see some of my to-dos. I will share some pictures of my projects in a day or two. Ms V's closet is expanding!
Like my lighting dilemma, it is pretty much impossible to DIY a sink, cabinet pulls or a faucet and all of those things are EX-PEN-SIVE!
I love bin pulls but when I looked at places like Home Depot they were priced between $4-$5 each. Now, I have a small kitchen and with that price it was still going to cost around $100 just for cabinet hardware.
I started looking online to see if I could find a better deal. I came across a great little Ebay shop that you can find here that was selling the cup pulls for $1.79 each and my handles were around $1.30. Also, because I bought more than 25 knobs and pulls I got free shipping. So I paid around $50 for everything (including 7 pulls for a future furniture build). I felt that even though I couldn't DIY something cheap I still got a great deal and I love them!


Next I really wanted to replace my kitchen sink. We had an old stainless steel sink. I know that stainless steel can be done beautifully but my sink was not an example of that.
Again. after looking around a new kitchen sink was going to be paying at least $100. So I started looking online at a local classified website. We ended up finding a brand new acrylic white sink for only $40. Now that is saving some dough.
We also wanted a new faucet. I went online to ebay, again, and found a faucet for $20 because it was missing the side spray (it usually retailed at $120.) I then bought a side spray for $15. So my brand new sink and faucet set me back only $75!

I think there are some really great deals out there and you can definitely redo your kitchen or any room in your house on the cheap if you are willing to use your creativity, do your research and maybe even be a little patient .
On a completely unrelated note, does anyone watch Bachelorette? What is up with mask guy and why is Bentley such a jerk?
I really couldn't get over mask guy swimming with the mask on! All I could think of was the hilarious tan lines he will soon be rocking if he doesn't take it off!
Any favorites yet?
I have mine.
Tuesday, May 31, 2011
The Internet Issue
So I have been having some huge issues with my internet the last week. It would go off and on randomly and I could never complete a blog post or anything else really.
It was so frustrating. Finally I had someone come Friday and they got it up and working again.
I promise some great posts this week but tonight I owe my family some updates on my family blog. Hope you guys had a wonderful Memorial Day and I will be back here tomorrow!

It was so frustrating. Finally I had someone come Friday and they got it up and working again.
I promise some great posts this week but tonight I owe my family some updates on my family blog. Hope you guys had a wonderful Memorial Day and I will be back here tomorrow!

Wednesday, May 18, 2011
Pinterest aka My New Favorite Website and a Tutorial
So recently I have started using this new (to me) site called Pinterest. This site is absolutely amazing and has revolutionized how I search the web.

If you are anything like me, you have hundreds of sites bookmarked for one image. Maybe it is something that inspires you or something you want to make or have.
You may even have hundreds of pages bookmarked for recipes you want to try, books you want to read and places you want to go.
Well this site makes all of that so much easier. You have boards (kind of like a mood board) and you can "pin" a photo on any site and save to one of your boards.
It only takes a few seconds to pin something.
For example I just pinned a few photos from Pottery Barn on my living room ideas board. I love their Printer's Collection.

On my browser bar I have a little add on that says Pin It. I just click that and this page pops up with all the images from that web page.

I click on the image I want and another box pops up asking me on what board I want to pin it to and how I want to describe it.

Back on my boards I can see all the images next to each other. Here is screenshot of my boards with my living room board highlighted. I just started so I don't have too much pinned

Also, Pinterest saves the website which you got the image from so you can go back to get your recipe or the detailed instructions to craft you wanted to make.
You can also follow other people's boards. It is fun to find people who have a great eye and follow the beautiful things they find.
Now, you have to be invited to join Pinterest (I am not really sure why) I just put my email on their waiting list and after a few days I got an invite. Once you are a member you can invite and find friends.
If you have a Pinterest account or you get one in the next little while you can follow my boards here.
What do you think? Are you interested in Pinterest or are you going to stick with your bookmarks? Or maybe even a combination of both?
I can tell you one thing, it has completely invigorated me to find new beautiful things and ideas!
Monday, May 16, 2011
Spring Has Sprung and Nursery Paint
What a crazy weekend it was with blogger! I have to give props to the people who's job it is to fix and maintain blogger because 1) most of what they do is completely foreign to me and 2) I can't imagine how stressful things become when something doesn't go right and it is up to them to figure it out and fix it.
Not a job for me, I can tell you that.
Spring is finally starting to arrive in Alaska and with views like these outside our apartment I am feeling a little spoiled.

We are loving all the trails and things to do outside. We are trying to get out and enjoy it all. Our "to-do" list here keeps growing because there are so many things to go do and see.
One of our friends took her girls on a walk a few days ago and across the pond from her was a black bear mama and two cubs. A little scary but luckily they were far away so they could just sit and watch the cubs play.
Before we left on our adventure in Alaska we got quit a bit done on the nursery. First things first, we had to get the yellow out of there and get some fresh paint on the walls. If you remember from my nursery mood board I had decided to use Sherwin Williams Sassy Green and Heron Plume on my walls. I thought I would give you some before pictures. We were mostly using this room for storage since we had gotten home.
I was trying to get a move on and had already begun to tape the room before I remembered that I needed to get before pictures. I had shoved all the junk to the center of the room to start painting so please don't judge me on all the junk.
Thanks!
This door looks out into the hallway and the door on the left is the closet. Now this is a pretty small room at around 9ft x 9ft but, to be honest, they don't get much bigger in my house.

This is from the next corner looking at the closet door and window. The location of the closet is in this room has caused me some serious grief with arranging furniture and I think I am going to remove the door and hang a curtain to make arranging a little easier.

This is the the corner just right of the door.

Now here is a little sneak peak of the wall color now. Of course I forgot to take a picture of the walls before I started to move things in so I had to crop this from another picture I took.

I am excited to show you the progress of this room and I am looking forward to getting home to work on it.
In other news I started potty training Mr. U today. So far it is going okay but it has only been a few hours. Also, Mr P starts soccer this week. I might be crazy....
Not a job for me, I can tell you that.
Spring is finally starting to arrive in Alaska and with views like these outside our apartment I am feeling a little spoiled.

We are loving all the trails and things to do outside. We are trying to get out and enjoy it all. Our "to-do" list here keeps growing because there are so many things to go do and see.
One of our friends took her girls on a walk a few days ago and across the pond from her was a black bear mama and two cubs. A little scary but luckily they were far away so they could just sit and watch the cubs play.
Before we left on our adventure in Alaska we got quit a bit done on the nursery. First things first, we had to get the yellow out of there and get some fresh paint on the walls. If you remember from my nursery mood board I had decided to use Sherwin Williams Sassy Green and Heron Plume on my walls. I thought I would give you some before pictures. We were mostly using this room for storage since we had gotten home.
I was trying to get a move on and had already begun to tape the room before I remembered that I needed to get before pictures. I had shoved all the junk to the center of the room to start painting so please don't judge me on all the junk.
Thanks!
This door looks out into the hallway and the door on the left is the closet. Now this is a pretty small room at around 9ft x 9ft but, to be honest, they don't get much bigger in my house.

This is from the next corner looking at the closet door and window. The location of the closet is in this room has caused me some serious grief with arranging furniture and I think I am going to remove the door and hang a curtain to make arranging a little easier.

This is the the corner just right of the door.
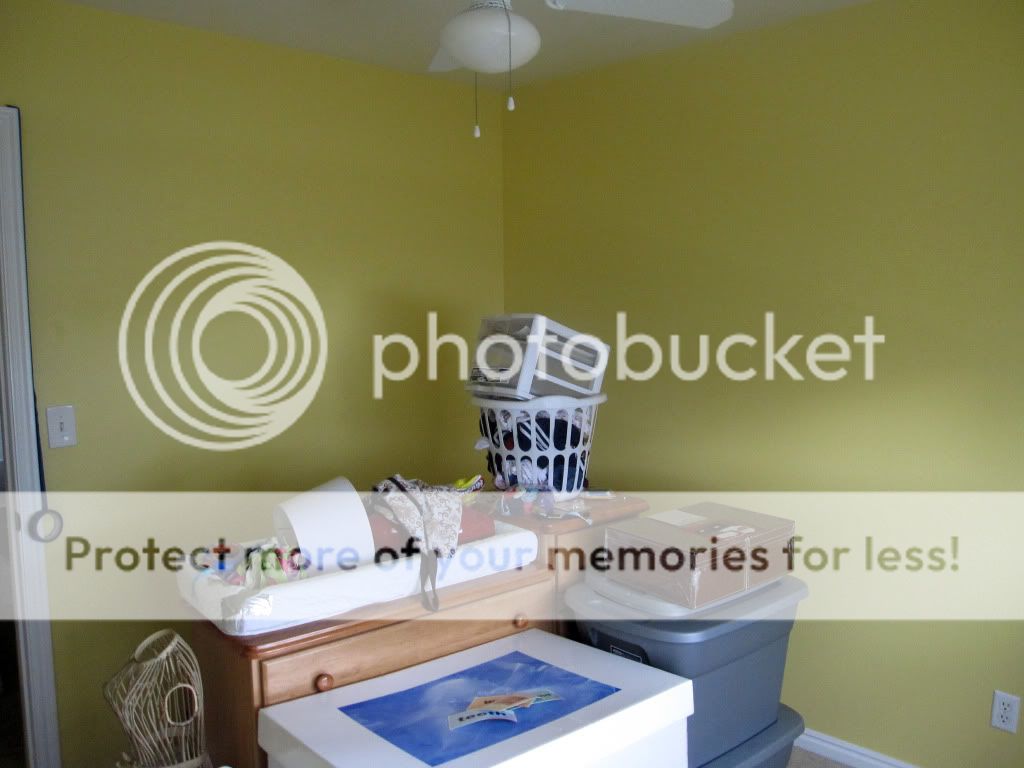
Now here is a little sneak peak of the wall color now. Of course I forgot to take a picture of the walls before I started to move things in so I had to crop this from another picture I took.

I am excited to show you the progress of this room and I am looking forward to getting home to work on it.
In other news I started potty training Mr. U today. So far it is going okay but it has only been a few hours. Also, Mr P starts soccer this week. I might be crazy....
Wednesday, May 11, 2011
A Yummy Recipe: Breakfast Casserole
One of my cute friend Amber asked me for this recipe so I decided I might as well share it with everyone. Amber is responsible for this and this recipe.
I actually made this for Mother's Day. My hubby isn't the best cook and since you make this the night before I thought it was a good compromise (he did the dishes.) Horribly, I didn't take a picture of it but I promise it is yummy!
Breakfast Casserole
6-8 Slices Texas Toast
12 Eggs
1 C Milk
1 Tsp Vanilla
1 C Meat, Cooked (crumbled bacon, sausage and ham are examples)
1 8oz Cream Cheese
2 C Grated Cheese
Butter a 9x13 generously.
Remove the crust and cube the bread and add to the 9x13.
In a large bowl beat your eggs. Add milk and vanilla. Mix until smooth and pour over the bread.
Sprinkle meat evenly over the top.
Pinch small pieces of cream cheese and add evenly over the top and then sprinkle the cheese evenly over the top.
Let this sit over night.
Bake in a preheated oven at 350 degrees for 45-50 minutes.
Enjoy!
Tuesday, May 10, 2011
Shedding a Little Light on the Issue: Kitchen Lighting
Whenever you look at designer kitchens they always have tons of light sources and beautiful light fixtures.
My kitchen was lacking both.
As I started looking for lighting I had to get over the idea that all the lighting in your home needed to match. I have almost always lived in a home with matched lighting through out the entire house. I was also overwhelmed at how expensive it could be! You can easily spend $300-$400 on one light fixture not to mention the expense of hiring an electrician to wire and install new lighting. That type of cash was completely outside my budget.
Luckily I have a ridiculously handy husband who comes from a family of ridiculously handy men. They can fix, install or build anything.
We went with simple lighting from IKEA. They had clean lines and they would help us add a lot more light to our kitchen. We (and I think you all know by we I mean my husband) also installed recessed lighting we got from Home Depot.
We first changed out the light fixture above the dining table.
If you remember I had this light before.
 And this is the light after.
 This light set us back 50 bucks. Not bad.
Now, over the cooking area and bar I wanted a lot more light. I only had two light fixtures before. One was over the sink and one was in the middle of the ceiling. Every time I did anything in the kitchen I was always working in my own shadow.
We added pendant lighting above the bar but before hanging the light we had to decide where to place them.
I stood there staring at the ceiling over the bar wondering how I could figure out how to center them and make sure they were even. I finally went online and found some great suggestions.
First measure the width of your bar.

Find the middle of your measurement and mark the center of your counter top with painters tape.(If you like my counters you can find out how I painted them here)

Next you want to mark where the pendants will hang. Mark these spots with more tape. You may have to play with this a little. Just make sure if you are hanging multiple lights, that the distance between each is the same.

Next you want to take a very long piece of string and tie something heavy to the end like a washer. Attach the string to the ceiling with tape so the washer hangs directly over the intersections.

You may need to play with the positioning a little until you are happy. I would also recommend opening any cupboards that may get in the way to make sure you have given them enough clearance.
Now you need to figure out the length of your lights. Take another piece of blue tape and mark the height of where you think you would like your light.

Stand and sit around your counter to make sure the height is right. I had my kids and husband sit at the counter while I stood on the other side to make sure that they weren't too low and then my husband and I switched.

My husband cut the holes and wired the lights.
We (again my husband) also wired some recessed lighting and ended up installing 5 new recessed lights.
Here is the before lighting.

And here it is after. One of the recessed lights above the fridge was cut out of the picture.

We also added wireless puck lights under the cabinets. I am not sold on them yet. I don't have any "hidden" plugs behind the cabinets so I can't really use wired lights without cords and plugs dangling all over the place so I am stuck with them as an only option right now.
I am so happy with my new lighting. It is so nice to be able to see what I am doing and to create a bright and happy atmosphere.
A big thanks has to go out to my hubby for crawling around in the attic all afternoon to do this.
Love you babe!
So how about you guys? Is lighting that important to you or do you not really think about it? I know I really didn't until I started working on this kitchen. I am happy I took it into consideration and decided to add it to our kitchen.
My kitchen was lacking both.
As I started looking for lighting I had to get over the idea that all the lighting in your home needed to match. I have almost always lived in a home with matched lighting through out the entire house. I was also overwhelmed at how expensive it could be! You can easily spend $300-$400 on one light fixture not to mention the expense of hiring an electrician to wire and install new lighting. That type of cash was completely outside my budget.
Luckily I have a ridiculously handy husband who comes from a family of ridiculously handy men. They can fix, install or build anything.
We went with simple lighting from IKEA. They had clean lines and they would help us add a lot more light to our kitchen. We (and I think you all know by we I mean my husband) also installed recessed lighting we got from Home Depot.
We first changed out the light fixture above the dining table.
If you remember I had this light before.


Now, over the cooking area and bar I wanted a lot more light. I only had two light fixtures before. One was over the sink and one was in the middle of the ceiling. Every time I did anything in the kitchen I was always working in my own shadow.
We added pendant lighting above the bar but before hanging the light we had to decide where to place them.
I stood there staring at the ceiling over the bar wondering how I could figure out how to center them and make sure they were even. I finally went online and found some great suggestions.
First measure the width of your bar.

Find the middle of your measurement and mark the center of your counter top with painters tape.(If you like my counters you can find out how I painted them here)

Next you want to mark where the pendants will hang. Mark these spots with more tape. You may have to play with this a little. Just make sure if you are hanging multiple lights, that the distance between each is the same.

Next you want to take a very long piece of string and tie something heavy to the end like a washer. Attach the string to the ceiling with tape so the washer hangs directly over the intersections.
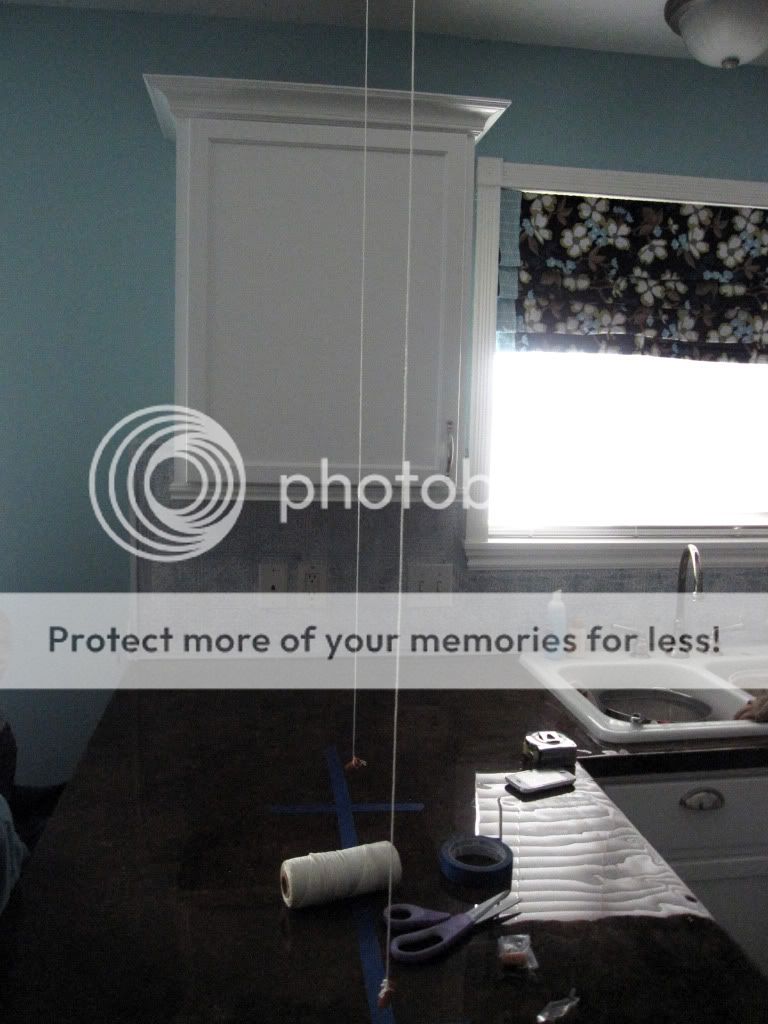
You may need to play with the positioning a little until you are happy. I would also recommend opening any cupboards that may get in the way to make sure you have given them enough clearance.
Now you need to figure out the length of your lights. Take another piece of blue tape and mark the height of where you think you would like your light.
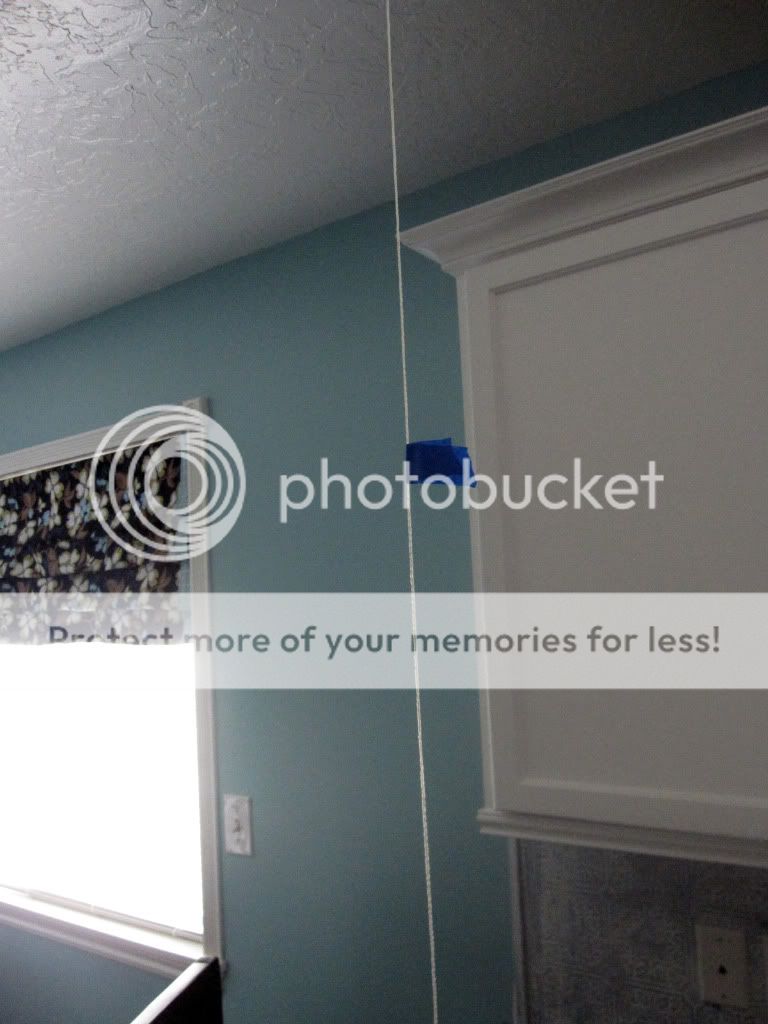
Stand and sit around your counter to make sure the height is right. I had my kids and husband sit at the counter while I stood on the other side to make sure that they weren't too low and then my husband and I switched.
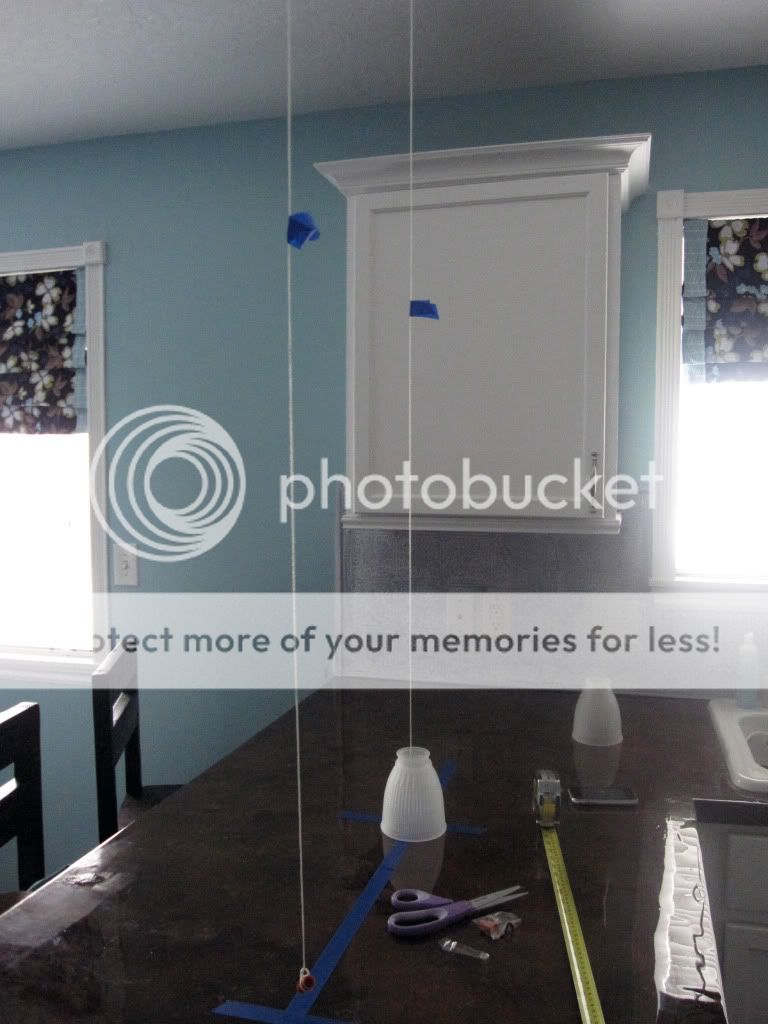
My husband cut the holes and wired the lights.
We (again my husband) also wired some recessed lighting and ended up installing 5 new recessed lights.
Here is the before lighting.
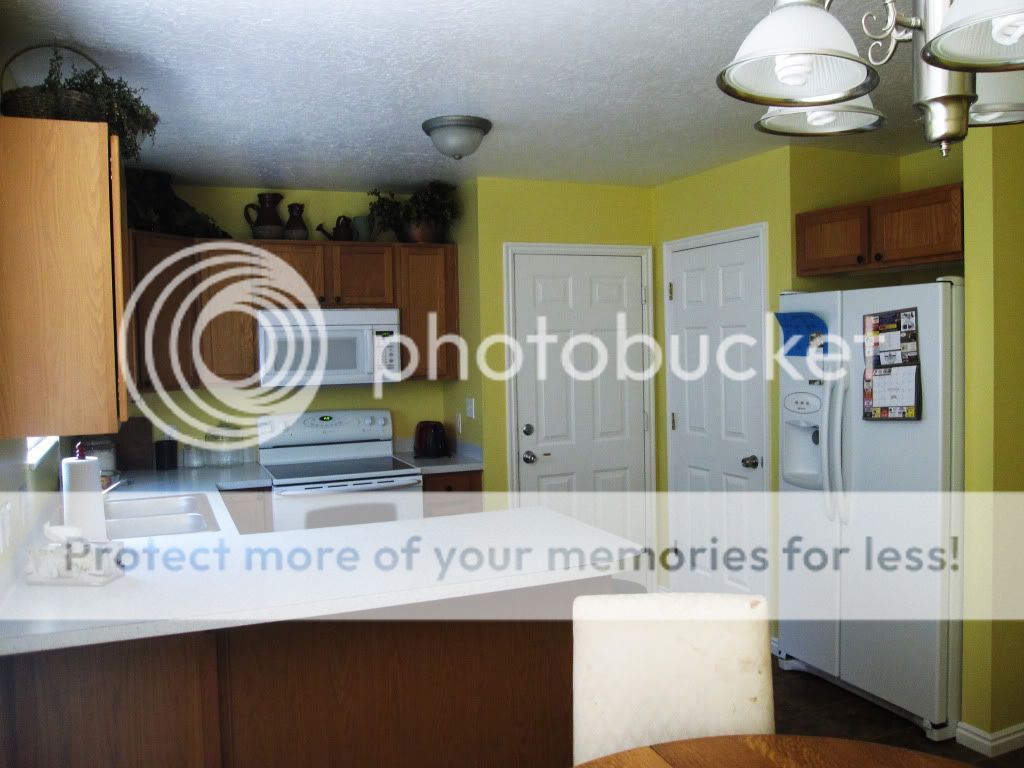
And here it is after. One of the recessed lights above the fridge was cut out of the picture.

We also added wireless puck lights under the cabinets. I am not sold on them yet. I don't have any "hidden" plugs behind the cabinets so I can't really use wired lights without cords and plugs dangling all over the place so I am stuck with them as an only option right now.
I am so happy with my new lighting. It is so nice to be able to see what I am doing and to create a bright and happy atmosphere.
A big thanks has to go out to my hubby for crawling around in the attic all afternoon to do this.
Love you babe!
So how about you guys? Is lighting that important to you or do you not really think about it? I know I really didn't until I started working on this kitchen. I am happy I took it into consideration and decided to add it to our kitchen.
Sunday, May 8, 2011

Friday, May 6, 2011
The Best Peanut Butter Bars
Like 1/3 of the world, me and some of my friends (and our kiddos) got to together to watch the Royal Wedding last week. We recorded it so we didn't have to stay up late to see everything and we all brought treats and snacks to share.
I brought The Best Peanut Butter Bars to share and now I am going to share the recipe with you.
These are seriously delicious and unlike most recipes they have peanut butter frosting instead of chocolate and did I mention they are ridiculously easy?
So here you go.
The Best Peanut Butter Bars
1/2 C Butter
1/2 C Peanut Butter
1/2 C Brown Sugar
1/2 C sugar
1 Egg
1 C Flour
1/2 Tsp Baking Soda
1 C Oatmeal
Frosting
1/4 C Butter
1/4 C Peanut Butter
1 3/4 C Powder Sugar
3 Tbs Milk
1 Tsp Vanilla
Preheat the oven to 350 degrees.
To make the cookie cream the butter and peanut butter until combined. Cream in the sugars until fluffy. Beat in the egg. Add the flour, oatmeal and baking soda until combined. Press into a 9x13 and bake a 350 degrees for 15 minutes.
For the frosting combine the butters and beat in the powder sugar. Add the milk and vanilla and mix until smooth.
Frost while still slightly warm.
 Yumm!
I brought The Best Peanut Butter Bars to share and now I am going to share the recipe with you.
These are seriously delicious and unlike most recipes they have peanut butter frosting instead of chocolate and did I mention they are ridiculously easy?
So here you go.
The Best Peanut Butter Bars
1/2 C Butter
1/2 C Peanut Butter
1/2 C Brown Sugar
1/2 C sugar
1 Egg
1 C Flour
1/2 Tsp Baking Soda
1 C Oatmeal
Frosting
1/4 C Butter
1/4 C Peanut Butter
1 3/4 C Powder Sugar
3 Tbs Milk
1 Tsp Vanilla
Preheat the oven to 350 degrees.
To make the cookie cream the butter and peanut butter until combined. Cream in the sugars until fluffy. Beat in the egg. Add the flour, oatmeal and baking soda until combined. Press into a 9x13 and bake a 350 degrees for 15 minutes.
For the frosting combine the butters and beat in the powder sugar. Add the milk and vanilla and mix until smooth.
Frost while still slightly warm.

One Awful Bug
This week has just been yucky. My entire family has been hit by a terrible, no good, very bad stomach bug and it has been hectic at my home.
We are finally on the mends and since even momma was sick, my house was a disaster area. I scrubbed the house down today and I promise a new tutorial tomorrow.
Thanks for hanging in with me through all of life's adventures and we will see you tomorrow!
We are finally on the mends and since even momma was sick, my house was a disaster area. I scrubbed the house down today and I promise a new tutorial tomorrow.
Thanks for hanging in with me through all of life's adventures and we will see you tomorrow!
Friday, April 29, 2011
My Zinc Bookcase: A Faux Finishing Tutorial Part 2
If you remember from the first part of the tutorial, I recently have fallen in love with zinc furniture. My inspiration came from pieces like this from Restoration Hardware. Like this gorgeous nightstand.
 Beautiful. But of course I don't have $1000 to throw at a new piece of furniture so I decided to try and create the look myself.
I finished the outside of my bookcase using my faux zinc finishing technique but the inside I had left to look like this.
 Yes I know it looks great just the way it is (chuckle) but you know me, I am an overachiever.
It took me a few days to decide how to finish the inside. I kept going back and forth between fabric and the zinc look. All I knew is that I wanted it to have nice clean lines inside and I wanted to hide all the unfinished edges of the tinfoil.
I decided to go with fabric and to make sure my fabric would have clean lines I used poster board and mod podge.
First I had to cover the 2x2s that were in each corner. I cut my fabric to cover the two by two but I added 1 inch to the length. I covered the fabric with mod podge.

I folded each end over 1/2.

I pressed it over the 2x2 and moved it until it fit snugly and smoothed it out.

I did this on all of the 2x2s and then moved on to cover the sides and tops.
I first measured my sides and top and then I cut out my poster boards about 1/4" less. So if I measured 15 1/2 " by 23" I actually cut my poster board to 15 1/4" by 22 3/4".

Next I cut fabric about an inch bigger on all four sides and coated the poster board in a thin layer of mod podge.

I turned it over and smoothed the fabric out. I then wrapped the edges over and glued them down.

I then did another layer of mod podge on the back of the poster board and glued them the the sides of my bookcase until it looked like this.

I really liked how it turned out. It gave me clean lines and it added some interest to the piece. Here is another angle.

Here is a reminder of my inspiration.
I filled my shelves with things to help me get organized.


On the bottom shelf I put two baskets.
 I labeled the baskets with upstairs and downstairs. The kitchen is on the main floor and seems to be the gathering place for EVERYTHING in the house. This way I can throw things into the baskets as the day goes on and then take only one trip up and one trip down to put everything back. The baskets are from Ikea and I am going to do a tutorial on the tags.
On the middle shelf I have file boxes.
 One thing I have struggled organizing since I have been married is mail. I have tried SO MANY different storage options but it always piles up on me. I am hoping that this bookcase will make opening my mail and then throwing away, shredding or filing right away more reasonable.These file boxes were also from Ikea.
On the top shelf I have my version of this Ballard Designs Desk Organizer.

 This was the first thing I have ever built in my life. It is a little rough but I am like a proud mama when it comes to this organizer. I will share a tutorial soon on how to build one yourself.
You could easily use this technique on a existing piece of furniture but you could also build something new. You can visit Ana White's site for some great plans. You can even check here to see the kitchen furniture we built with her free plans.
I hope everyone had a great week. Did anyone else watch the royal wedding? I got together with a few friends and watched it today (thanks to a DVR). They were so cute and I loved watching them break into huge grins. I thought it was nice to see something so sweet on TV when usually it is just sad. My heart and prayers go out to those living in the areas affected by the crazy tornadoes they have been having down south.

I finished the outside of my bookcase using my faux zinc finishing technique but the inside I had left to look like this.

It took me a few days to decide how to finish the inside. I kept going back and forth between fabric and the zinc look. All I knew is that I wanted it to have nice clean lines inside and I wanted to hide all the unfinished edges of the tinfoil.
I decided to go with fabric and to make sure my fabric would have clean lines I used poster board and mod podge.
First I had to cover the 2x2s that were in each corner. I cut my fabric to cover the two by two but I added 1 inch to the length. I covered the fabric with mod podge.

I folded each end over 1/2.
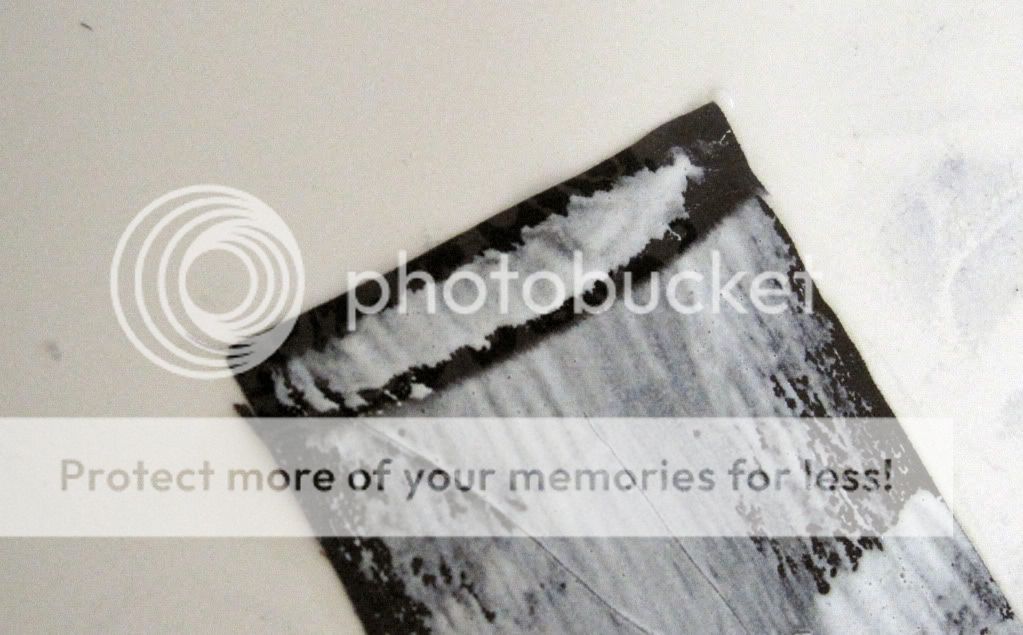
I pressed it over the 2x2 and moved it until it fit snugly and smoothed it out.

I did this on all of the 2x2s and then moved on to cover the sides and tops.
I first measured my sides and top and then I cut out my poster boards about 1/4" less. So if I measured 15 1/2 " by 23" I actually cut my poster board to 15 1/4" by 22 3/4".

Next I cut fabric about an inch bigger on all four sides and coated the poster board in a thin layer of mod podge.

I turned it over and smoothed the fabric out. I then wrapped the edges over and glued them down.

I then did another layer of mod podge on the back of the poster board and glued them the the sides of my bookcase until it looked like this.

I really liked how it turned out. It gave me clean lines and it added some interest to the piece. Here is another angle.

Here is a reminder of my inspiration.
I filled my shelves with things to help me get organized.
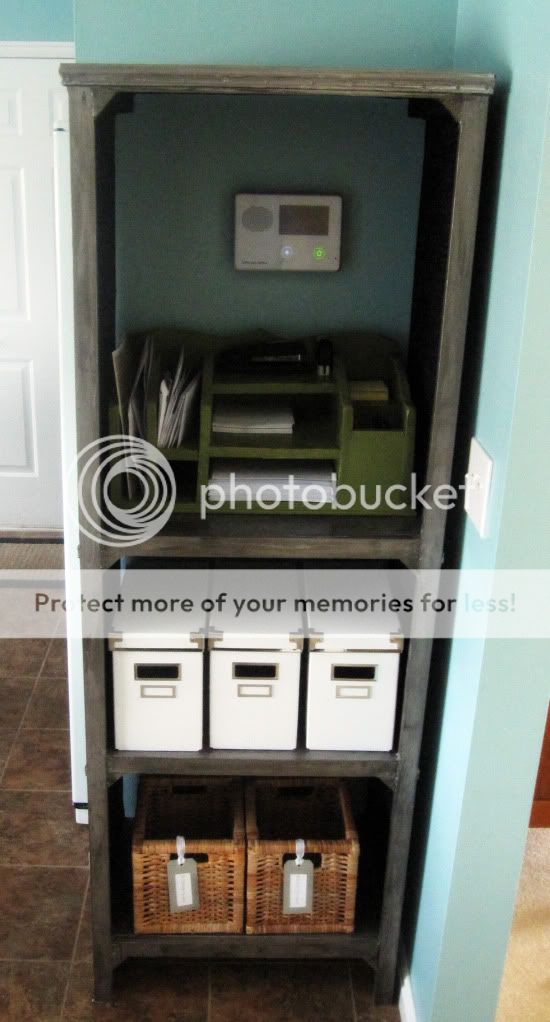

On the bottom shelf I put two baskets.

On the middle shelf I have file boxes.

On the top shelf I have my version of this Ballard Designs Desk Organizer.


You could easily use this technique on a existing piece of furniture but you could also build something new. You can visit Ana White's site for some great plans. You can even check here to see the kitchen furniture we built with her free plans.
I hope everyone had a great week. Did anyone else watch the royal wedding? I got together with a few friends and watched it today (thanks to a DVR). They were so cute and I loved watching them break into huge grins. I thought it was nice to see something so sweet on TV when usually it is just sad. My heart and prayers go out to those living in the areas affected by the crazy tornadoes they have been having down south.
Thursday, April 28, 2011
An Apartment of Our Own
So we finally got into our apartment. I feel like I am 90% settled in and I had the internet installed and ready to go today. I should be back up and running soon, though I am considering begging the potty training phase with my 2 1/2 year old next week.
We will see.
We will see.
Thursday, April 21, 2011
My Zinc Bookcase: A Faux Finishing Tutorial Part 1
We have had quite an adventure up here. My husbands company finds us housing to live in while we are away for the summer but when we got here the apartments were not ready to move into, so we have been staying at an extended stay.
Oh, the fun you can have in a tiny room with 3 kids all day.... wait...
Well, after looking into the apartments they had for us I found out that they accepted animals and from most of the reviews it sounded like there are a ton of animals there. Well I panicked a little because my oldest has animal allergies, especially to cats, and those allergies induce asthma attacks.
Bad ones.
I called the housing department at my hubby's work and they were so sweet and understanding and took it upon themselves to find us a new place on almost no notice! We get to move in on Saturday and I get to kiss this extended stay goodbye. Now that is exciting!
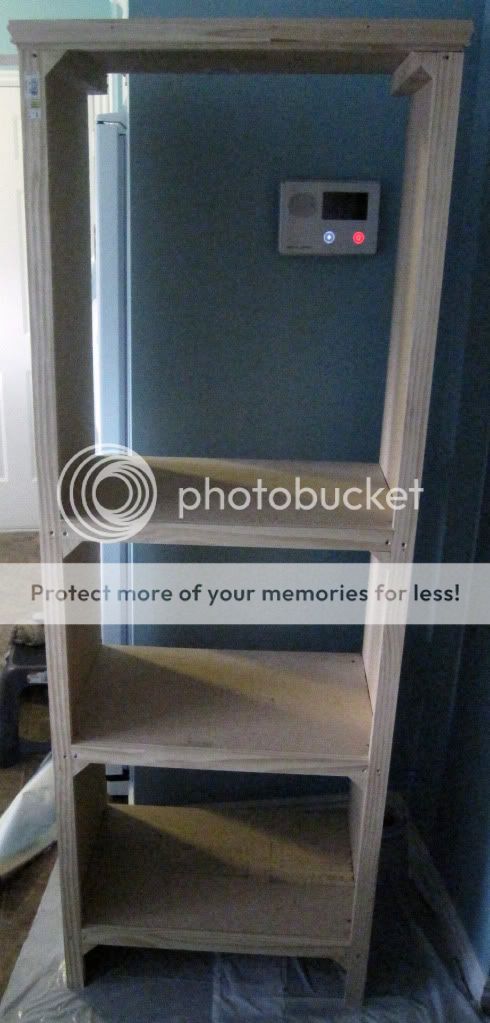
In my kitchen at The Starter Home I have an awkward empty space right next to the fridge. I have always wondered why they didn't just put more cabinets there...
Well I decided to build a mail storage/book shelf thing for that wall so increase my storage space and make use of all that empty space.
My husband built the bookcase using mdf, 2x2's, 1x2's and moulding.

Because the main part of this was made from MDF I knew I would have to paint it but I wasn't really sold on a color or even how it would look once it was all done. After scourging the internet I fell in love with zinc wrapped furniture. Zinc furniture is all over the place in super gorgeous/expensive designs right now. I mean just take a look at this piece from Restoration Hardware. I mean it is only a measly $795. Pocket change....right...?
I loved the idea of adding another layer to my kitchen. I had painted wood cabinets, stained wood furniture so I thought a metallic piece would be a great addition but the real questions was how in the world could I create it? I thought about just painting the wood with metallic paint but I was worried that it would look just like that.
Wood painted with metallic paint.
So I decided to get a little creative and pray to the crafting gods that it would all turn out how I wanted.
I used some tinfoil, a ton of mod podge, craft paint (I bought black, cream, gray and brown metallic craft paints) and a foam craft brush.
The very first thing I did was apply the tinfoil. I planned out where I wanted seams and started going for it.
Cut your tinfoil to fit the area you will cover and then use your craft brush to apply a thin layer of mod podge to the wood.

Smooth your tinfoil over the wood being careful to not wrinkle it too much.

Keep up this process until you have completely covered your item. When my hubby walked in at this point you could tell that he hated it but wasn't sure how I felt about it. He sat there quietly starring and not wanting to hurt my feelings.
I let him struggle for a minute before I told him I wasn't done. Big Huge Sigh of Relief!

Do you see that large container of mod podge! Seriously love that stuff.
Next I used small nails to create the look that the metal was wrapped around the furniture. I used pictures from Restoration Hardware to choose where to place them. Then I started the faux finishing.
I was going to use a glazing medium to create the the faux zinc look but then I decided to use the flat finish mod podge. Not only would it create a protective finish but since it drys clear it would work similar to a glaze.
I poured a bunch of mod podge on a plate and added my colors.

I used mostly the grey metallic color and just added spots of the black, brown and cream. Next I mixed the colors until they were kind of swirly.
Like this.

You don't want to mix it too much because you want there to be variation in the color. I just painted on a layer letting the colors go where they wanted and not trying to be too perfect with it. This was while it was still wet.

Do you see how it is kind of streaky and varied? Let that layer dry and keep layering. I think I ended up with four coats of different mixtures.
This was the side after the first layer had dried. It still looked a little tinfoily.

Now the sides were a little plain so I added metal straps to them. I cut out strips of cardboard and, using mod podge, I covered them in tinfoil.

 If you like my granite counters in the background of these photos you can learn how I created them with craft paint here.
I attached the strips to the sides of my bookcase with nails and used my mod podge/paint mix to faux finish them.

I let everything dry thoroughly and then topped it with two coats of satin finish poly-acrylic.

Oh, the fun you can have in a tiny room with 3 kids all day.... wait...
Well, after looking into the apartments they had for us I found out that they accepted animals and from most of the reviews it sounded like there are a ton of animals there. Well I panicked a little because my oldest has animal allergies, especially to cats, and those allergies induce asthma attacks.
Bad ones.
I called the housing department at my hubby's work and they were so sweet and understanding and took it upon themselves to find us a new place on almost no notice! We get to move in on Saturday and I get to kiss this extended stay goodbye. Now that is exciting!
In my kitchen at The Starter Home I have an awkward empty space right next to the fridge. I have always wondered why they didn't just put more cabinets there...
Well I decided to build a mail storage/book shelf thing for that wall so increase my storage space and make use of all that empty space.
My husband built the bookcase using mdf, 2x2's, 1x2's and moulding.
Because the main part of this was made from MDF I knew I would have to paint it but I wasn't really sold on a color or even how it would look once it was all done. After scourging the internet I fell in love with zinc wrapped furniture. Zinc furniture is all over the place in super gorgeous/expensive designs right now. I mean just take a look at this piece from Restoration Hardware. I mean it is only a measly $795. Pocket change....right...?
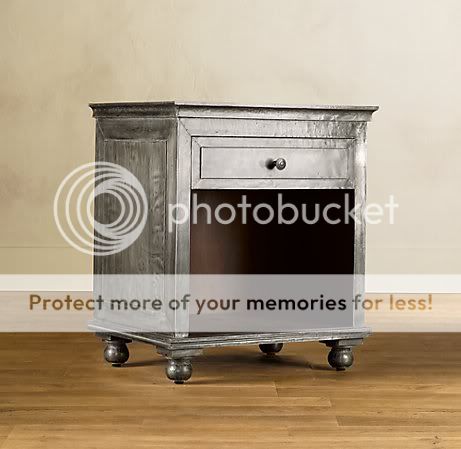 | |
| www.restorationhardware.com |
I loved the idea of adding another layer to my kitchen. I had painted wood cabinets, stained wood furniture so I thought a metallic piece would be a great addition but the real questions was how in the world could I create it? I thought about just painting the wood with metallic paint but I was worried that it would look just like that.
Wood painted with metallic paint.
So I decided to get a little creative and pray to the crafting gods that it would all turn out how I wanted.
I used some tinfoil, a ton of mod podge, craft paint (I bought black, cream, gray and brown metallic craft paints) and a foam craft brush.
The very first thing I did was apply the tinfoil. I planned out where I wanted seams and started going for it.
Cut your tinfoil to fit the area you will cover and then use your craft brush to apply a thin layer of mod podge to the wood.

Smooth your tinfoil over the wood being careful to not wrinkle it too much.

Keep up this process until you have completely covered your item. When my hubby walked in at this point you could tell that he hated it but wasn't sure how I felt about it. He sat there quietly starring and not wanting to hurt my feelings.
I let him struggle for a minute before I told him I wasn't done. Big Huge Sigh of Relief!

Do you see that large container of mod podge! Seriously love that stuff.
Next I used small nails to create the look that the metal was wrapped around the furniture. I used pictures from Restoration Hardware to choose where to place them. Then I started the faux finishing.
I was going to use a glazing medium to create the the faux zinc look but then I decided to use the flat finish mod podge. Not only would it create a protective finish but since it drys clear it would work similar to a glaze.
I poured a bunch of mod podge on a plate and added my colors.
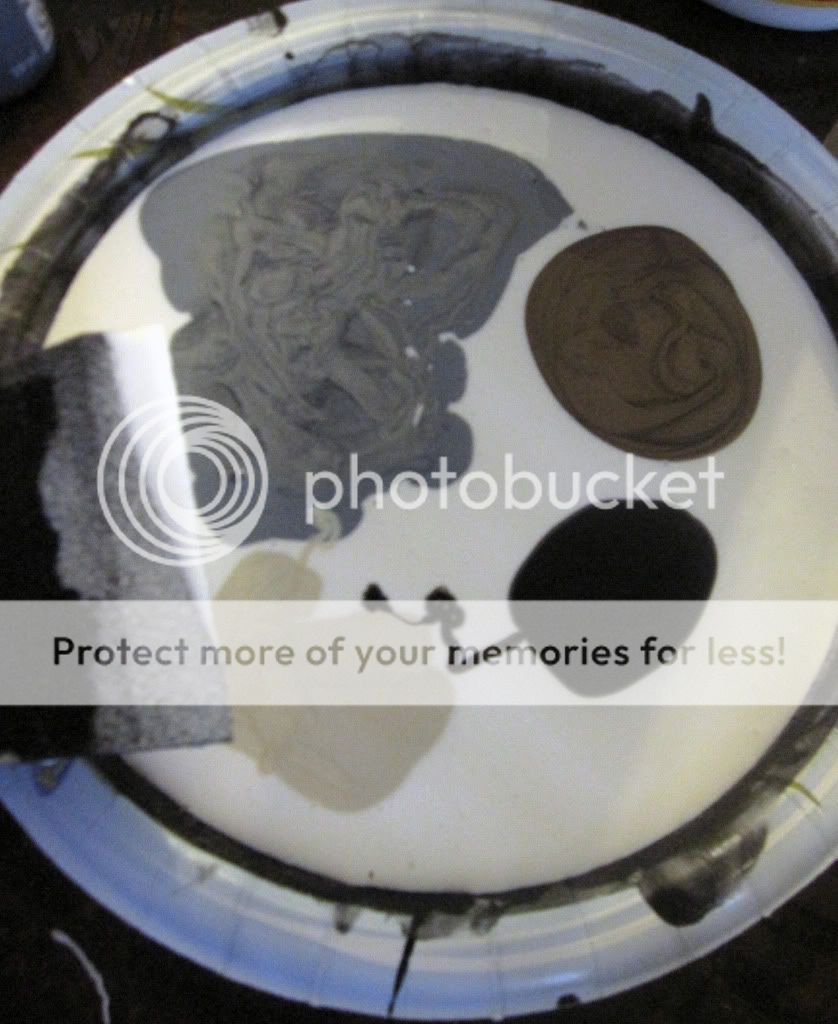
I used mostly the grey metallic color and just added spots of the black, brown and cream. Next I mixed the colors until they were kind of swirly.
Like this.
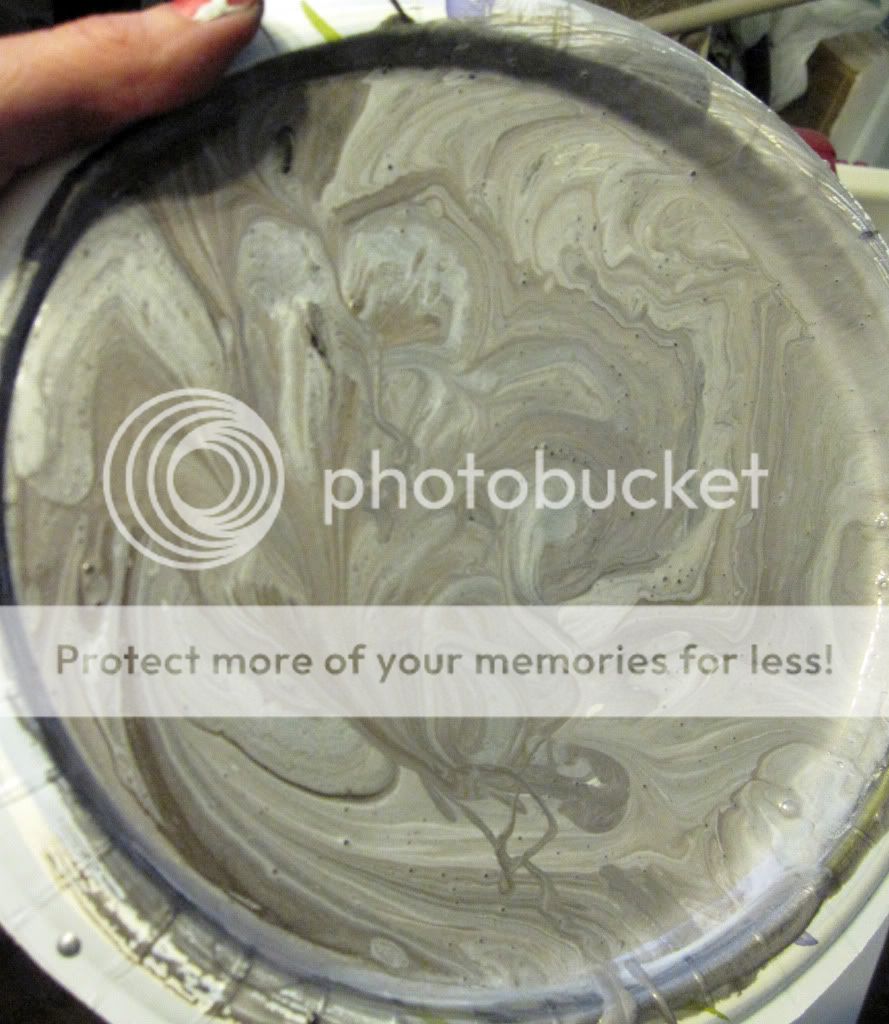
You don't want to mix it too much because you want there to be variation in the color. I just painted on a layer letting the colors go where they wanted and not trying to be too perfect with it. This was while it was still wet.

Do you see how it is kind of streaky and varied? Let that layer dry and keep layering. I think I ended up with four coats of different mixtures.
This was the side after the first layer had dried. It still looked a little tinfoily.

Now the sides were a little plain so I added metal straps to them. I cut out strips of cardboard and, using mod podge, I covered them in tinfoil.


I attached the strips to the sides of my bookcase with nails and used my mod podge/paint mix to faux finish them.

I let everything dry thoroughly and then topped it with two coats of satin finish poly-acrylic.

Here is just one side. I decided not to finish the inside of it with the zinc finish so I will show you in the next post how I chose to finish the inside and I will also have the final after pictures!
Thanks to all you who come, read and share your thoughts on the happenings at The Starter Home and hopefully the next time I am posting it will be from an apartment and not a hotel :)
Subscribe to:
Posts (Atom)
