


What I really mean to say is I have a thief in my midst.
So far, in the last week, Mr. U (my 2-year-old) has successfully snitched and hidden my camera charger, 3 bottles of cooking wine, a drawer from my bathroom organizer that includes all my hair ties and bobby pins and a partridge in a pear tree. Okay... I am joking about the last one.
The only reason it isn't missing is because we don't own one.
The best part is I can't find ANY OF IT! How does that much stuff go missing without a trail or even a hint of it's location? He is so sneaky, busy and currently loves destroying my house.
I am holding out on buying a new charger too because I know as soon as I get it in the mail Mr. U will come meandering out with the charger in hand. Sneaky I tell you...
Well enough about my current drama and on to the tutorial...
Remember when I told you about how I picked out my colors for my kitchen? Well I had yards of some gorgeous fabric from Joel Dewberry and I wanted to do some kind window treatment with it. I settled on a Faux Roman Shade.
Well the day I decided to get everything done I realized I had no black-out fabric but I did have yards of navy cotton fabric.
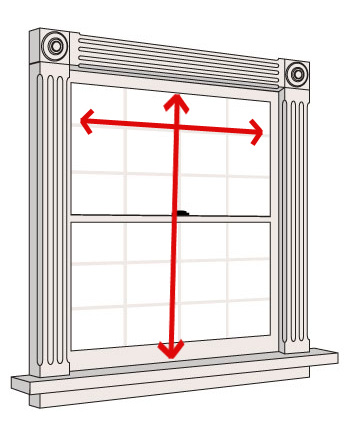
First I measure my window. I wanted my valance to fit inside my window so I measured inside the casing but if you would like yours outside you need to measure the outside. I also measured the height of my window.
You will need to take your width and add 1 inch. So if your window is 60 inches wide you would end up with a measurement of 61 inches.
My windows were only about 50 inches tall so I just used the 45" width of my fabric for the length and cut it to 61" wide.
I cut a piece of my patterned fabric and a piece of my navy. I sewed the right sides together only sewing up the sides and the bottom (leave the top open).

I clipped the corners and turned it right side out.

I pressed all the edges well and top stitched the sides and bottom.

I created a pocket for my tension rod by folding the top 1/4" over and pressing it with an iron. I then folded it 1" over and pressed again. I stitched the hem to create a pocket.

I then laid the fabric out and created pleats. I used a measuring tape to keep them as even as possible. I pinned them in place.

Now you can just sew each of your pleats in place... or you can do what I did. I really didn't want stitches on the top pleat for everyone to see. I sewed the bottom pleats in place with a straight stitch.

I ran a small stitch about 1/4" long over the top stitching to secure the edge of the pleat in place.

I flipped the top over to see the back fold of the top pleat. I then ran a straight stitch across it.

I then laid the the valance down flat and whip stitched the top of the back pleat to the back piece of fabric. Every once and awhile I would do through the front piece to help secure it.

Well I hung it in the window and it looked like this. I was about ready to scream. I wanted it to look perfect in the window and...well...it looked like this. Not at all what I had hoped.

So to fix the nice gaps on each side I cut 4 strips of fabric about 4" wide. I sewed them right sides together on the two long sides and one short side. I turned them inside out and pressed them well. I then top stitched around the long sides and one short side.

I then hot glued, yes you heard me. I hot glued them on. I started at the bottom and worked my way up and just glued as I went. You can't tell and no one would know. Well... except me and now all of you.
Ahh... much better.

I really am so pleased with how they turned out.
The hubster has been working on my new dining room table. Ah, how nice it is to have a handy-man-hubby. I am so excited to show it to you guys. I should be staining it tomorrow.
0 comments:
Post a Comment